Problem #9: Nutrient Deficiencies — Feeding Your Plants the Right Way
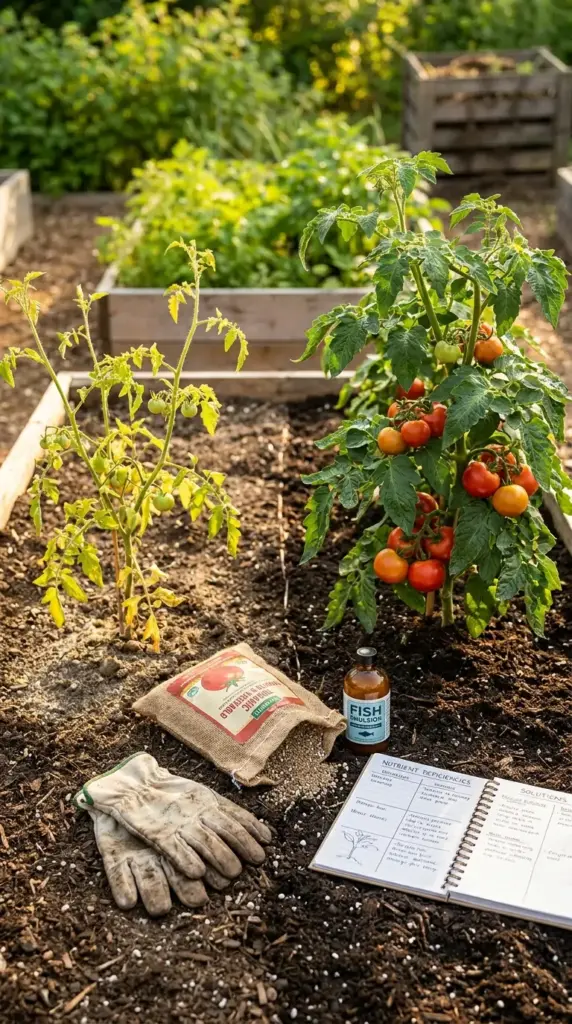
I once spent an entire summer convinced my tomatoes had a disease.
Yellowing leaves, stunted growth, fruit that never quite developed right. I treated for everything — fungus, pests, you name it.
Turns out? My plants were just starving. 😔
Why Plant Nutrition Is More Complicated Than It Looks
Here’s the thing most beginner gardeners don’t realize — plants need 17 essential nutrients to grow properly.
Not one. Not three. Seventeen.
The good news is that most of those nutrients are naturally present in healthy soil. But the three that gardens run out of fastest — nitrogen, phosphorus, and potassium — are the ones you need to actively manage.
These three are so important that every fertilizer bag you’ve ever seen lists them as three numbers on the front label. That 10-10-10 or 5-3-4 you see on fertilizer packaging? Those numbers represent the percentage of nitrogen (N), phosphorus (P), and potassium (K) in that exact order.
Understanding what each one does — and what it looks like when your plants don’t have enough — is genuinely one of the most useful skills in gardening.
Reading the Signs of Nitrogen Deficiency
Nitrogen is the nutrient responsible for leafy, green, vigorous growth. It’s the one plants use the most of — and the one that depletes from soil the fastest.
Signs your plants are nitrogen deficient:
- Leaves turning pale yellow or lime green — starting with the oldest, lowest leaves first and moving upward
- Slow, stunted growth even with adequate water and sunlight
- Stems that look thin and weak rather than thick and sturdy
- Older leaves dropping prematurely while new growth looks small and pale
Nitrogen deficiency is especially common in:
- Heavy-feeding crops like corn, tomatoes, and leafy greens
- Sandy soils that don’t hold nutrients well
- Gardens that have been planted in the same beds for multiple seasons without amendment
- Container gardens where nutrients leach out with every watering
The fix is relatively fast — nitrogen is one of the most quickly absorbed nutrients when applied correctly. A liquid nitrogen fertilizer like fish emulsion can show visible improvement in as little as 5-7 days.
Reading the Signs of Phosphorus Deficiency
Phosphorus is the nutrient responsible for root development, flowering, and fruit production. Without enough of it, plants can’t convert sunlight into energy efficiently.
Signs your plants are phosphorus deficient:
- Leaves developing a distinctive purple or reddish tint — especially on the undersides
- Poor root development — plants that look healthy above ground but pull out of the soil with almost no root system
- Delayed flowering — plants that should be blooming but just… aren’t
- Small, poorly developed fruit that doesn’t size up properly
- Leaves that look dark green but have a slightly dull, matte appearance
Phosphorus deficiency is trickier to fix than nitrogen because phosphorus moves slowly through soil. It can take several weeks to see improvement after application — which is why prevention through good soil preparation matters so much.
Cold soil temperatures also lock phosphorus out of plant roots — which is why early spring transplants in Chicago, Minneapolis, and Detroit often show phosphorus deficiency symptoms even when soil phosphorus levels are adequate. The roots simply can’t absorb it until soil warms above 55°F.
Reading the Signs of Potassium Deficiency
Potassium — sometimes called potash — is the nutrient that regulates water movement within plants, strengthens cell walls, and improves disease resistance. Think of it as the nutrient that makes plants tough.
Signs your plants are potassium deficient:
- Leaf edges turning brown and crispy — called “leaf scorch” — starting with older leaves
- Weak stems that can’t support the plant’s weight properly
- Increased susceptibility to disease and pest damage — plants just seem to struggle with everything
- Fruit that develops unevenly or has poor flavor and texture
- Wilting during the day even when soil moisture is adequate
Potassium deficiency is common in:
- Sandy or light soils that drain quickly
- Gardens with high rainfall — potassium leaches out faster than other nutrients in wet conditions (important for Seattle and Minneapolis gardeners)
- Beds that produce heavy-fruiting crops like tomatoes, peppers, and squash year after year
Secondary Nutrient Deficiencies Worth Knowing
Beyond the big three, a few secondary deficiencies show up regularly in home gardens and are worth recognizing.
Calcium deficiency causes blossom end rot in tomatoes and peppers — that dark, sunken, leathery patch on the bottom of the fruit that makes you want to cry after waiting all summer for your tomatoes to ripen.
Interestingly, blossom end rot is rarely caused by a lack of calcium in the soil. It’s almost always caused by inconsistent watering that prevents calcium from moving through the plant properly. Fix your watering consistency first before adding calcium amendments.
Magnesium deficiency shows up as interveinal chlorosis — leaves that turn yellow between the veins while the veins themselves stay green. It looks almost like a road map on the leaf surface.
Epsom salt (magnesium sulfate) is the classic fix — dissolve 1 tablespoon per gallon of water and apply as a foliar spray or soil drench. Results are usually visible within 10-14 days.
Iron deficiency looks similar to magnesium deficiency but affects new growth first rather than old growth — which is the key diagnostic difference. Young leaves at the top of the plant turn yellow while older leaves stay green.
Iron deficiency is almost always a pH problem rather than an actual lack of iron in the soil. When soil pH rises above 7.0, iron becomes chemically unavailable to plant roots even if it’s physically present. Lower your soil pH with sulfur amendments and iron availability will correct itself naturally.
Organic vs. Synthetic Fertilizers: What Actually Works Best
This is one of the most debated topics in home gardening — and honestly, the answer is more nuanced than either camp wants to admit.
Synthetic fertilizers deliver nutrients in immediately available chemical forms that plant roots can absorb almost instantly. They work fast — sometimes showing results within 48-72 hours — and they’re precise. You know exactly what you’re applying and in what quantity.
The downsides:
- They do nothing to improve soil structure or biology over time
- Salt buildup from repeated synthetic fertilizer use can damage soil health and harm beneficial microorganisms
- They require more frequent application because nutrients aren’t held in the soil — they leach out quickly, especially in sandy soils or with heavy rainfall
- Easy to over-apply, which can burn plants and contribute to nutrient runoff into waterways
Organic fertilizers work differently — they feed the soil biology first, which then makes nutrients available to plants. This process is slower but creates genuinely lasting improvements in soil health.
The advantages of organic fertilizers:
- They improve soil structure, water retention, and microbial activity with every application
- Nutrients release slowly and steadily — much lower risk of burning plants or over-fertilizing
- They build long-term soil fertility rather than just addressing immediate deficiencies
- Safe for children, pets, and beneficial insects — important for family-friendly backyards
The honest answer? For most home gardeners, a combination approach works best.
Use organic fertilizers as your foundation — building soil health through compost, worm castings, and slow-release organic granular fertilizers. Then use targeted liquid fertilizers (organic or synthetic) to address specific deficiencies quickly when you spot them.
The Best Fertilizer Products at Popular Garden Supply Stores
Let me save you some time and confusion in the fertilizer aisle — because there are a lot of products and most of them aren’t worth your money.
For general garden feeding:
- Espoma Garden-Tone (3-4-4) — my go-to all-purpose organic granular fertilizer for vegetable gardens. Made from feather meal, bone meal, and kelp. Around $15-$18 for a 3 lb. bag at Home Depot and Lowe’s. Apply every *4-6 weeks during the growing season
- Dr. Earth Organic 5 (3-3-3) — another excellent all-purpose organic option, widely available and consistently effective. Includes beneficial soil microbes that help plants absorb nutrients more efficiently
For nitrogen-hungry crops (tomatoes, corn, leafy greens):
- Alaska Fish Emulsion (5-1-1) — liquid fish fertilizer that delivers a fast nitrogen boost. Smells absolutely terrible. Works incredibly well. Around $10-$12 for a 32 oz. bottle that makes up to 48 gallons of fertilizer solution
- Milorganite (6-4-0) — slow-release nitrogen fertilizer made from heat-dried microbes. Gentle enough that it’s almost impossible to over-apply. Great for lawns and garden beds alike. Around $12-$15 for a 5 lb. bag
For flowering and fruiting plants:
- Espoma Tomato-Tone (3-4-6) — specifically formulated for tomatoes, peppers, and fruiting vegetables with extra calcium to prevent blossom end rot. Around $12-$15 for a 3 lb. bag
- Dr. Earth Bud & Bloom Booster (3-9-4) — high phosphorus formula that encourages prolific flowering. Excellent for roses, dahlias, and annual flowers
For a quick fix in any deficiency situation:
- Miracle-Gro Water Soluble All Purpose Plant Food (24-8-16) — yes, it’s synthetic. Yes, it works fast. For a gardener dealing with a serious deficiency mid-season who needs results in days rather than weeks, this is the tool for the job. Use it as a short-term fix while building long-term organic soil health
Seasonal Feeding Schedules for Different Garden Types
Fertilizing at the wrong time is almost as bad as not fertilizing at all.
Here’s a practical seasonal feeding schedule that works across most U.S. climates:
Spring (soil temperature above 50°F):
- Apply a balanced granular organic fertilizer to all beds as you prepare them for planting
- Side-dress transplants with a gentle starter fertilizer like fish emulsion at half strength within the first week of planting
- Begin monthly feeding of heavy feeders like tomatoes and roses
Early summer:
- Switch tomatoes and peppers to a higher potassium formula once they begin flowering — this supports fruit development
- Feed container gardens every 2 weeks with liquid fertilizer — nutrients leach out much faster in containers than in-ground beds
- Leafy greens benefit from a nitrogen boost every 3-4 weeks to keep producing fresh leaves
Midsummer:
- Reduce or stop feeding cool-season crops that are winding down
- Continue monthly feeding of tomatoes, peppers, and heavy-fruiting crops
- Feed roses after each bloom cycle to encourage repeat flowering
Late summer/early fall:
- Stop feeding annuals that are finishing their season
- Switch perennials and shrubs to a low-nitrogen, higher phosphorus and potassium formula — this encourages root development and hardiness going into winter rather than soft new growth that’s vulnerable to frost
- Apply a fall compost top-dressing to all beds — this is one of the highest-impact things you can do for next year’s garden
Winter:
- Most garden plants need no fertilizer during dormancy
- Focus on building compost to have rich amendment ready for spring
- Indoor container plants need reduced feeding — roughly half their normal rate — during shorter winter days
Composting at Home: A Beginner’s Guide to Free Plant Food
I want to talk about composting for a minute — because I think it gets overcomplicated in a way that puts people off.
Composting is just controlled decomposition. You’re creating the conditions for organic matter to break down into rich, dark, crumbly material that is genuinely the best plant food on earth.
And it’s free. Completely free.
What you can compost:
- ✅ Fruit and vegetable scraps
- ✅ Coffee grounds and paper filters
- ✅ Tea bags (remove staples)
- ✅ Eggshells
- ✅ Grass clippings
- ✅ Dry leaves
- ✅ Shredded paper and cardboard
- ✅ Plant trimmings (disease-free only)
What you should NOT compost:
- ❌ Meat, fish, or dairy — attracts pests
- ❌ Diseased plant material — spreads pathogens
- ❌ Pet waste — contains harmful bacteria
- ❌ Treated wood products
- ❌ Anything with oils or fats
The basic composting formula:
Successful compost needs a balance of “greens” (nitrogen-rich materials) and “browns” (carbon-rich materials) in roughly a 3:1 ratio of browns to greens.
- Greens: fruit scraps, vegetable peels, fresh grass clippings, coffee grounds
- Browns: dry leaves, shredded cardboard, paper, straw, wood chips
Too many greens and your pile gets slimy and smelly. Too many browns and it just sits there doing nothing. Get the ratio right and it practically composts itself.
The fastest composting method:
A hot compost pile — maintained at 130-160°F in the center — can produce finished compost in as little as 4-8 weeks.
To achieve hot composting:
- Build a pile at least 3x3x3 feet — smaller piles don’t generate enough heat
- Turn the pile every 3-5 days to introduce oxygen and redistribute heat
- Keep it as moist as a wrung-out sponge — not dripping wet, not dry
- Add a nitrogen activator if the pile is slow to heat up — a shovelful of finished compost, a handful of blood meal, or even a cup of urine (yes, really — it’s high in nitrogen and completely effective)
The lazy composting method:
If turning a pile every few days sounds like too much work — I hear you — cold composting is a perfectly valid alternative.
Just pile your materials in a bin or corner of the yard, keep it roughly moist, and wait. It takes 6-12 months instead of 4-8 weeks, but requires almost zero effort.
A basic compost bin from a garden supply store runs $30-$60 and keeps things tidy. Or build one for free from four wooden pallets wired together at the corners.
How to know when compost is ready:
Finished compost looks like dark, crumbly soil and smells earthy — like a forest floor after rain. If it still looks like recognizable food scraps or plant material, it needs more time.
Apply finished compost as:
- A 2-inch top dressing worked lightly into garden beds each spring and fall
- A compost tea — steep finished compost in water for 24-48 hours and use the liquid as a gentle foliar spray or soil drench
- A seed starting mix component — blend equal parts compost, perlite, and coconut coir for an excellent homemade seed starting medium
Up Next: The Invasion Problem
Your plants are well-fed, properly spaced, and thriving — but something is creeping in from the edges and threatening to take over everything.
👇 Click “Next” below — because we’re tackling invasive plants next, and some of the most beautiful plants at your local garden center are secretly ecological nightmares that could take over your entire yard within a few seasons.
GIPHY App Key not set. Please check settings