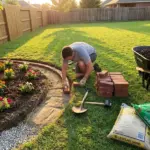
Prepping the Ground So the Edging Stays Put

Remove grass, roots, and loose soil
A clean trench matters more than people think. Grass and roots left behind will keep your bricks from sitting evenly.
I use a flat spade to slice the edge first, then scoop out the trench. It’s not glamorous, but it makes the rest of the project way easier.
Dig a trench that follows the curve cleanly
Follow your marked line slowly instead of trying to dig the whole thing in one go. Curves look better when the trench is smooth and continuous.
This is where patience pays off. A jagged trench usually creates a jagged finished edge.
Level the base without overcomplicating it
You don’t need engineering-level precision for easy brick edging. You just want the bottom of the trench reasonably even, with no major dips or humps.
I check every few feet with a small level and adjust as I go. Good enough really is good enough here.
Drainage matters more than most DIYers think
Poor drainage for edging is one of the fastest ways to get shifting and frost issues later. Water needs somewhere to go, especially in freeze-thaw climates.
If your area stays soggy, add more gravel and avoid trapping water against the bricks. Next, I’ll cover how to build a strong base without overdoing the job, so hit the next button below.

GIPHY App Key not set. Please check settings