
6. The Pergola Paradise: Overhead Privacy Solutions
I never realized how exposed my patio felt until my upstairs neighbor mentioned she could see everything from her bedroom window. Talk about a privacy wake-up call – suddenly every outdoor meal felt like dinner theater for the whole neighborhood.
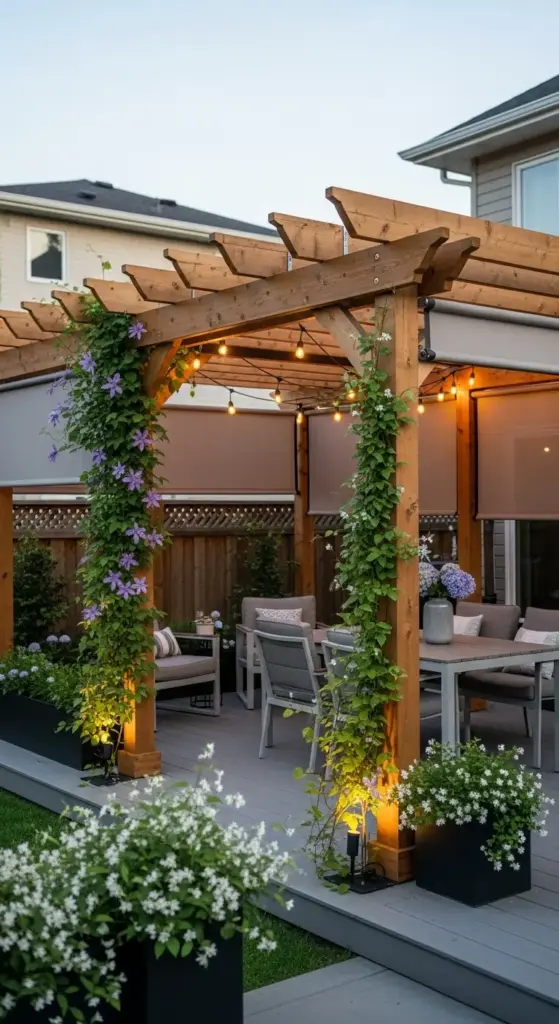
That’s when I discovered overhead privacy solutions. My pergola project started as a simple shade structure but evolved into this gorgeous privacy canopy that completely transformed how I use my outdoor space.
Designing Pergolas for Maximum Privacy Coverage
Strategic beam placement makes all the difference between basic shade and actual privacy. I learned to space my cross beams 12 inches apart instead of the typical 24 inches for better overhead screening.
The angle of your pergola matters more than most people realize. I positioned mine to block the sight lines from my neighbor’s second-story windows while still allowing morning sun to filter through.
Size calculations should account for furniture placement plus walking space. My 12×16 pergola covers my dining table, lounge chairs, and still leaves room for people to move around comfortably.
Here’s what I wish I’d known earlier – build bigger than you think you need. I originally planned a 10×12 structure but I’m so glad I went larger – the extra coverage makes the space feel like an outdoor room.
Fabric, Vine, and Panel Covering Options
Retractable shade sails became my favorite discovery for flexible privacy. I can adjust coverage based on weather, season, or how much privacy I need for different activities.
Outdoor fabric panels in Sunbrella material provide instant privacy that looks intentional and polished. I use grommets and stainless steel cables for easy installation and removal.
Climbing vines create the most gorgeous natural privacy, but patience is required. My grape vines took two full seasons to provide decent coverage, but now they’re absolutely stunning.
The vine combination that works best includes clematis for flowers, hops for fast coverage, and jasmine for incredible fragrance. Each serves a different purpose in my overhead privacy strategy.
Integration with Existing Patios and Decks
Anchoring systems vary dramatically depending on your existing surface. For my concrete patio, I used wedge anchors that create rock-solid connections without major demolition.
Deck integration requires careful planning to avoid compromising structural integrity. I worked with a contractor to ensure my pergola posts aligned with existing deck joists for proper support.
Visual flow between your pergola and existing structures makes everything look intentional. I matched my pergola stain to my deck railings and used similar hardware throughout.
The transition zones where pergola meets existing structures need special attention. I added decorative brackets and trim work to make connections look finished and professional.


Lighting Solutions for Evening Privacy
String lights create magical ambiance while providing enough illumination for evening privacy. I installed Edison bulb strings on dimmer switches for adjustable mood lighting.
Uplighting from below the pergola creates this gorgeous canopy effect that makes the space feel intimate and enclosed. LED spotlights hidden in planters work perfectly for this.
Solar post cap lights on pergola posts provide subtle boundary lighting without running electrical. They charge during the day and automatically illuminate pathways at night.
The lighting trick that changed everything was adding rope lights along the pergola beams. They create a soft glow that defines the space while maintaining privacy from above.
Permit Requirements and HOA Considerations
Building permits caught me off guard initially. My city requires permits for any structure over 120 square feet or taller than 8 feet – definitely check local codes before starting.
HOA approval took longer than expected but was worth the wait. I submitted detailed plans showing how the pergola would enhance property values and neighborhood aesthetics.
Setback requirements from property lines vary by location. My pergola had to be at least 5 feet from the fence line, which actually worked out better for the overall design.
The permit process taught me about wind load calculations and footing requirements that I never would have considered. Professional plans cost $200 but saved me from potential structural issues.
Real Investment for Pergola Privacy
For my 12×16 pergola with full privacy features, here’s the actual cost breakdown:
- Pressure-treated lumber and hardware: $485
- Concrete footings and anchors: $125
- Fabric panels and installation hardware: $165
- Climbing plants and support systems: $85
- Lighting and electrical: $140
- Permits and professional consultation: $250
- Total: $1,250
Professional installation quotes were running $3,500-4,500 for similar coverage, so the DIY savings were substantial. The project took three weekends but was totally manageable.
Annual maintenance costs run about $50 for fabric cleaning, plant care, and hardware inspection. The structure should last 15-20 years with proper care.
The property value boost from a well-designed pergola typically exceeds the installation cost, making it one of the better outdoor investments you can make.
Ready to discover the ultimate privacy strategy that combines multiple materials and techniques for maximum impact and year-round beauty? Click “next” to learn about mixed media marvels that create stunning privacy solutions while adding serious curb appeal – plus the color coordination secrets that make everything look professionally designed.


GIPHY App Key not set. Please check settings