3. The Soil Secret That Changes Everything

I killed my first three snake plants with kindness – and Miracle-Gro potting soil. Yep, that stuff everyone swears by for houseplants was literally drowning my poor plants.
Nobody warned me that snake plants have completely different soil needs than your average houseplant. This one mistake cost me more plants than I care to admit.
Why Regular Potting Soil is Plant Poison
Here’s what blew my mind: regular potting soil holds moisture like a sponge. That’s great for most plants, terrible for snake plants.
Snake plants come from arid regions where water drains away fast. When you trap them in moisture-retaining soil, their roots basically rot from the inside out.
I watched beautiful, healthy plants turn to mush in just weeks because I used the wrong soil. The leaves would get soft and yellow from the bottom up – classic root rot symptoms.
Peat-based potting mixes are the worst offenders. They stay wet forever and create that swampy environment that kills snake plants dead.
My Go-To DIY Soil Recipe
After losing those plants, I got serious about creating the perfect snake plant soil mix. This recipe has never failed me, and all the ingredients are easy to find.
50% regular potting soil, 30% perlite, 20% coarse sand. That’s it – simple but game-changing.
The perlite creates air pockets so water drains through instead of sitting around the roots. I buy the big bags at Home Depot – way cheaper than buying small containers.
Coarse sand (not fine sand!) adds weight and drainage. I get mine from the hardware store in the concrete section – it’s like $3 for a huge bag.
Some people add bark chips, but honestly? This three-ingredient mix works perfectly and doesn’t break the bank.
Commercial Soil Brands That Actually Work
When I’m feeling lazy or don’t want to mix my own, Black Gold Cactus Mix is my go-to. It’s specifically formulated for plants that hate wet feet.
Miracle-Gro Cactus, Palm & Citrus Mix works too, though it’s not quite as chunky as I’d prefer. I usually add extra perlite to it.


Espoma Organic Cactus Mix is pricier but really well-balanced. The drainage is excellent right out of the bag.
Avoid anything labeled “moisture control” or “water retaining” – that’s the opposite of what you want for snake plants.
Drainage: The Make-or-Break Factor
Drainage holes are non-negotiable. I don’t care how cute that pot is – if water can’t escape, your plant will die.
I learned this lesson with a gorgeous ceramic pot that had no holes. The plant looked fine for months, then suddenly collapsed from root rot.
Layer some pebbles or broken pottery at the bottom before adding soil. This creates extra drainage space and prevents soil from clogging the holes.
Saucers need to be emptied after watering. Letting plants sit in standing water defeats the whole purpose of good drainage.
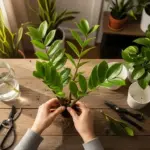
Repotting Timeline and Techniques
Snake plants are slow growers, so don’t rush to repot them. I used to repot yearly like other houseplants – huge mistake.
Wait until roots are literally growing out of the drainage holes or the plant is pushing itself up out of the pot. This usually takes 2-3 years.
Spring is the best time for repotting when they’re entering their growing season. I learned not to repot in winter when they’re dormant.
Go up just one pot size – maybe two inches wider max. Snake plants actually like being slightly rootbound and will focus on leaf growth instead of root growth.
When repotting, gently shake off the old soil and check for any mushy, dark roots. Cut those off with clean scissors – healthy roots should be white or light tan.
Got your soil game on point? Perfect! But even the best soil won’t save your snake plant if you ignore the temperature and humidity factors that most people completely overlook. The next section reveals the climate secrets that separate thriving plants from barely surviving ones – including my biggest seasonal mistake that nearly killed my entire collection! 🌡️


GIPHY App Key not set. Please check settings