2. Creating a Stunning Circular Island Flower Bed

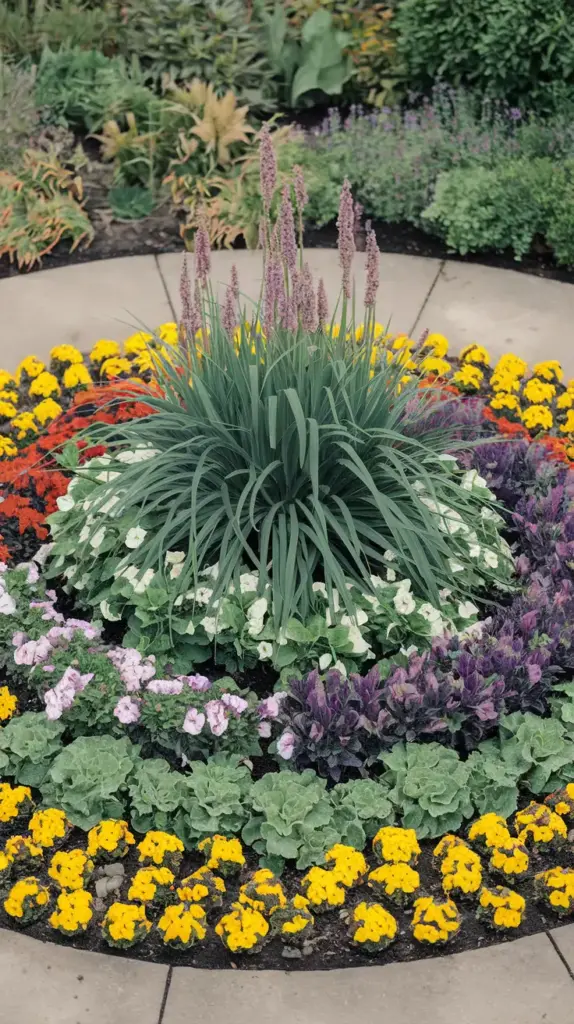
Let me tell you about my journey with circular island flower beds – they’re absolutely game-changing for any garden! After 15 years of gardening, I’ve learned that these 360-degree beauties can become the crown jewel of your landscape when done right.
Planning Your Circular Design
I’ll never forget my first attempt at creating a circular island bed. Let’s just say it looked more like a blob than a circle! Now I know the secret: start by laying out a perfect circle using a rope and center stake. The key to a professional-looking circular bed is precise measurement and careful planning.
For a small garden, I recommend starting with a 6-foot diameter bed. This gives you enough space to work with without overwhelming your yard. Soil preparation is crucial – I learned this the hard way when my first bed turned into a mud pit! Make sure to dig down at least 12 inches and amend your soil with organic matter.
Creating Height and Drama
The real magic happens when you nail the plant heights. Think of your circular bed like a living wedding cake – each layer needs to complement the others. Start with your focal point plant in the center. I absolutely love using ornamental grasses like Purple Fountain Grass or a dramatic Canna Lily as the centerpiece.
The secret to successful circular beds is working in rings. Here’s my tried-and-true formula:
- Center: One tall focal plant (4-5 feet)
- Inner ring: Medium-height plants (2-3 feet)
- Middle ring: Lower-growing flowers (1-2 feet)
- Outer ring: Ground covers or border plants (under 1 foot)
Color Planning and Maintenance
Let me share a pro tip that took me years to figure out: plan your color scheme based on blooming seasons. I combine early spring bulbs, summer perennials, and late-season bloomers to keep the show going. Continuous blooming is essential for maintaining visual interest.
For maintenance, here’s what works best:
- Water deeply but less frequently to encourage deep root growth
- Mulch with a 2-inch layer to retain moisture
- Deadhead regularly to promote continuous blooming
- Edge the circle every 2-3 weeks to maintain that crisp shape
Adding the Finishing Touches
Remember those accent stones I mentioned? They’re not just decorative! I use large stones strategically placed around the edge to prevent mulch washout during heavy rains. The right border can elevate your circular bed from pretty to professional.
Want to know what really takes your circular bed to the next level? Stay tuned for our next section about creating stunning crescent moon flower beds – they’re like circular beds’ elegant cousins! Click the next button below to discover how these graceful curves can add a touch of romance to your garden design. Trust me, you won’t want to miss these tips for shaping the perfect crescent!


GIPHY App Key not set. Please check settings