2. Framing the View: Modern Stone Border Edging

Years ago, I tried saving a few bucks by installing that cheap, flimsy plastic lawn edging from the discount bin. By mid-summer, the blazing sun warped it into a jagged, plastic roller coaster that looked totally ridiculous and let weeds run completely wild.
That messy disaster taught me that framing a garden bed requires real visual weight and structure.
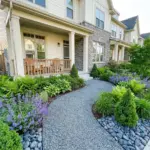
Upgrading to Heavyweight Pavers
Ditch the cheap plastic strips entirely and upgrade to solid concrete paver stones or natural Belgian blocks. These heavy materials stay exactly where you put them and give your front yard an instantly polished, upscale look.
You want to select a stone that is at least two inches thick so it easily withstands accidental bumps from your heavy lawnmower. Investing a tiny bit more on quality materials now saves you from years of frustrating weekend repairs down the road.
The No-Fail Level Trenching Method
To keep your new stone border from shifting out of place, dig a shallow trench about two inches wider than your pavers and roughly three inches deep. Line the bottom of the channel with a thin layer of sand or packed gravel to create a completely flat foundation.
Set your stone border edging directly into the trench, tapping them gently with a rubber mallet until they sit perfectly flush and level with each other. This simple step locks the blocks together, stops shifting, and creates a crisp barrier that aggressive grass roots simply cannot cross.
Now that your ground-level borders are completely locked in and looking incredibly sharp, we need to lift our eyes upward to add some gorgeous dimension. Go ahead and click that next button right below so we can talk about how to layer beautiful, bursting container gardens all over your front porch steps!

GIPHY App Key not set. Please check settings