3 DIY Raised Garden Bed Hacks Every Beginner Needs to Try
I want to be upfront about something before we dive in.
I am not a naturally crafty person. I don’t have a garage full of tools. I’m not someone who looks at a pile of PVC pipes and immediately sees a project.
But these three hacks? Even I pulled them off without a single YouTube tutorial meltdown.
That’s actually why I love them so much. They’re not complicated. They don’t require special skills or expensive equipment. They’re the kind of clever, practical solutions that make you think — why didn’t anyone tell me about this sooner?
Each one solves a real problem that beginner raised bed gardeners run into constantly. And together, they can genuinely transform how productive and manageable your garden feels — especially if you’re a busy person trying to fit gardening into an already full life.
Let’s get into it.
Hack #1 — The No-Dig Lasagna Method
Build incredibly rich soil without tilling, hauling, or breaking your back.
Here’s the situation this hack solves.
You’ve built your raised bed. Now you need to fill it with soil — and if you’ve priced out quality raised bed soil mix recently, you know it adds up fast. A standard 4×8 foot bed filled 12 inches deep needs roughly 32 cubic feet of soil. Buying that entirely in bagged mix can cost $150 to $300 depending on your area.
The lasagna method cuts that cost dramatically while actually building better soil than most bagged mixes can offer.
What Is the Lasagna Method?
The name comes from the layering process — just like building a lasagna, you’re stacking alternating layers of different organic materials directly inside your raised bed. Over time, those layers break down into incredibly rich, biologically active soil that plants absolutely love.
It’s also called sheet mulching or no-dig gardening, and it’s been used by organic gardeners for decades. The results are genuinely impressive — especially in year two and three when the layers have fully decomposed.
What You’ll Need
- Cardboard boxes (free — appliance stores, liquor stores, and moving companies give these away constantly)
- Brown materials — dried leaves, straw, wood chips, shredded newspaper
- Green materials — grass clippings, kitchen vegetable scraps, fresh garden trimmings
- Compost — finished compost from a bag or your own pile
- Topsoil or raised bed mix for the top planting layer
- A garden hose for watering between layers
Total cost for materials you can’t source free: roughly $30 to $60 depending on how much compost and topsoil you purchase. Compare that to $150 to $300 for a fully bagged soil fill. The savings are real.
Step-by-Step Instructions
Step 1: Place your raised bed frame in its permanent location. If grass or weeds are growing underneath, don’t bother removing them — the lasagna layers will smother them completely.
Step 2: Lay overlapping sheets of cardboard across the entire bottom of your bed. This is your weed-suppressing base layer. Make sure pieces overlap by at least 4 to 6 inches so nothing can push through the gaps. Remove any tape or staples from the cardboard first. Wet the cardboard thoroughly with your hose — damp cardboard breaks down faster and starts suppressing weeds immediately.
Step 3: Add your first brown layer — dried leaves, straw, or wood chips — about 3 to 4 inches deep. Brown materials are carbon-rich and provide the structural backbone of your lasagna layers.
Step 4: Add your first green layer — grass clippings, kitchen scraps (vegetable peels, coffee grounds, eggshells — no meat or dairy), or fresh garden trimmings — about 2 to 3 inches deep. Green materials are nitrogen-rich and fuel the decomposition process.
Step 5: Add a layer of compost — about 2 inches deep. This introduces beneficial microorganisms that accelerate decomposition throughout the entire stack.
Step 6: Repeat the brown-green-compost layering sequence until your bed is filled to within 4 to 6 inches of the top.
Step 7: Finish with a 4 to 6 inch top layer of quality topsoil or raised bed mix. This is your actual planting medium — the layer your seeds and transplants will go into directly.
Step 8: Water the entire bed thoroughly and let it settle for at least a few days before planting. If you’re building in fall for spring planting, even better — the layers will have months to begin breaking down.
Important timing note: A freshly built lasagna bed is best planted with transplants rather than direct-sown seeds in the first season, since the layers are still actively decomposing and the soil temperature can run slightly warm. By year two, the bed will be absolutely perfect for everything.
Pro Tips
Don’t stress about getting the ratios perfect. The lasagna method is forgiving — as long as you’re alternating carbon-rich and nitrogen-rich materials, the biology takes care of itself.
Cardboard is genuinely free if you know where to look. Appliance stores (refrigerator and washing machine boxes are enormous), liquor stores, bookstores, and Amazon delivery boxes are all great sources. Post in your neighborhood Facebook group or Nextdoor asking for cardboard and you’ll have more than you need within 24 hours.
Why This Hack Is Perfect for Busy Gardeners
This method eliminates the most physically demanding part of setting up a raised bed — hauling and mixing large quantities of heavy soil.
For anyone managing a household, a job, kids, and approximately seventeen other responsibilities, not having to make multiple trips to the garden center with bags of soil in your car is genuinely meaningful. You’re building better soil with materials that are largely free, and you’re doing it in a fraction of the time.
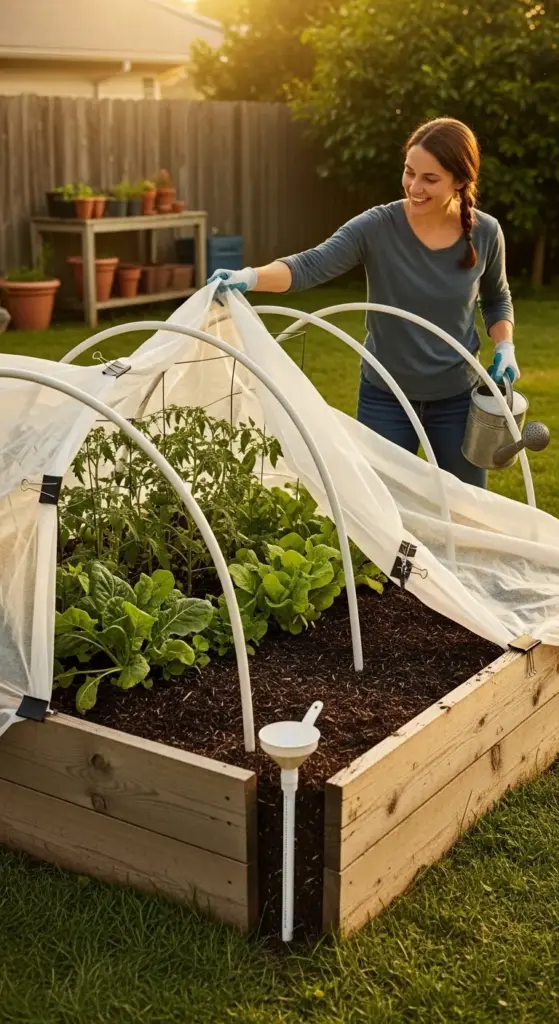
Hack #2 — The PVC Hoop Cover
Turn your raised bed into a mini greenhouse for under $30.
This is the hack that made me feel like an actual genius the first time I used it.
The problem it solves: the growing season is never long enough.
In cities like Minneapolis, Chicago, and Philadelphia, the last frost date in spring and the first frost date in fall bookend your growing season pretty tightly. You’re often looking at 5 to 6 months of viable growing weather — and that’s if you’re lucky.
A PVC hoop cover extends that window by 4 to 6 weeks on each end of the season. That’s potentially 2 to 3 extra months of growing time from a $25 investment. The math on that is pretty incredible.
What You’ll Need
- ½-inch diameter PVC pipe — buy 10-foot lengths from any hardware store (Home Depot, Lowe’s, Ace Hardware). You’ll need one length for every 2 feet of bed length — so a 4×8 foot bed needs 4 lengths of PVC pipe. Cost: around $2 to $3 per 10-foot length.
- ½-inch rebar stakes — 12-inch lengths, two per hoop. These anchor the PVC into the soil. Cost: around $1 to $2 each.
- Row cover fabric (also called floating row cover or garden fleece) — available at garden centers and on Amazon. Agribon AG-19 is a popular lightweight option for frost protection. A 10×25 foot roll costs around $15 to $20 and covers a standard 4×8 bed with plenty to spare.
- Binder clips or clothespins to secure the fabric to the hoops
- A rubber mallet for driving rebar stakes
Total cost for a standard 4×8 foot bed: approximately $25 to $35. That’s it.
Step-by-Step Instructions
Step 1: Drive rebar stakes into the soil inside your raised bed frame, about 6 inches deep, positioning them in pairs directly across from each other. Space pairs every 2 feet along the length of your bed. For a 4×8 foot bed, you’ll have 4 pairs of stakes — 8 stakes total.
Step 2: Slide one end of a 10-foot PVC pipe over a rebar stake on one side of the bed. Bend the pipe gently into an arch and slide the other end over the corresponding stake on the opposite side. The rebar holds the pipe in place — no drilling, no connectors, no tools required.
Step 3: Repeat with remaining PVC pipes until you have a series of evenly spaced hoops running the length of your bed. They should look like a tunnel frame when you’re done.
Step 4: Drape your row cover fabric over the hoops, centering it so you have equal overhang on all sides. Pull it taut enough that it doesn’t sag onto your plants.
Step 5: Secure the fabric to the hoops using binder clips — clip every foot or so along each hoop. Tuck or weigh down the fabric edges along the sides and ends of the bed to seal out cold air and pests.
Step 6: To access your plants for watering, harvesting, or checking on things, simply unclip one end of the fabric and fold it back. Re-clip when you’re done. The whole process takes about 60 seconds.
Choosing the Right Row Cover Weight
Row cover fabric comes in different weights that offer different levels of protection:
- Lightweight (AG-19 or similar): Allows 85% light transmission, protects to about 28°F. Best for extending the season in mild climates or protecting against light frosts.
- Medium weight (AG-30): Allows 70% light transmission, protects to about 24°F. Good all-around option for most U.S. climates.
- Heavy weight (AG-50): Allows 50% light transmission, protects to about 20°F. Best for serious cold protection but limits light significantly — not ideal for long-term use during the growing season.
For most gardeners in the Northeast and Midwest, a medium-weight cover is the most versatile choice.
Beyond Frost Protection
The hoop cover isn’t just for cold weather. It has several other incredibly useful applications:
In early spring, it creates a warm, humid microclimate that accelerates germination and early plant growth — sometimes by 1 to 2 weeks compared to uncovered beds.
During pest season, a hoop cover with fine mesh fabric (instead of row cover) creates a physical barrier against cabbage moths, squash vine borers, and other flying pests — completely eliminating the need for any pest control products on covered crops.
In midsummer heat, a shade cloth (30 to 40% shade rating) draped over the same hoop structure protects cool-season crops like lettuce and spinach from bolting in high temperatures. Same frame, different fabric, completely different function.


Why This Hack Is Perfect for Busy Gardeners
More growing time means more harvests from the same bed and the same investment of time and money.
For a busy mom who spent a weekend building and planting a raised bed, getting 6 to 8 extra weeks of production from a $30 add-on is an incredible return. It also means you can start seeds earlier in spring — before the chaos of end-of-school-year activities hits — and harvest later in fall when schedules start to slow down again.
It works with your life instead of against it.
Hack #3 — The Self-Watering Reservoir Insert
Cut your watering time in half and keep plants consistently hydrated — automatically.
Of the three hacks in this section, this one might be the most genuinely life-changing for busy gardeners.
Here’s the problem it solves: inconsistent watering is the number one reason raised bed gardens underperform.
Plants don’t just need water — they need consistent water. Drought stress followed by overwatering followed by drought stress again causes a cascade of problems: blossom end rot in tomatoes, tip burn in lettuce, cracking in peppers, and generally stressed plants that are more vulnerable to pests and disease.
A self-watering reservoir delivers moisture to plant roots consistently and automatically — even when you’re too busy to get outside, traveling for a weekend, or just having one of those weeks where the garden is the last thing on your mind.
What You’ll Need
- Large plastic storage tote (the kind with a lid) — a 66-quart Sterilite tote from Walmart or Target works perfectly. Cost: around $8 to $12.
- PVC pipe — one 1-inch diameter, 18-inch length for the fill tube. Cost: around $3 to $5.
- Plastic mesh or egg crate light diffuser panel (found at hardware stores in the lighting section) — this creates the platform that separates the reservoir from the soil. Cost: around $10 to $15 for a panel you can cut to size.
- Landscape fabric — a small piece to line the soil platform
- Drill with a ½-inch bit
- Waterproof silicone sealant
Total cost: approximately $25 to $40 depending on what you already have on hand.
How the System Works
The basic principle is simple: a water reservoir sits below your soil, and plant roots draw moisture upward through a process called capillary action — the same way a paper towel absorbs water from a wet surface.
Plants take exactly as much water as they need, exactly when they need it. You refill the reservoir every few days instead of watering daily. It’s essentially a self-regulating hydration system built into your raised bed.
Step-by-Step Instructions
Step 1: Take your plastic storage tote and drill a ½-inch overflow hole on one side, about 3 inches from the bottom. This prevents the reservoir from overfilling and waterlogging your soil. The overflow hole is important — don’t skip it.
Step 2: Cut your mesh panel or egg crate diffuser to fit snugly inside the tote, resting on the tote’s built-in ledges or supported by small blocks of wood or PVC pipe sections glued to the bottom. This platform should sit 3 to 4 inches above the bottom of the tote — the space below is your water reservoir.
Step 3: Cut a 3-inch diameter hole in the mesh platform in one corner. This is where your soil wicking column will go — a small cylinder of soil that extends down through the platform into the water, creating the capillary connection between reservoir and growing medium.
Step 4: Cut a second hole in the mesh platform — just large enough for your 1-inch PVC fill tube to pass through. This tube will extend from above the soil surface down through the platform into the reservoir, giving you a way to refill the water without disturbing the soil.
Step 5: Line the top of the mesh platform with landscape fabric, cutting holes to match the ones in the platform. The fabric keeps soil from falling through the mesh while still allowing moisture to wick upward.
Step 6: Place the assembled reservoir insert into the bottom of your raised bed before filling with soil. If your raised bed is deeper than the tote, that’s fine — the tote sits at the bottom and you fill soil on top of and around it.
Step 7: Fill your bed with soil mix as normal, making sure the wicking column hole is packed with soil that makes direct contact with the water in the reservoir below. Insert the PVC fill tube through its designated hole so it extends a few inches above the soil surface — this is how you’ll add water to the reservoir.
Step 8: Fill the reservoir through the PVC tube until water runs out of the overflow hole. Your system is ready to go.
Using and Maintaining the Reservoir
Check the reservoir every 3 to 5 days by looking down the fill tube — you can see or feel the water level. In hot weather, you may need to refill every 2 to 3 days. In cooler weather, the reservoir can last 5 to 7 days between refills.
Compare that to daily hand watering and the time savings become very real very quickly.
Add a diluted liquid fertilizer to the reservoir water every 2 to 3 weeks during the growing season and your plants will receive consistent nutrition along with consistent hydration — a combination that produces noticeably better results than either practice alone.
At the end of the season, drain the reservoir completely before winter to prevent freezing damage to the tote.
A Simpler Alternative
If the full DIY reservoir feels like too much for right now, a much simpler version uses self-watering planter inserts — pre-made reservoir systems designed to drop into raised beds. Brands like Vegepod and EarthBox make excellent versions starting around $40 to $60. They’re not as customizable as the DIY version but they work on the same principle and require zero construction.
Why This Hack Is Perfect for Busy Gardeners
I want to speak directly to something here, because I think it matters.
A lot of the women I talk to about gardening tell me the same thing: “I love the idea of it, but I just don’t have time to keep up with it.”
And watering is almost always the specific task that feels most burdensome. It’s daily. It’s time-sensitive. Miss a few days in July heat and you can lose plants you’ve been nurturing for months.
The self-watering reservoir removes that pressure almost entirely. Your garden stays consistently hydrated whether you’re at work, at your kids’ activities, traveling for a weekend, or just having a week where everything else takes priority.
It makes the garden fit into your life — not the other way around.
These Three Hacks Work Even Better Together
Here’s something worth noting before we wrap up this section.
These three hacks aren’t just individually useful — they’re genuinely complementary.
Build your bed using the lasagna method and you’ve got rich, biologically active soil for a fraction of the usual cost and effort. Add a self-watering reservoir and that beautiful soil stays consistently hydrated without daily attention. Cover it all with a PVC hoop structure and you’ve extended your growing season on both ends while protecting your plants from late frosts and early pest pressure.
Together, they create a raised bed system that’s more productive, more resilient, and significantly less demanding of your time than a standard setup.
For a total investment of roughly $60 to $100 in additional materials beyond your basic bed, you’re getting a genuinely upgraded growing system that experienced gardeners spend years figuring out through trial and error.
You’re starting with the shortcut. And there’s absolutely nothing wrong with that.
You Made It — Now Go Build Something Beautiful 🌿
You’ve just worked through the complete raised garden bed guide — from choosing your location and materials all the way through soil, planting, design, care, and now these three game-changing DIY hacks.
That’s a lot of knowledge. Give yourself some credit.
The only thing left to do is start. Pick one thing from this guide — just one — and do it this weekend. Choose your spot. Order your lumber. Buy a bag of compost. Sketch out your bed layout on a piece of paper.
Momentum is everything in gardening. The gardeners who thrive aren’t the ones who know the most — they’re the ones who start, make mistakes, learn, and keep going season after season.
Your raised bed garden is waiting. And I genuinely cannot wait for you to see what you’re capable of growing. 🌻
Conclusion
Raised garden beds are truly one of the best investments you can make — for your home, your health, and your dinner table! 🌿 From choosing the right materials and soil mix to designing a space that looks like it belongs on a home decor blog, you now have everything you need to get started with confidence.
Don’t let the fear of “doing it wrong” hold you back. Start small, try one of those three DIY hacks, and watch your garden — and your harvests — grow bigger than you ever imagined. Whether you’re planting your first tomato in a Minneapolis backyard or designing a tiered herb garden on a Washington D.C. rooftop, your raised bed journey starts today.
Ready to get your hands dirty? Pick your spot, grab your tools, and start building your dream garden this weekend! 🌻


GIPHY App Key not set. Please check settings