7. Recycled Material Edging with Professional Finishing
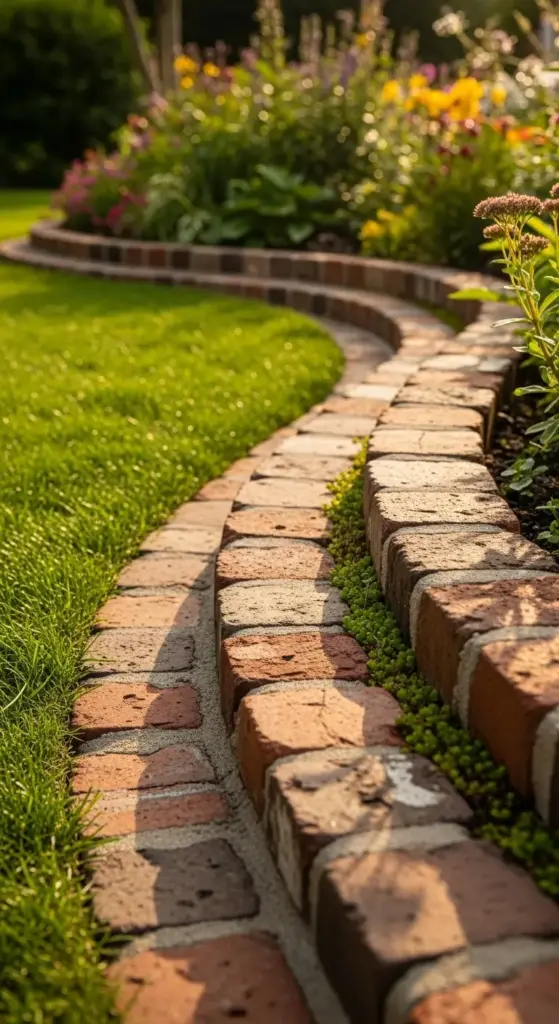
My most complimented garden feature started as a pile of discarded bricks I found behind a demolished house. People constantly ask where I bought my “expensive reclaimed brick edging” – little do they know it cost me exactly $0 in materials.
Recycled material edging isn’t just eco-friendly, it’s incredibly rewarding when done right. But there’s a huge difference between “junk pile chic” and professional-quality recycled installations.
Sourcing High-Quality Recycled Materials
Quality recycled materials require a trained eye and patience. I’ve learned to spot the difference between genuine vintage materials and modern “distressed” knockoffs that cost ten times more.
Construction demolition sites are goldmines. I always ask contractors before they haul materials to the dump – most are happy to let you take quality pieces.
Architectural salvage yards offer curated selections but at premium prices. I use them for specialty pieces to accent my free finds rather than for bulk materials.
Facebook Marketplace and Craigslist hide amazing deals. Search terms like “old brick,” “reclaimed stone,” and “vintage concrete” turn up incredible finds from homeowners cleaning out properties.
Estate sales often have stacks of materials from old garden projects. I’ve scored beautiful flagstone and vintage concrete blocks for pennies on the dollar.
Material Quality Assessment Secrets
Structural integrity testing prevents future failures. I tap every piece with a hammer – solid materials ring clearly, while damaged pieces sound dull or hollow.
Freeze-thaw damage shows as flaking, spalling, or hairline cracks. These pieces look fine initially but crumble within one winter cycle.
Mortar residue on bricks and stones actually adds character when cleaned properly. I use a wire brush and muriatic acid solution to reveal the original surface texture.
Salt damage appears as white efflorescence stains. These materials need special treatment or they’ll continue deteriorating in your garden.
Professional Preparation and Treatment Methods
Cleaning recycled materials properly makes the difference between treasure and trash. My three-step process transforms grimy salvage into beautiful edging materials.
Step one: pressure washing with degreasing detergent. This removes surface dirt, oil stains, and loose debris that would interfere with treatments.
Chemical cleaning comes next using appropriate solutions for each material type. Muriatic acid for concrete and stone, TSP for organic stains, oxalic acid for rust removal.
Final step: neutralizing and sealing. I always neutralize acid treatments with baking soda solution, then apply penetrating sealer for weather protection.
Safety gear is non-negotiable during chemical cleaning. Acid burns are serious business – I learned this the hard way with a splash on my forearm.
Creative Arrangement and Installation Techniques
Mixed-material arrangements create stunning visual interest when done thoughtfully. I follow the rule of thirds – no more than three different materials in one edging run.
Color gradation from dark to light creates natural flow. I arrange materials so colors transition smoothly rather than creating jarring contrasts.
Size variation adds organic appeal. I mix large anchor pieces with smaller fill materials, maintaining roughly 60% large, 40% small proportions.
Texture contrast between smooth and rough materials creates dynamic visual interest. Smooth river stones paired with rough brick, polished concrete with natural fieldstone.
Installation Pattern Strategies
Random patterns look more natural than geometric arrangements. I lay out 20-30 feet of materials before installation to perfect the arrangement.
Avoid creating obvious repeating patterns. The eye picks up repetition immediately and it screams “artificial” rather than naturally weathered.
Height variation prevents the flat, monotonous look of uniform edging. I vary heights by 1-2 inches to create gentle undulation.
Gaps between materials should be consistent but not uniform. I aim for 1/4 to 1/2-inch spacing with natural variation.
Weatherproofing and Protection Strategies
Penetrating sealers protect recycled materials without changing their appearance. I use siloxane-based sealers that repel water while allowing vapor transmission.


Application timing matters hugely. Materials must be completely dry and temperatures between 50-80°F for proper sealer penetration.
UV protection prevents color fading in exposed materials. I add UV inhibitors to my sealer for materials that will receive direct sunlight.
Reapplication schedules vary by material and exposure. Most recycled materials need resealing every 3-5 years to maintain protection.
My Recycled Material Disaster
I once installed 60 feet of “beautiful” reclaimed concrete blocks without proper preparation. Within six months, they were crumbling and staining everything around them with rust and efflorescence.
That failure taught me that preparation time equals longevity. Rushing the cleaning and treatment process always leads to problems later.
Had to remove everything and start over with properly prepared materials. There are no shortcuts in recycled material preparation.
Creative Finishing Touches
Mortar pointing between recycled materials creates a finished, intentional appearance. I use colored mortar that complements rather than contrasts with the materials.
Antiquing techniques help new mortar blend with aged materials. I brush mortar joints with diluted stain while still damp for weathered appearance.
Plant integration softens the industrial look of some recycled materials. Small sedums and mosses growing between stones create that coveted aged appearance.
Maintenance Tips for Extended Lifespan
Annual inspection catches problems before they become expensive repairs. I check for loose pieces, damaged sealers, and drainage issues every spring.
Gentle cleaning maintains appearance without damaging aged surfaces. I use soft brushes and mild detergents rather than aggressive pressure washing.
Selective replacement of damaged pieces maintains the overall integrity. I keep extra materials from each project for future repairs.
Drainage maintenance prevents water damage and frost heaving. Clear debris from gaps and ensure proper water flow away from the edging.
Cost and Time Investment Reality
Material costs for recycled edging range from free to $5 per linear foot, depending on your sourcing skills. The real investment is time – expect 2-3 hours of preparation for every hour of installation.
Tool requirements include cleaning equipment, safety gear, and specialized sealers. Initial tool investment runs $200-400 but serves multiple projects.
Professional installation of recycled material edging costs $30-50 per linear foot. DIY saves money but requires significant time and effort investment.
Sourcing Success Stories
My best find was 200 linear feet of vintage clay edging tiles from a 1920s estate demolition. The homeowner was thrilled someone wanted to preserve them rather than send them to the landfill.
Networking with contractors has yielded amazing materials over the years. Most are happy to call when they encounter quality salvage materials.
Conclusion
These seven professional garden edging techniques represent years of industry knowledge and expertise that typically costs homeowners hundreds of dollars to access.
By implementing even just one of these methods, you’ll not only save significant money but also create a landscape feature that rivals those designed by high-end professionals!
Remember, the key to success lies in proper preparation, quality materials, and attention to detail.
Which technique speaks to your style and garden needs?
Start with one that matches your skill level and budget – your neighbors will be asking for your landscaping secrets in no time!


GIPHY App Key not set. Please check settings