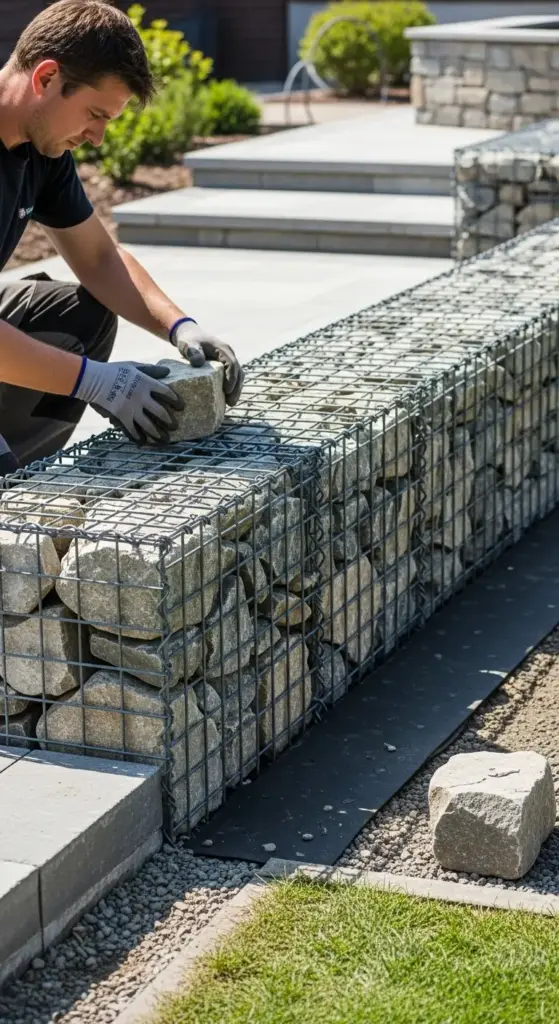
6. Gabion Stone Edging with Wire Mesh Systems

The first time I saw gabion edging at a high-end resort, I thought it was some kind of expensive custom stonework. Turns out, it was just cleverly engineered wire baskets filled with rocks – and I was about to become obsessed.
My first attempt looked like a prison fence filled with gravel. Professional gabion installation requires way more finesse than I initially thought.
Professional-Grade Wire Mesh Selection
Wire mesh quality separates amateur gabion work from professional installations. I learned this when my cheap galvanized mesh started rusting within six months of installation.
PVC-coated galvanized steel mesh is the only way to go. The coating needs to be at least 0.5mm thick to prevent corrosion from stone abrasion and weather exposure.
Mesh opening size matters more than you’d think. I use 2×3-inch openings for most residential applications – small enough to contain decorative stones but large enough for proper drainage.
Wire gauge can’t be less than 10-gauge for structural integrity. Thinner wire sags under stone weight and creates that cheap, bulging look that screams amateur work.
Spiral binding wire needs to match your mesh coating exactly. Mixing galvanized and PVC-coated components creates galvanic corrosion that destroys the entire system.
Stone Sizing and Placement Techniques
Stone selection for gabions follows the 1.5x rule – stones must be at least 1.5 times larger than your mesh openings. Smaller stones fall through, larger stones create unstable voids.
I use a graduated stone placement system. Largest stones go against the visible face, medium stones fill the interior, and smaller stones pack the gaps.
Hand-placing face stones is non-negotiable. Random dumping creates an ugly, chaotic appearance that looks like construction debris.
Stone color consistency requires careful sourcing. I always order 10% extra from the same quarry lot to ensure perfect color matching throughout the project.
Angular stones lock together better than rounded river rock. Crushed granite and quarried limestone create the most stable, professional-looking fills.
Foundation Requirements That Prevent Failure
Proper foundation preparation starts with excavation 6 inches deeper than your finished gabion height. Most DIYers skip this step and wonder why their gabions settle and lean.
The base layer is 4 inches of compacted crushed stone. I use 3/4-inch minus gravel compacted in 2-inch lifts with a plate compactor.
Geotextile fabric goes under the gravel base to prevent soil migration. This isn’t optional – soil infiltration destroys the drainage system and causes settlement.
I always extend the foundation 6 inches beyond the gabion footprint on both sides. This prevents undermining and provides long-term stability.
Drainage considerations require a slight slope away from structures. Even a 1% grade prevents water accumulation behind the gabion wall.
Assembly Methods for Structural Integrity
Gabion assembly starts with laying out all panels flat and checking for damage. One bent panel ruins the entire basket’s structural integrity.
I assemble the base and sides first, then add the lid after filling. Trying to fill through the top opening creates uneven stone distribution.
Spiral wire installation requires specific technique. Start at one corner and work systematically – random spiraling creates weak joints that fail under load.
Every connection point needs double-wrapping with binding wire. Single wraps loosen over time and allow panel separation.
Overfilling by 5% compensates for stone settlement. The lid should require moderate pressure to close – too easy means insufficient fill density.
Professional Assembly Secrets
Panel alignment must be perfect before adding stones. I use temporary bracing and string lines to ensure straight, level installation.
Fill gabions in 12-inch lifts, not all at once. This allows proper stone placement and prevents panel bulging from excessive weight.
Internal bracing wires every 3 feet prevent panel bowing. These tie the front and back panels together for maximum structural integrity.
I always wear heavy gloves and safety glasses during assembly. Sharp wire ends and flying stone chips are serious safety hazards.
Landscape Integration Strategies
Gabion integration with existing landscaping requires careful planning. These industrial-looking structures can overwhelm delicate garden settings without proper softening.
Planting pockets between gabion sections break up the linear appearance and add natural elements. I leave 2-foot gaps every 20 feet for plantings.
Height variation creates visual interest. I alternate between 18-inch and 24-inch gabions for a more organic, less fortress-like appearance.
Color coordination with existing hardscape elements ties everything together. I match my stone selection to existing retaining walls or patio materials.
My Costliest Gabion Mistake
I once built 40 feet of gabion edging without proper foundation preparation. The entire thing settled 3 inches and developed a permanent lean within one season.
Had to disassemble everything, excavate properly, and rebuild from scratch. Foundation shortcuts always come back to haunt you in structural applications.
That$600 lesson taught me to never skip the boring but critical preparation work.
Stone Placement Artistry
Face stone arrangement is where artistry meets engineering. I select the most attractive stones for the visible face and arrange them like a puzzle.
Color gradation from bottom to top creates visual flow. Darker stones at the base, lighter stones toward the top looks most natural.
Texture mixing adds visual interest. I combine smooth river rock faces with rough quarried stone for dynamic contrast.
Cost and Time Reality Check
DIY gabion edging runs $25-40 per linear foot including mesh, stones, and foundation materials. Professional installation costs $60-90 per foot but includes engineering and warranties.
Assembly time is significant – expect 6-8 hours per 10-foot section including foundation prep. The physical demands are real – moving tons of stone is exhausting work.
Tool requirements include wire cutters, come-alongs, and lifting equipment. Proper tools make the difference between professional results and amateur struggles.
Ready to discover the eco-friendly technique that transforms discarded materials into stunning, unique edging that tells a story while saving money? Click “next” to learn about recycled material edging with professional finishing that creates one-of-a-kind borders from unexpected sources!


GIPHY App Key not set. Please check settings