4. Poured Concrete Edging with Decorative Finishes
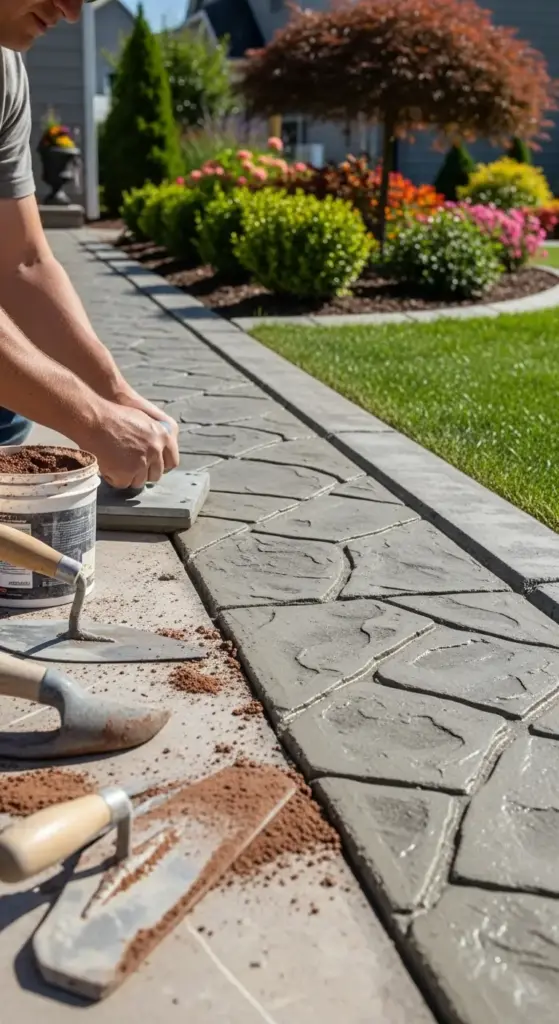
The first time someone mistook my concrete edging for expensive natural flagstone, I knew I’d cracked the code. That “fake it ’til you make it” moment cost me three failed attempts and about$400 in wasted materials.
But man, was it worth learning how to create poured concrete edging that looks like it cost thousands when it actually cost hundreds.
Professional Concrete Mixing for Outdoor Durability
Outdoor concrete mixing is completely different from indoor projects, and I learned this the hard way when my first edging crumbled after one winter. Regular concrete just doesn’t cut it for freeze-thaw cycles.
The magic ratio is 1:2:3 – one part Portland cement, two parts sand, three parts gravel. But here’s the kicker: you need air-entraining admixture for cold climates.
I add exactly 6 ounces of air-entraining agent per 94-pound bag of cement. This creates tiny air bubbles that give water somewhere to expand when it freezes.
Water-to-cement ratio can’t exceed 0.45 for outdoor durability. Too much water creates weak concrete that spalls and cracks within months.
Stamping and Texturing Techniques That Fool Everyone
Concrete stamping transformed my boring gray edging into convincing stone replicas. The key is working fast – you’ve got maybe 45 minutes before the concrete gets too hard to stamp.
I always use release powder before stamping. This prevents the stamps from sticking and creates natural color variation that looks authentic.
Texture rollers work great for wood grain effects. Roll them while the concrete is still plastic, then come back with a brush to enhance the grain pattern.
My favorite technique? Hand-carved texturing using a putty knife and wire brush. It takes longer, but the results look completely custom and natural.
Proper Curing Methods for Weather Resistance
Concrete curing makes or breaks your project’s longevity. I used to think letting it air dry was fine – wrong! Proper curing takes 28 days of controlled moisture.
The first 7 days are absolutely critical. I cover fresh concrete with plastic sheeting and mist it twice daily to prevent rapid moisture loss.
Curing compound is my secret weapon for large projects. Spray it on after the surface firms up, and it creates a moisture barrier that ensures proper hydration.
Temperature matters huge. Below 50°F, concrete barely cures at all. Above 90°F, it cures too fast and becomes weak and brittle.
Color Integration and Staining Secrets
Integral color beats surface staining every time for durability. I learned this when my beautiful stained edging started wearing off after two seasons of foot traffic.
Mix color directly into the concrete using iron oxide pigments. Start with 5% by weight of cement – you can always add more, but you can’t take it back.
Acid staining creates gorgeous, natural-looking color variation. I use muriatic acid-based stains that react with the concrete’s lime content.
My color-matching trick? Test small batches first. Concrete color changes dramatically as it cures, and what looks perfect wet might be completely wrong when dry.


Expansion Joint Placement Strategies
Expansion joints prevent those ugly random cracks that ruin the whole look. I place them every 8-10 feet maximum, regardless of what anyone tells you.
Control joints need to be exactly 1/4 the thickness of your concrete. For 4-inch edging, that’s 1-inch deep cuts made within 24 hours of pouring.
Isolation joints separate your edging from existing structures like sidewalks or driveways. Use 1/2-inch foam backer rod to create clean separation.
I always cut joints with a concrete saw, not a trowel. Hand-cut joints look amateur and don’t provide proper crack control.
My Concrete Mixing Disaster
I once tried to pour 60 feet of edging using bagged concrete mix from the hardware store. The color variation was so bad it looked like a patchwork quilt.
That failure taught me to always mix my own concrete for consistent color and texture. Bagged mix is fine for small repairs, but not for visible decorative work.
The lesson cost me a weekend of jackhammering and starting over.
Decorative Finishing Techniques
Exposed aggregate creates beautiful texture by washing away the surface cement paste. I use a garden sprayer and soft brush about 4-6 hours after pouring.
Timing is everything with exposed aggregate. Too early and you wash out the cement; too late and nothing happens.
Broom finishing gives subtle texture that’s perfect for natural stone looks. Drag a stiff broom across the surface in long, smooth strokes.
Cost Breakdown Reality
DIY poured concrete edging runs about $8-15 per linear foot including decorative treatments. Professional installation? You’re looking at $25-40 per foot.
The material costs are low, but the labor is intensive. Plan on a full weekend for 50 linear feet if you’re doing decorative finishes.
Tool investment is significant – mixer, stamps, trowels, and finishing tools easily run$300-500. But they’ll last for multiple projects.
Weather Timing Secrets
Perfect concrete weather is 60-75°F with low humidity and no rain in the forecast for 48 hours. I’ve learned to be patient and wait for ideal conditions.
Hot weather requires shade cloth and frequent misting. Cold weather needs insulated blankets and sometimes even heaters.
Want to discover the living edging technique that creates a natural border that actually gets more beautiful over time? Click “next” to learn about structured root barrier systems that keep your living edges perfectly controlled while they flourish!


GIPHY App Key not set. Please check settings