3. Composite Timber Edging with Reinforcement Stakes
My neighbor asked me what kind of wood I used for my gorgeous garden edging last summer. I couldn’t help but grin when I told her it wasn’t wood at all.
That composite timber edging had fooled everyone for three years running – no rot, no warping, and zero maintenance headaches.
High-Quality Composite Material Selection
Not all composite materials are created equal, and I learned this lesson the expensive way. My first attempt used cheap big-box store composite that faded to an ugly gray within six months.
Real quality composite contains at least 50% recycled wood fiber mixed with high-grade polyethylene. The cheap stuff uses too much plastic and looks fake from day one.
Trex and TimberTech are the gold standards, but they’re pricey at $12-18 per linear foot. I’ve had great success with NewTechWood as a middle-ground option at around $8-10 per foot.
The key specification to look for? Density rating above 0.9 g/cm³. Anything lower feels hollow and cheap when you tap it.
Professional Staking Patterns That Actually Work
Here’s where most DIYers mess up: staking patterns. You can’t just pound stakes wherever you feel like it and expect professional results.
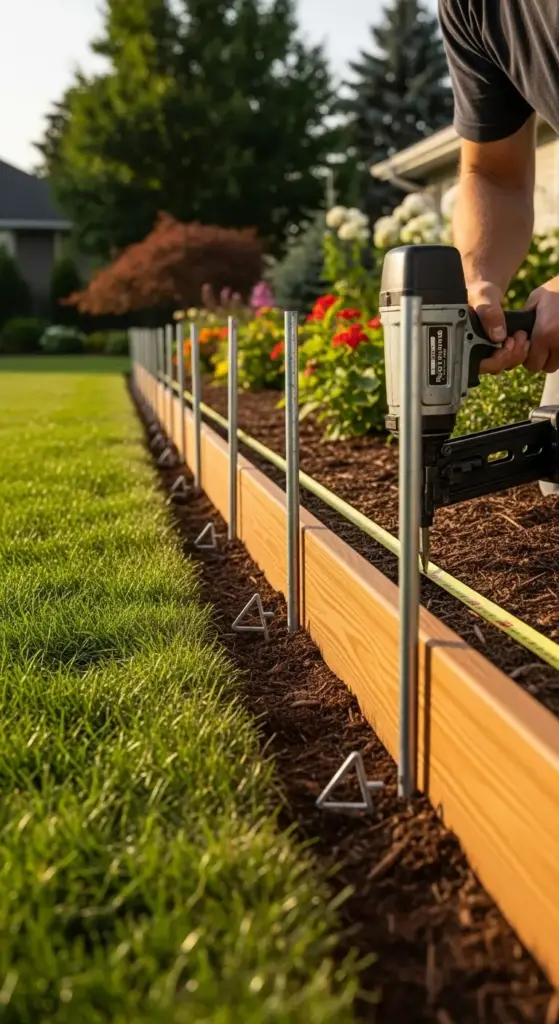
The pros use a triangular staking system every 4 feet on center. Two stakes behind the edging at 45-degree angles, plus one vertical stake for extra support.
I space my stakes exactly 18 inches from each corner and intersection. Galvanized steel stakes are non-negotiable – aluminum bends, and regular steel rusts out within two seasons.
The angle matters more than you think. Stakes driven at 30-degree angles pull out under frost pressure. 45 degrees is the sweet spot for maximum holding power.
Color-Matching Techniques for Natural Appearance
Color-matching composite edging to your existing landscape takes some finesse. I always order samples first – colors look completely different in outdoor lighting.
Cedar tones work best with traditional landscaping. Gray composites look modern but can clash with natural plantings.
The secret is weathering simulation. New composite looks too perfect and uniform. I lightly sand high-wear areas and apply diluted wood stain to create natural variation.
UV-resistant pigments are crucial. Cheap composites without proper UV protection fade to that telltale plastic look within one season.
Installation Tools That Professionals Swear By
Composite-specific tools make all the difference in installation quality. Regular wood-cutting tools create rough, splintered edges that scream “amateur work.”
I invested in a fine-tooth composite blade for my circular saw – 80 teeth minimum. The clean cuts look infinitely more professional than standard 24-tooth blades.
Pre-drilling is absolutely essential. Composite splits differently than wood, and you need special composite screws with self-countersinking heads.


My game-changer tool? A pneumatic palm nailer for driving stakes. Hand-driving 40+ stakes will destroy your wrist and create inconsistent depths.
Staking Depth and Spacing Secrets
Proper staking depth varies by soil type, but I always go minimum 12 inches deep. Clay soils need 14-16 inches because of expansion pressure.
The spacing pattern I use is bulletproof: Main stakes every 4 feet, intermediate stakes every 2 feet on curves or slopes.
Corner reinforcement requires triple staking – two angled stakes plus one vertical. Corners take the most stress and fail first without proper support.
I mark all my stake locations with spray paint before starting. Trying to eyeball spacing while you’re working leads to wonky, unprofessional results.
Seasonal Adjustment Methods
Composite materials expand and contract more than most people realize. I learned this when my perfectly straight edging developed waves after the first summer.
Spring adjustments involve checking all connections and re-tightening any loose fasteners. Winter contraction can loosen everything up.
Summer expansion gaps need to be built in during installation. I leave 1/8-inch gaps every 8 feet to prevent buckling during hot weather.
Fall preparation includes clearing all debris from expansion joints and checking stake stability after freeze-thaw cycles.
My Biggest Composite Installation Mistake
I once installed 100 feet of composite edging without considering seasonal movement. That first summer, the buckling was so bad it looked like a roller coaster.
Had to pull up 30 feet and reinstall with proper expansion gaps. Always account for thermal movement – it’s not optional with composite materials.
The lesson? Measure twice, cut once, and always plan for movement.
Cost Reality Check
DIY composite edging runs $15-25 per linear foot including stakes and hardware. Professional installation? You’re looking at $35-50 per foot.
The time investment is significant – expect a full day for every 25 feet if you’re doing it right. But the longevity makes it worth every hour.
Ready to learn the concrete technique that creates permanent, customizable edging that can mimic any material you want? Click “next” to discover poured concrete edging with decorative finishes that rivals expensive natural stone at half the cost!


GIPHY App Key not set. Please check settings