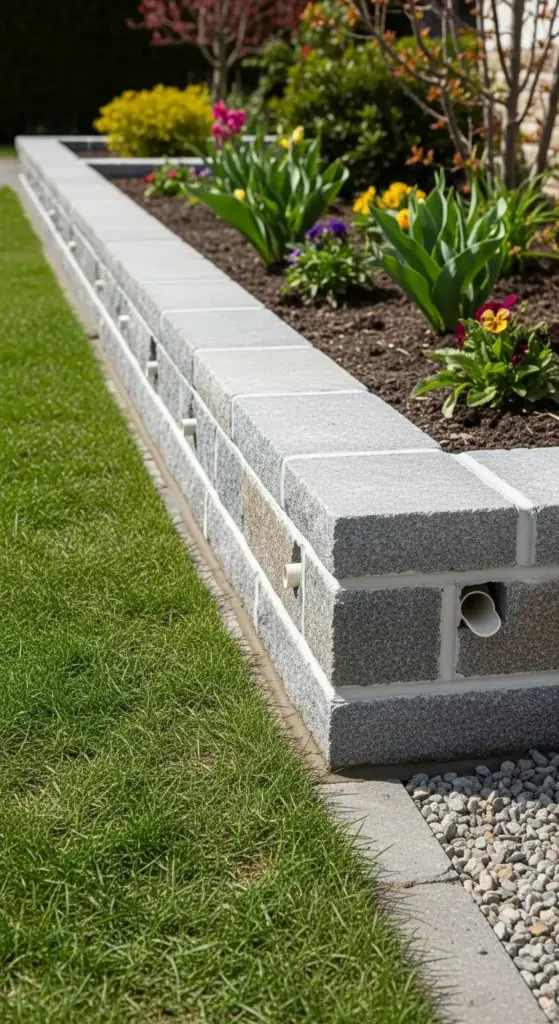
2. Mortared Stone Edging with Drainage Integration

I’ll never forget the sinking feeling when I saw my beautiful stone edging cracking apart after just one winter. Turns out, I had completely ignored drainage – rookie mistake that cost me $800 and a weekend of backbreaking removal work.
That failure taught me everything about mortared stone edging and why drainage integration isn’t optional, it’s absolutely critical.
Choosing Stone Materials for Your Climate
Natural stone selection depends entirely on your local weather patterns. I learned this after watching my gorgeous limestone edging turn into chalk dust after two freeze-thaw cycles.
In northern climates, you need dense stones with low water absorption. Granite, quartzite, and certain sandstones are your best friends.
Southern gardeners can get away with softer stones like limestone or even decorative concrete blocks. The key is understanding your stone’s absorption rate – anything over 3% is asking for trouble in freezing climates.
I always do the overnight water test now. Drop a stone in water for 24 hours and weigh it before and after. If it gains more than 3% weight, skip it.
Professional Mortar Mixing That Actually Works
Here’s where most DIYers go wrong: mortar mixing ratios. The standard 3:1 sand-to-cement ratio isn’t right for outdoor edging applications.
I use a 2.5:1 ratio with added lime for flexibility. The lime prevents that brittle, crack-prone mortar that fails every winter.
Portland cement is non-negotiable – don’t cheap out with masonry cement. Add exactly 10% hydrated lime by weight, not volume.
My mixing secret? Add the water slowly while the mixer runs. Too much water creates weak mortar that crumbles within months.
Drainage Integration That Prevents Disasters
Integrated drainage solutions saved my sanity and my wallet. Every 8-10 feet, I install weep holes using 1/2-inch PVC pipe angled slightly downward.
Behind the stone wall, I create a 6-inch gravel drainage zone. This isn’t optional – water buildup will destroy even perfect mortar work.
The gravel needs to be angular, not rounded river rock. I use 3/8-inch crushed stone because it locks together and doesn’t shift over time.
French drain integration works beautifully with stone edging. Run perforated pipe along the base and connect it to your existing drainage system.
Foundation Preparation That Lasts Decades
Proper foundation preparation starts 8 inches below your finished grade. I excavate exactly 6 inches wider than my stone width on both sides.
The base layer is 4 inches of compacted crushed stone, followed by 2 inches of concrete footing. Skip the concrete and you’ll be rebuilding in five years.
I always use rebar in the concrete footing – two pieces of #4 rebar running the entire length. The concrete needs to cure for 48 hours minimum before stone installation.
Frost line considerations are huge in northern areas. Your footing needs to extend below the frost line, or winter heaving will destroy everything.
Mortar Application Techniques
Butter and bed method is what the pros use. Spread mortar on the footing, then butter each stone’s bottom surface before placement.
Keep your mortar joints consistent – I use 3/8-inch spacing for most residential applications. Wider joints look amateur, narrower joints crack easily.
Clean excess mortar immediately with a damp sponge. Once it starts setting, you’re stuck with messy-looking joints.
Maintenance Schedules for Longevity
Annual inspection happens every spring in my garden. I look for hairline cracks, loose stones, or drainage issues.
Repointing mortar joints every 7-10 years keeps everything solid. Don’t wait until stones start moving – prevention is way cheaper than reconstruction.
I seal my stone edging every three years with penetrating sealer. This prevents water infiltration and extends the mortar life significantly.
Winter preparation includes clearing all drainage holes and checking for standing water issues.
My Costliest Learning Experience
I once installed 60 feet of beautiful fieldstone edging without proper drainage. The spring thaw turned it into a $1,200 pile of rubble.
That disaster taught me to always overengineer the drainage system. Better safe than sorry when water and freezing temperatures are involved.
Want to discover the composite timber technique that gives you the look of natural wood without the rot, warping, or constant maintenance? Click “next” to learn about reinforced composite edging systems that fool even landscape professionals!


GIPHY App Key not set. Please check settings