3. Lighting Secrets That Transform Any Space
I’ll never forget the first time I tried to create “ambiance” on my patio with a single strand of string lights haphazardly draped around the railing. It looked more like a sad Christmas decoration in July than the romantic boho paradise I was going for.
That’s when I realized lighting isn’t just about brightness – it’s about creating magic.
After years of trial and error (and way too many extension cords), I’ve cracked the code on outdoor lighting design that actually transforms spaces. Let me save you from my expensive mistakes.
String Light Installation That Creates Drama
Here’s what nobody tells you about string lights – the installation technique matters more than the lights themselves. I used to just hang them in straight lines like I was decorating a garage sale.
The secret is creating layers and varying heights. I now zigzag my lights at different levels, creating what designers call “light mapping.”
Start high and work your way down. I attach my highest strand about 10 feet up, then create lower layers at 8 feet and 6 feet. This creates depth and makes your ceiling feel taller.
My biggest game-changer was learning to drape lights in gentle curves instead of tight straight lines. It creates this soft, romantic glow that makes everything look more expensive.
Always buy more lights than you think you need – I learned this after running out halfway through my installation and having to make an emergency Home Depot run.
Layering Light Sources Like a Pro
Ambient lighting isn’t just one type of light doing all the work. Professional designers use at least three different light sources, and now I understand why.
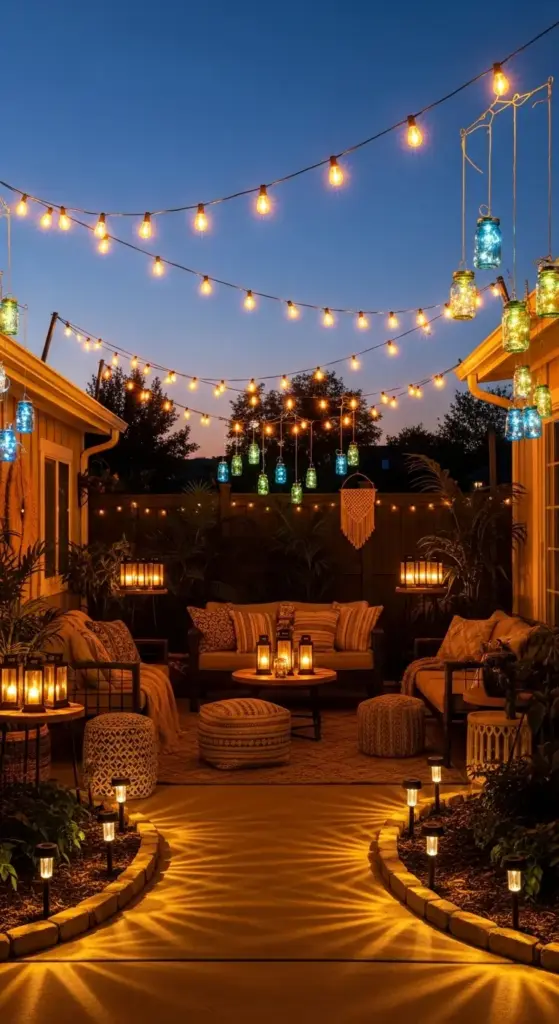
I combine string lights for overhead glow, lanterns for mid-level warmth, and small accent lights for ground-level definition. The layering creates this incredible depth that makes your space feel professionally designed.
My current setup includes Edison bulb string lights overhead, battery-powered lanterns on my side tables, and small solar stake lights along my planter edges.
The trick is making sure no single light source is doing all the heavy lifting. Each layer serves a different purpose and creates a different mood.
Solar-Powered Solutions That Actually Work
I was skeptical about solar lighting until my electricity bill made me reconsider. Now I’m completely converted to solar options for most of my outdoor lighting needs.
The key is buying quality solar lights, not the cheap ones from the dollar store. I learned this after replacing flimsy solar stakes three times in one season.
My favorite solar discovery is these amazing string lights that charge during the day and automatically turn on at dusk. They last about 8 hours on a full charge, which covers most evening entertaining.


For pathway lighting, I use solar lantern stakes that cast beautiful patterns on the ground. They’re completely maintenance-free once you find the right sunny spots for charging.
Just remember that solar lights need direct sunlight to charge properly – I made the mistake of placing some under my pergola where they barely got any sun.
Strategic Lantern Placement for Gatherings
Lantern placement is where I see most people go wrong. They either cluster them all in one spot or spread them out so much that they lose impact.
The magic number is groups of three at varying heights. I use one large floor lantern, one medium table lantern, and one small hanging lantern in each seating area.
Place lanterns where people naturally gather – near seating areas, by the entrance, and around your dining space. This creates intimate pockets of light that encourage conversation.
I’ve found that battery-powered LED lanterns are way more practical than real candles for regular use. No wind issues, no fire hazards, and they last for hours.
For special occasions, I do add real candles in hurricane glasses for that authentic flickering glow. There’s just something magical about real flame that LED can’t quite replicate.
DIY Mason Jar Magic
My mason jar lighting projects started as a Pinterest experiment and became my signature patio feature. These DIY lights cost about$3 each to make and look like they came from a high-end boutique.
The basic technique is simple – drill a hole in the mason jar lid, thread battery-powered fairy lights through, and hang them at varying heights.
I’ve made over 20 of these in different sizes and they never get old. The glass creates this beautiful diffused light that’s perfect for intimate gatherings.
My favorite variation uses colored mason jars – the blue and green ones cast the most gorgeous light patterns on surrounding surfaces.
For a more permanent installation, I’ve wired some with actual electrical connections, but the battery versions are perfect for renters or anyone who wants flexibility.
The best part about DIY lighting is customizing it to your exact space and style. No two patios need the same lighting solution.
Your lighting is now absolutely perfect, but let’s talk about the psychology behind furniture arrangement – because where you place your seating can make or break the entire vibe. Click “next” to discover the furniture placement secrets that make guests never want to leave your space!


GIPHY App Key not set. Please check settings