3. Transform with Paint and Stain Techniques
I used to think painting a fence was just slapping on whatever color was on sale at Home Depot. Then I painted my entire privacy fence bright yellow because I thought it would be “cheerful.”
Let’s just say my neighbors weren’t thrilled, and I learned about color psychology the hard way.
Three weeks later, I was back at the paint store, armed with actual knowledge about outdoor color schemes and a much better plan.
Color Psychology That Actually Works Outdoors
Here’s what nobody tells you: outdoor colors behave completely differently than indoor ones. That gorgeous sage green that looked perfect on the paint chip? It turned muddy brown on my north-facing fence.
Warm colors like terracotta and deep blues make spaces feel cozy and intimate. I painted my back fence a rich charcoal blue, and suddenly my small yard felt like a sophisticated outdoor room.
Cool colors expand spaces visually. My friend’s tiny courtyard looks twice as big since she painted her fence a soft gray-green.
Earth tones are your safest bet for fence colors – they complement plants beautifully and won’t clash with seasonal decorations. Think warm grays, soft browns, and muted greens.
Avoid bright whites on fences unless you want a sterile, commercial look. Off-white or cream colors are much more welcoming and hide dirt better.
Ombre and Gradient Techniques for Visual Drama
This technique scared me at first, but ombre painting is actually easier than you think! I created a stunning gradient effect on my side fence that gets compliments from every visitor.
Start with your darkest color at the bottom and gradually blend upward. I used three shades of blue, mixing them wet-on-wet with a large brush for smooth transitions.
The secret is working in small sections – about 3 feet at a time. Acrylic paints stay workable longer than latex, giving you more blending time.
Horizontal gradients work beautifully too. I helped my neighbor create a sunset effect using warm oranges and pinks that looks absolutely magical at golden hour.
Practice your blending technique on a scrap board first. Trust me, you don’t want to learn on your actual fence!
Weather-Resistant Products That Actually Last
I learned this lesson the expensive way: cheap exterior paint is not worth the savings. My first paint job started peeling after one winter.
100% acrylic latex paint is your best friend for fence painting. It flexes with temperature changes and resists cracking better than oil-based paints.
Look for paints with built-in primer – they save time and provide better adhesion. I use Sherwin Williams Duration now, and it’s held up beautifully for three years.
Stain-blocking primers are essential if you’re painting over pressure-treated wood. Those tannins will bleed through regular paint and ruin your finish.
For metal fences, invest in rust-inhibiting primer. I skipped this step once and watched my beautiful paint job bubble and peel within six months.
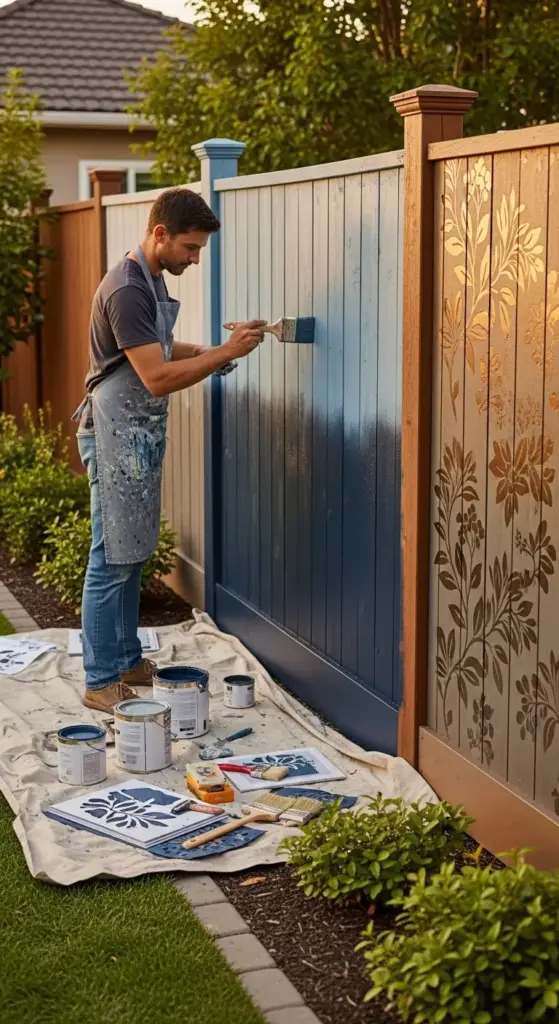
Stencil Patterns That Add Personality
Fence stenciling was intimidating until I discovered adhesive stencils. They stay put in wind and create crisp, professional-looking patterns.


Start simple with geometric designs or botanical motifs. I used a large leaf pattern on my garden fence, and it looks like expensive wallpaper from a distance.
Spacing is everything with stencil work. I measure and mark my pattern placement before starting – it prevents that crooked, amateur look.
Metallic stencil paints add incredible depth and interest. A subtle bronze geometric pattern on my dark gray fence catches the light beautifully.
Less is more with fence stenciling. I made the mistake of covering too much surface area once, and it looked busy and overwhelming.
Two-Tone Designs That Complement Architecture
This is where you can really make your fence feel like part of your home’s design. I painted my fence posts a darker shade than the panels, and it instantly looked more expensive.
Horizontal two-tone designs work great for ranch-style homes. Paint the bottom third a darker color – it grounds the fence and hides dirt from lawn mowers.
Match your fence colors to your home’s trim for a cohesive look. My white house with black shutters looks perfect with a black and white fence design.
Vertical two-tone patterns complement colonial architecture beautifully. Alternate light and dark panels, or paint every third board a different shade.
Don’t forget about fence caps and hardware – painting them a contrasting color adds professional finishing touches.
Preparation Steps That Prevent Do-Overs
Here’s the truth: fence prep work takes longer than the actual painting, but skipping it guarantees you’ll be repainting next year.
Power washing is essential, but let your fence dry completely – I’m talking 48-72 hours depending on humidity. Painting damp wood traps moisture and causes peeling.
Sand any rough spots and fill nail holes with exterior wood filler. It seems tedious, but smooth surfaces make your paint job look professional.
Prime everything, even if you’re using paint-and-primer-in-one. Bare wood, metal, and previously painted surfaces all need proper primer for maximum adhesion.
Tape off plants and hardscaping before you start. I learned this after accidentally painting half my hostas green – they didn’t survive.
Weather timing is crucial. Avoid painting in direct sunlight, high humidity, or when rain is forecast within 24 hours. Early morning or late afternoon are ideal.
Use high-quality brushes and rollers – they hold more paint and create smoother finishes. Cheap tools leave brush marks and lint in your paint job.
Your fence is looking absolutely incredible, but we’re not done yet! Next up, I’ll show you how to add decorative elements and artistic features that’ll make your neighbors think you hired a professional designer. From the $12 mirror trick that doubled my yard’s visual space to the DIY art project that became my most-photographed fence feature – click “next” to discover the finishing touches that’ll make your fence transformation truly unforgettable!


GIPHY App Key not set. Please check settings