2. Defining Clean Segments with Inexpensive Heavy-Duty Bender Board
There is a subtle psychological trick that professional landscapers use to justify their massive fees, and it all comes down to crisp, razor-sharp lines. When a yard has distinct, hyper-clean divisions between the gravel, the mulch, and the pathways, your brain automatically registers the space as high-end and expensive. Without those clean boundaries, even the priciest plants can end up looking like a chaotic tangle of weeds.
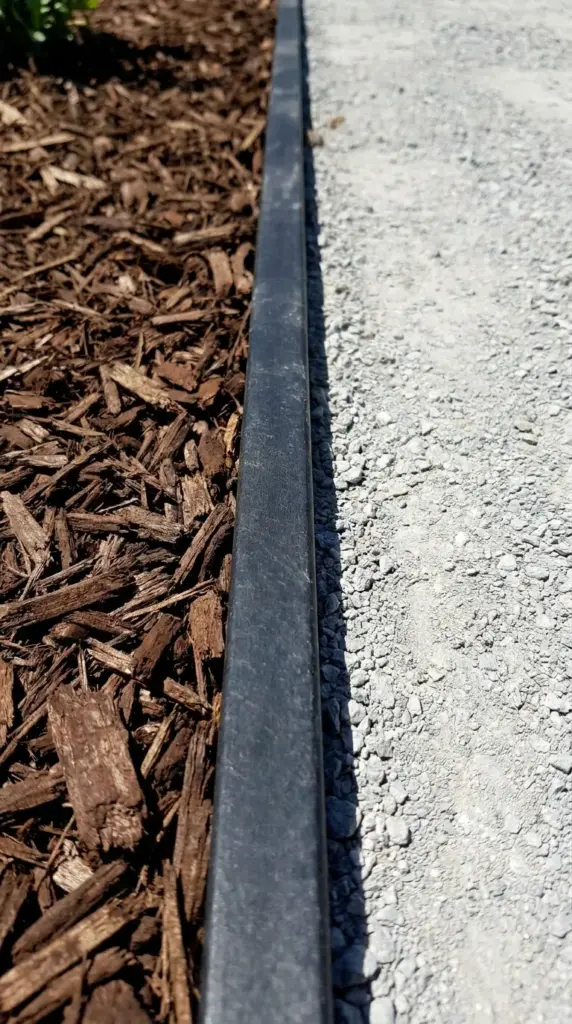
When my $5,000 contractor bid included thousands just for masonry retaining strips, I knew there had to be a better way. I found my answer in heavy-duty plastic bender board and flexible steel edging. These budget-friendly alternatives allow you to achieve those coveted, modern geometric lines or elegant curves for a fraction of the price of concrete pavers.
Choosing the Right Budget Edging
When shopping for diy garden edging, step away from the ultra-flimsy, cheap plastic landscape edging that comes in thin rolls—it warps under the sun, bubbles up out of the ground after the first heavy rain, and looks incredibly tacky. Instead, look for heavy-duty composite bender board (often made from recycled plastics) or affordable 14-gauge flexible steel edging strips.
Composite bender board mimics the thick look of expensive wood or steel but won’t rot, splinter, or rust over time. It gives you that thick, structural presence that anchors a modern xeriscaping layout beautifully while keeping your project strictly on a dime.
Step-by-Step Installation Secrets
Installing this yourself is incredibly straightforward and requires zero specialized power tools. Here is the exact method I used to get perfectly smooth lines that haven’t budged in years:
- Let it Bake: If you are using plastic or composite bender board, uncoil it and lay it flat out on your driveway in the direct sun for an hour before installing. The heat softens the material, making it incredibly pliable and easy to shape into flawless, sweeping curves without any awkward kinks.
- Trench the Path: Dig a narrow vertical trench about 4 to 5 inches deep along your desired boundary line using a flat spade.
- Set the Height: Place the edging into the trench. The top of the bender board should sit roughly a half-inch to an inch above your final mulch or gravel level. This creates a functional dam that keeps materials from spilling into each other while remaining subtle to the eye.
- Stake It Securely: Drive matching heavy-duty landscape stakes into the ground right alongside the edging every 3 to 4 feet, and screw or pin the edging directly to the stakes. For tight curves, add an extra stake at the apex of the bend to hold the tension.
- Backfill and Pack: Pack the native soil tightly back into the trench on both sides of the board. Stomp it down with your boots to lock everything firmly into place.
Once your boundaries are locked down, you have the perfect structural grid to start filling in the blanks. Click ‘Next’ to see how we can use an ultra-affordable raw material to build stunning, texture-rich paths that give your new yard an inviting, walkable flow.


GIPHY App Key not set. Please check settings