4. Ignoring Drainage and Pot Selection
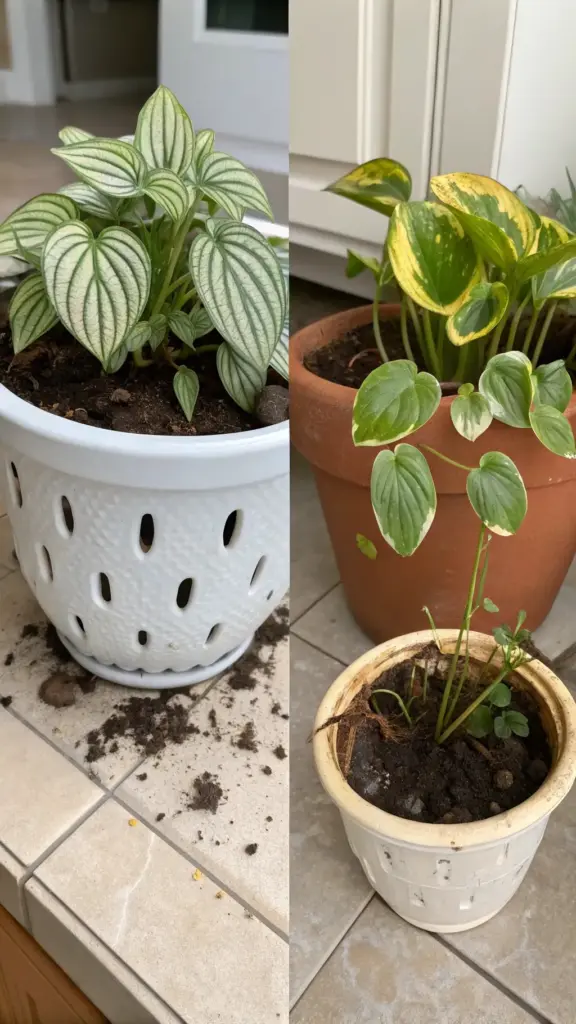
Let me tell you about the most expensive plant lesson I ever learned. I spent$40 on this gorgeous white ceramic planter from Target – no drainage holes, but it was so Instagram-worthy.
Within three weeks, my beautiful watermelon peperomia was a mushy, rotting mess.
That pretty pot was basically a plant coffin.
The Cute Pot Death Trap Reality
Ceramic pots without drainage holes are the silent killers of the houseplant world. They look amazing on your shelf, but they’re basically creating a swamp for your plant’s roots.
Water goes in, but it has nowhere to go out.
I used to think I could just “water less” to compensate. Wrong. Even small amounts of water build up over time, creating that soggy soil nightmare.
Standing water at the bottom of decorative pots creates the perfect environment for root rot and fungal growth. Your poor watermelon peperomia is literally drowning from the bottom up.
The Best Pot Materials for Happy Plants
After my ceramic pot disaster, I did serious research on pot materials. Terracotta became my best friend.
Terracotta pots are porous, which means they actually help soil dry out between waterings. Perfect for watermelon peperomias that hate wet feet.
Plastic nursery pots work great too – they’re lightweight, have drainage holes, and you can hide them inside prettier containers.
Glazed ceramic with drainage holes is fine, but unglazed terracotta is still my top choice. The clay actually breathes with your plant.
DIY Drainage Hacks That Actually Work
I wasn’t ready to give up my pretty pots completely, so I got creative with DIY drainage solutions. My drill became my plant-saving superhero.
Drilling drainage holes in ceramic pots is easier than you think. Use a masonry bit, go slow, and keep the area wet to prevent cracking.
For pots I couldn’t drill, I created a “false bottom” system. Layer of pebbles, then landscape fabric, then soil. Not perfect, but way better than nothing.
Activated charcoal mixed into that pebble layer helps prevent water from going stagnant. Game changer for decorative containers.
The Soil Mix That Changed Everything
Regular potting soil was keeping my watermelon peperomias too wet for too long. I had to get serious about soil drainage.
My go-to mix now: 50% regular potting soil, 25% perlite, 25% orchid bark. Sounds fancy, but you can get everything at any garden center.
Perlite creates air pockets that help water drain quickly. Orchid bark adds chunky texture that prevents soil compaction.


The soil should feel light and airy, not dense and heavy. If water sits on top when you pour it, your mix is too heavy.
Making Drainage Look Good
The biggest challenge was making functional drainage look stylish in my apartment. Nobody wants ugly plastic saucers everywhere.
Decorative saucers that match your pots are worth the investment. Just remember to empty them after watering – standing water defeats the whole purpose.
I started using cache pots – basically putting a functional pot inside a pretty pot. Best of both worlds.
Macrame plant hangers are perfect for this because excess water can drip without ruining furniture. Plus they look amazing in photos.
The Saucer Mistake I Made
Even with proper drainage holes, I was making a huge mistake with plant saucers. I’d water my plants and just leave the excess water sitting there.
Rookie error.
Emptying saucers 30 minutes after watering is crucial. That standing water will get sucked back up into the soil, creating the same soggy conditions you’re trying to avoid.
I set a phone timer now. Water plants, set timer for 30 minutes, empty all saucers. Simple routine that saves plants.
The Weight Test for Proper Drainage
Here’s a pro tip I learned from a plant shop owner: well-draining soil in the right pot should feel noticeably lighter when it’s dry.
I lift my pots before watering now. Heavy pot usually means wet soil. Light pot means it’s time to water.
Watermelon peperomias in proper draining setups will feel almost weightless when they’re ready for their next drink.
Finding Your Drainage Sweet Spot
Every plant and pot combination is different. What works for my watermelon peperomia might be too much drainage for my pothos.
Start with good drainage basics – holes in the pot, well-draining soil, proper saucers. Then adjust based on how your specific plant responds.
Trust the process and watch your plants thrive.
Think you’ve mastered watering now? Not so fast. Click “next” to discover the sneaky watering mistake that’s happening right on your plant’s leaves – and why it’s causing more damage than you realize.


GIPHY App Key not set. Please check settings