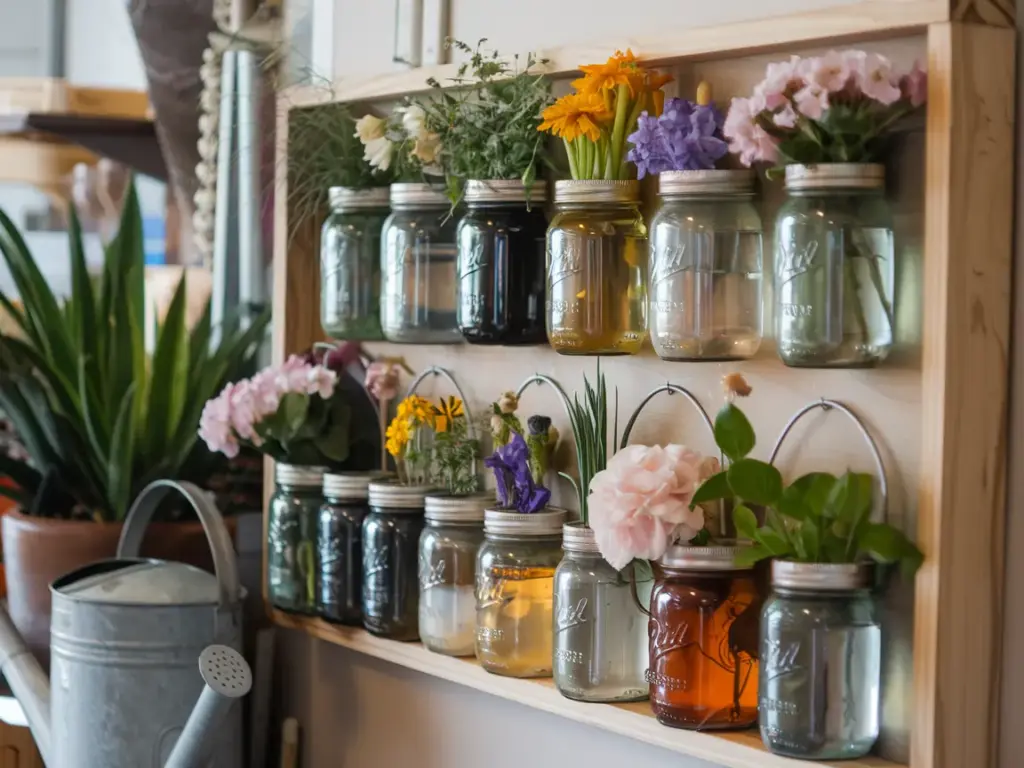
10. Mason Jar Herb and Flower Wall

Let me tell you about my favorite vertical gardening project ever! After countless experiments with different containers, I’ve found that mason jars create the most charming and practical vertical garden setup you can imagine. I learned this the hard way after my first attempt ended with three broken jars (oops!) but now I’ve got it down to a science.
Creating the Perfect Mounting System
The secret to a successful mason jar wall garden is all about the mounting system. Trust me on this one – I’ve tried everything from rope to wire, but stainless steel pipe clamps have been my absolute game-changer. They’re not just sturdy; they look pretty awesome too!
For the backing board, I use a piece of weather-treated plywood that’s at least 3/4 inch thick. You definitely don’t want to skimp on this part. I learned that lesson when my first attempt with thin board started sagging after a rainstorm!
Here’s my tried-and-true mounting process:
- Seal your plywood with outdoor waterproof sealant
- Space pipe clamps about 8 inches apart
- Pre-drill holes for better accuracy
- Always mount into wall studs or use heavy-duty anchors
Perfect Plant Combinations
You wouldn’t believe how many plant combinations I’ve experimented with over the years! The key is mixing plants that have similar needs but different visual appeals. My absolute favorite combination includes:
- Trailing plants: Creeping Jenny and String of Pearls
- Compact herbs: Basil, Thyme, and Mint
- Small flowers: Calibrachoa and Wave Petunias
I’ve found that mixing herbs and flowers not only looks gorgeous but also helps with natural pest control. Plus, there’s nothing better than grabbing fresh herbs while admiring your beautiful flower display!
Smart Watering Solutions
Okay, let’s talk about the trickiest part – watering! After flooding my first setup (and dealing with a very unhappy downstairs neighbor), I developed a foolproof watering system. The game-changer was adding small aquarium stones at the bottom of each jar for drainage and using self-watering crystals mixed into the soil.
Pro tip: I drill three small drainage holes in each jar instead of one big one. This prevents soil from washing out while still providing adequate drainage. And yes, I definitely learned this after making a muddy mess with single large holes!
Managing Light Requirements
Light management was something I totally messed up at first. I had placed sun-loving petunias next to shade-preferring ferns (rookie mistake!). Now I arrange my jars based on light requirements, with sun-lovers at the top and shade-tolerant plants at the bottom.
For optimal growth, I’ve found success with:
- Full sun plants: Upper rows
- Partial sun plants: Middle section
- Shade-tolerant plants: Bottom rows
Remember, even if you’re working with an indoor wall, you can use LED grow lights strategically placed to supplement natural light. I use them during winter months to keep everything thriving.
The best part about this whole setup? It’s totally customizable to your space and style. Just make sure you’re checking those mounting points regularly – nobody wants a midnight crash of herbs and flowers! After maintaining my mason jar wall for three years now, I can honestly say it’s been one of the most rewarding garden projects I’ve ever tackled.
Conclusion
Ready to transform your space into a vertical paradise? These 10 DIY vertical flower garden designs prove that you don’t need a huge yard to create something spectacular! Each design can be customized to fit your space and style preferences. Remember to start small and gradually expand your garden as you gain confidence. The key to success is proper planning and regular maintenance. Why not start your vertical gardening journey this weekend? Your perfect living wall awaits! 🌺


GIPHY App Key not set. Please check settings