5. Pruning Techniques for Maximum Color Impact
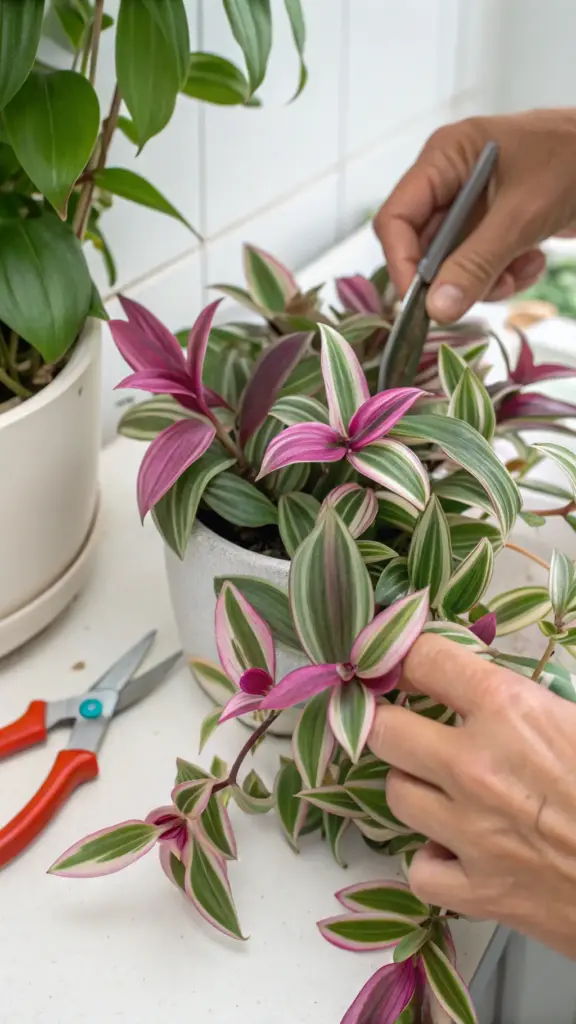
I was terrified to cut my first Nanouk. This gorgeous trailing plant cost me$40, and the thought of chopping it up made me physically anxious.
But leaving it unpruned was actually killing its colors. Those long, leggy vines were getting less and less pink as they stretched toward the light.
My breakthrough came when I finally got brave enough to make that first cut – and watched my plant explode with the most vibrant new growth I’d ever seen.
Strategic Pinching That Triggers Color Explosions
Pinching growing tips became my secret weapon for color enhancement. When you remove the top inch of a vine, the plant redirects energy into producing multiple new shoots.
Here’s the magic part – that new growth comes in with the most intense pink and purple pigmentation because it’s the plant’s freshest, most vigorous tissue.
I pinch my Nanouk every 3-4 weeks during growing season. Strategic pinching keeps the plant compact and forces constant production of those gorgeous colorful leaves.
Soft pinching with your fingernails works better than cutting for tender new growth. The plant responds more naturally to this gentle removal method.
Propagation Without Sacrificing Your Parent Plant
Cutting propagation used to stress me out because I thought I was weakening my main plant. Turns out, it’s the opposite.
Taking 4-6 inch cuttings actually stimulates the parent plant to produce more vigorous growth. It’s like pruning and propagating at the same time.
I take cuttings from the longest, most established vines first. Mature growth propagates more reliably than those tender new shoots.
The key is leaving at least 3-4 nodes on the parent plant after cutting. This ensures strong regrowth while giving you plenty of cutting material.
Removing Green Growth for Color Dominance
Green reversion happens when parts of your plant lose their variegation and go completely green. Don’t ignore these sections – they’ll take over if you let them.
Green growth is actually more vigorous than variegated growth because it has more chlorophyll. It’ll outcompete your pretty pink sections for resources.
I remove solid green vines as soon as I spot them. One green vine can turn your whole plant boring within a few months if left unchecked.
Selective pruning for color means being ruthless about removing anything that doesn’t contribute to your plant’s overall beauty.
Tools and Timing That Actually Matter
Clean, sharp scissors are non-negotiable for healthy cuts. I use small craft scissors that I sterilize with rubbing alcohol between plants.
Timing matters more than I realized. Early morning pruning when plants are fully hydrated leads to better healing and stronger regrowth.
Spring pruning gives you the longest growing season for recovery. I do my major shaping in March when new growth is just starting.
Summer maintenance pruning keeps colors vibrant throughout peak season. Light pinching every few weeks maintains that compact, colorful look.
Creating Fuller Plants Through Smart Cutting
Cutting above nodes ensures new growth emerges exactly where you want it. Each node can produce 2-3 new shoots if you cut in the right spot.
I learned to cut at angles rather than straight across. Angled cuts shed water better and reduce the risk of rot at the cut site.
Staggered cutting heights create natural-looking fullness. Don’t cut everything to the same length – it looks artificial and grows back weird.
Encouraging branching means cutting longer vines back to different points, creating multiple growing tips at various levels.


My Instagram-Worthy Styling Secrets
Symmetrical pruning creates that perfect, balanced look that photographs beautifully. I step back frequently to check the overall shape.
Trailing length variation adds visual interest. Some vines at 8 inches, others at 12 inches creates natural-looking cascades.
Color distribution matters for photos. I prune to ensure pink sections are evenly spread throughout the plant rather than clustered in one area.
Compact growth photographs better than leggy, sparse plants. Regular pruning keeps everything tight and full for those perfect plant parent shots.
Pruning Mistakes That Ruin Colors
Over-pruning stressed my plant so badly that new growth came in completely green. Never remove more than 1/3 of the plant at one time.
Cutting during dormancy led to slow healing and increased risk of rot. Winter pruning just doesn’t work for Tradescantias.
Using dirty tools introduced bacteria that caused stem rot. I learned to clean my scissors between every single cut.
Cutting too close to nodes damaged the growing points and prevented proper regrowth. Leave about 1/4 inch above each node.
The Professional Pruning Schedule
March: Major shaping and removal of any winter damage. This is when I take most of my propagation cuttings.
May-August: Monthly pinching sessions to maintain shape and encourage colorful new growth.
September: Final light pruning before growth slows down. Just removing any leggy or damaged sections.
October-February: Hands-off period except for removing any dead or damaged material.
Reading Your Plant’s Pruning Needs
Leggy growth with long spaces between leaves means it’s time for strategic cutting. The plant is telling you it needs more light and less length.
Fading colors on older growth is normal, but if new growth isn’t colorful, you might need to prune more aggressively to stimulate fresh shoots.
Uneven growth patterns usually mean some vines are dominating others. Selective pruning of the strongest vines encourages weaker sections to catch up.
Sparse appearance often improves dramatically with proper pruning techniques that encourage branching and fullness.
My Biggest Pruning Breakthrough
The game-changer was realizing that frequent light pruning works infinitely better than occasional heavy cutting. Little and often keeps colors consistent and growth manageable.
Propagating while pruning turned my plant maintenance into plant multiplication. Every pruning session now gives me new plants to share or expand my collection.
Documenting before and after photos helped me learn what techniques actually improved my plant’s appearance versus what just made me feel productive.
Seasonal timing made the biggest difference in recovery speed and color intensity of new growth.
You’ve mastered the art of pruning for maximum color, but there’s still one final piece of the puzzle! The environmental hacks that create year-round vibrancy will tie everything together – from using reflective surfaces to creating perfect microclimates that keep your Nanouk looking Instagram-ready in any season. Click “next” to discover these professional display secrets that’ll make your plant the envy of every plant parent!


GIPHY App Key not set. Please check settings