3. Butterfly Method (Tuber Propagation)
I’ll never forget the first time I spotted those weird little heart-shaped bumps on my String of Hearts vine. I honestly thought my plant was sick or something!
Turns out, I’d discovered nature’s own propagation hack – aerial tubers that are basically baby plants waiting to happen. Mind blown.
What Are These Mysterious Little Hearts?
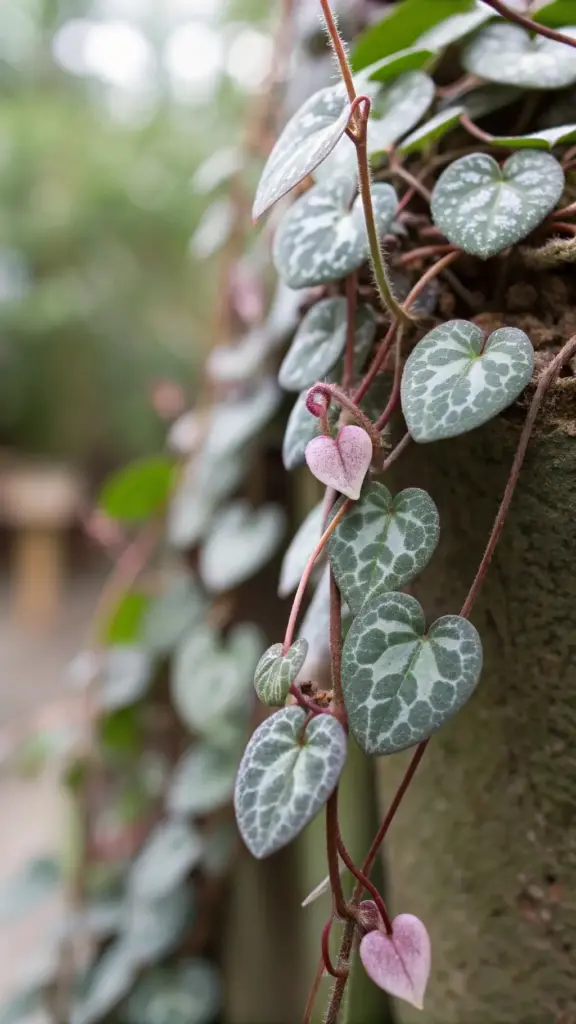
Those cute little butterfly-shaped growths you see along the vine aren’t random – they’re natural tubers that Ceropegia woodii produces as its survival mechanism.
Think of them as the plant’s insurance policy. In the wild, these tubers would drop to the ground and start new colonies.
Not every String of Hearts produces them, and honestly, I spent months wondering why some of my plants had them and others didn’t. Turns out it’s mostly about age and stress.
Mature plants that are slightly stressed (think bright light, less frequent watering) tend to produce more aerial tubers. It’s like the plant saying “better make some babies just in case!”
Spotting the Perfect Tubers for Propagation
Here’s what I learned the hard way: not all tubers are created equal. The best ones for tuber propagation are plump, firm, and at least the size of a small pea.
Avoid the tiny, shriveled ones – they usually don’t have enough stored energy to successfully root and grow.
The tuber should feel solid when you gently squeeze it, not mushy or hollow. A healthy tuber often has a slight pinkish or purplish tint.
Look for tubers that already have tiny root nubs or shoot tips starting to emerge. These are your golden tickets to propagation success!
Harvesting Without Killing Your Mother Plant
I used to just yank these things off like I was picking berries. Big mistake. This can damage both the tuber and the main vine.
Use clean, sharp scissors or pruning shears to cut the vine about an inch on either side of the tuber. You want to leave some vine attached – it helps with the transition.
The best time to harvest? When the tuber looks plump and the vine around it is healthy and green.
Don’t harvest all the tubers at once if you’re new to this. Start with one or two to get the hang of it.
Prep Work That Makes All the Difference
Here’s where the Butterfly Method gets its name – you’re going to cut that vine section with the tuber so it looks like a little butterfly with wings.
Trim the vine to about 1-2 inches on each side of the tuber. These vine sections will help anchor your new plant and provide extra propagation nodes.
Let the cut ends dry for about 30 minutes. This callusing period helps prevent rot when you plant them.
Don’t remove the tuber from the vine – they work better as a team during the establishment phase.
Planting for Maximum Success Rate
Use a small pot with excellent drainage and well-draining potting mix. I prefer the same succulent soil mix I use for regular cuttings.
Here’s the trick: plant the tuber so it’s sitting right at soil level, not buried deep. The vine sections should be laid on top of the soil with the nodes touching the surface.


Lightly press the vine sections into the soil but don’t bury them completely. You want good soil contact without suffocating them.
Water very lightly – just enough to settle the soil around the tuber. These things are way more drought-tolerant than regular cuttings.
Care During the Critical First Month
Tuber propagation is honestly the most low-maintenance method once you get it right. These little powerhouses come with their own food supply built in.
Keep the soil barely moist – think “slightly damp sponge” not “wet washcloth.” I check mine every 3-4 days and usually only water once a week.
Place in bright, indirect light. Direct sun can stress the developing plant, but too little light slows growth to a crawl.
Don’t fertilize during the first 6-8 weeks. The tuber has everything it needs, and fertilizer can actually burn the developing roots.
Signs Your Tuber Is Thriving
The first sign of success? New shoots emerging from the tuber, usually within 2-3 weeks. These look like tiny heart-shaped leaves.
You might also notice the vine sections starting to develop new growth points where they touch the soil. This is exactly what you want to see!
The tuber itself might shrink slightly as it uses its stored energy – this is totally normal and actually a good sign.
By week 4-6, you should have a proper little plant with multiple growth points and a developing root system.
Why This Method Beats Traditional Cuttings
Success rate is the biggest advantage – I’d say about 90% of viable tubers successfully establish, compared to maybe 70% for water or soil cuttings.
The plants grow faster too. That stored energy in the tuber gives them a serious head start over regular cuttings.
Less babysitting required. No daily water changes, no humidity domes, no constant monitoring. Plant it and mostly forget it.
The resulting plants are also more robust and seem to handle stress better than cutting-propagated plants.
Troubleshooting Tuber Problems
Mushy, black tubers mean rot has set in, usually from overwatering. Unfortunately, there’s no saving a rotted tuber.
If nothing happens after 4-5 weeks, the tuber might have been too immature or damaged during harvest.
Shriveled tubers that don’t plump up after planting were probably already past their prime when harvested.
Ready for a propagation method that’s practically foolproof? The Layering Propagation Approach coming up next is perfect for nervous plant parents who want guaranteed results. This technique lets you create new plants while they’re still attached to mama – it’s like training wheels for propagation! Click next to see how garden centers use this method for their most valuable specimens.


GIPHY App Key not set. Please check settings