2. Soil Propagation Technique
Okay, confession time: I was terrified of soil propagation for the longest time. It felt like I was burying my precious cuttings alive with no way to peek at what was happening underground.
But once I got the hang of it? Game changer. This method actually gives you stronger, more resilient plants than water propagation ever could.
Choosing Your Potting Mix (This Makes or Breaks Everything)
Here’s what I wish someone had told me from day one: regular potting soil is basically a death sentence for String of Hearts cuttings. These babies need well-draining soil or they’ll rot faster than you can say “propagation failure.”
My go-to mix now? Half succulent potting mix and half regular potting soil, with a handful of perlite thrown in for good measure.
You can also buy pre-made cactus soil – it works perfectly and saves you the mixing hassle. Just make sure it’s not bone dry when you use it.
The soil should feel light and airy, not dense and heavy. Think fluffy, not muddy.
Cutting Prep That Actually Sets You Up for Success
Start with a healthy cutting that’s about 4-6 inches long with multiple nodes visible. Those little bumpy spots are where your roots will emerge from.
Here’s where I used to mess up big time: I’d stick the cutting straight into soil without any prep. Don’t do this!
Let your cutting sit out for about 30 minutes to an hour after cutting. This allows the cut end to callus over slightly, which helps prevent rot.
Remove any leaves that would be buried in the soil. Buried leaves = rotting leaves = dead cutting. Trust me on this one.
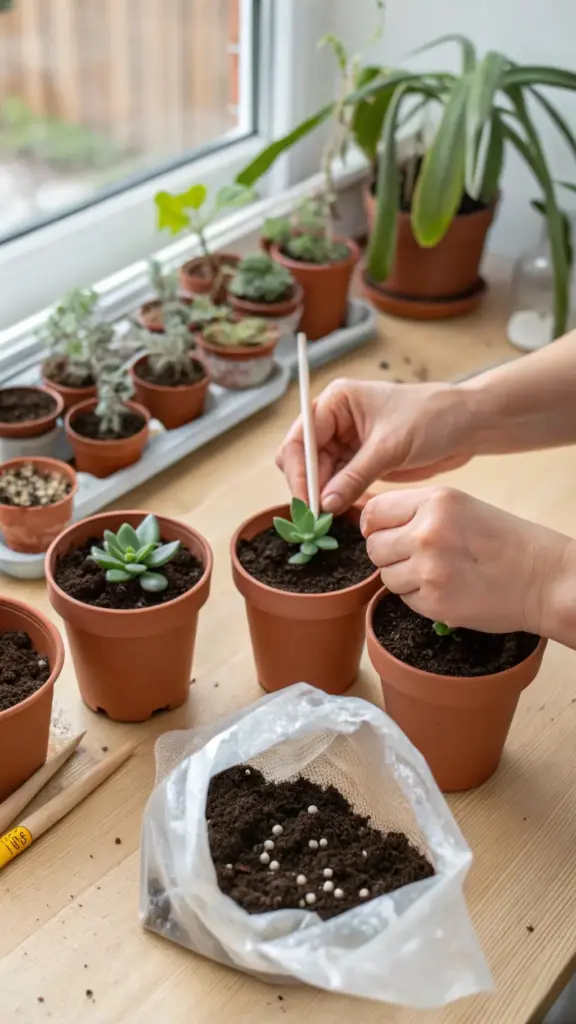
The Planting Process (Keep It Simple)
Use a small pot with drainage holes – this is non-negotiable. I learned this lesson after killing countless cuttings in cute pots without drainage.
Make a small hole in the soil with your finger, about 1-2 inches deep. Gently place the cutting so at least 2-3 nodes are buried in the soil.
Don’t pack the soil down hard. Just lightly firm it around the cutting so it stays upright.
Water lightly until you see a tiny bit of water come out the drainage hole. That’s your signal to stop.
Watering Schedule That Won’t Kill Your Cuttings
This is where most people (including past me) go completely wrong. Overwatering is the number one killer of soil propagation attempts.
For the first week, check the soil daily but only water when the top inch feels dry. Moist, not soggy is the goal here.


I use the finger test – stick your finger about an inch into the soil. If it’s dry, water lightly. If it’s still damp, leave it alone.
After roots establish (usually 2-3 weeks), you can water more thoroughly but less frequently.
Creating the Perfect Humidity Bubble
Here’s a pro tip that changed everything for me: create a mini greenhouse effect with a clear plastic bag or glass cloche.
Place the pot inside a clear plastic bag and seal it loosely. This creates the perfect humid environment for root development.
Don’t let the plastic touch the leaves – use chopsticks or small stakes to keep it propped up.
Remove the bag for a few hours every couple days to prevent mold issues. Fresh air circulation is important too.
Monitoring for Root Success (The Waiting Game)
Unlike water propagation, you can’t see what’s happening underground. This drove me crazy at first.
The first sign of success? New growth appearing at the tips of your cutting, usually around week 3-4.
You can also gently tug on the cutting after 2-3 weeks. If there’s resistance, congratulations – you’ve got root development happening!
Don’t be tempted to dig up the cutting to check. I’ve killed so many plants this way because I couldn’t control my curiosity.
Troubleshooting When Things Go Wrong
Mushy, black stems mean rot has set in. This usually happens from overwatering or poor drainage. Unfortunately, there’s no saving a rotted cutting.
If your cutting looks wilted but isn’t rotting, it might need more humidity. Try the plastic bag trick I mentioned earlier.
No growth after 6 weeks? The cutting might not have been healthy to begin with, or your soil might be staying too wet or too dry.
Yellow leaves are normal during the first few weeks – the plant is focusing energy on root development, not maintaining old leaves.
Want to know the secret method that literally uses the plant’s own natural tubers to create new plants? The Butterfly Method I’m sharing next is hands-down the most fascinating propagation technique, and it’s got the highest success rate of all five methods. Hit that next button to discover this garden center insider trick!


GIPHY App Key not set. Please check settings