5. Nurturing Seedlings Into Strong, Stocky Plants
Those first green sprouts? Adorable.
But here’s the truth nobody tells beginners: baby seedlings are drama queens.
One wrong move and they’re either stretching like noodles or keeling over dead.
I’ve killed more seedlings than I care to admit. But I learned what actually works.
The Leggy Seedling Trap
My first batch of tomatoes grew six inches tall with stems thinner than spaghetti.
Leggy seedlings happen when light’s too weak or too far away. They stretch desperately toward any glow like zombies.
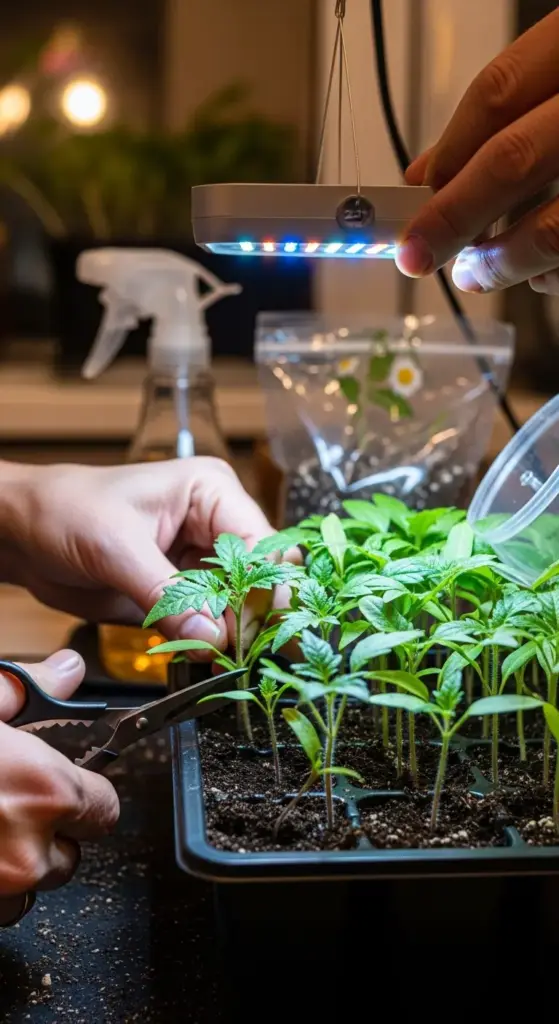
Keep your grow lights just 2–3 inches above the plants. Seriously—measure it. And run them 14–16 hours daily.
I use a $10 timer from Amazon so I don’t forget. My seedlings went from spindly to stocky in under a week once I fixed the light distance.
Thinning Without the Guilt Trip
When multiple seeds sprout in one cell, your instinct is to keep them all.
Bad idea.
Crowded seedlings compete for light and nutrients. They end up weak and disease-prone.
I used to feel terrible snipping extras. Then I tried leaving them—and lost the whole tray to mold.
Now I grab tiny scissors and snip the weakest sprouts at soil level. No yanking—just clean cuts. The survivors bush out beautifully.
It’s not cruel—it’s kindness to the plants that’ll actually thrive.
Feeding at the Right Moment
Those first rounded leaves? Those are cotyledons—basically seed food reserves.
Wait for the second set of leaves with jagged edges. Those are true leaves—your signal to start feeding.


I use diluted organic fertilizer at half strength once a week. Full strength burns delicate roots—learned that the hard way when my basil turned yellow overnight.
Bottom water with your fertilizer solution so nutrients wick up evenly. Your seedlings will thank you with thick, vibrant growth.
Hardening Off: Don’t Skip This!
Plopping indoor seedlings straight into your garden is like sending a cave dweller into Times Square.
They’ll shock and die.
Hardening off means gradually introducing them to outdoors over 7–10 days. Start with 1 hour of shade on day one. Add an hour daily plus gentle sun exposure.
I messed this up my second year—transplanted peppers on a warm day without hardening. They wilted within hours. Felt awful.
Now I use a folding tray on my balcony. Day 1: shade only. Day 4: morning sun. Day 7: full exposure. They transplant like champs.
Troubleshooting the Usual Suspects
Yellow leaves usually mean overwatering. Let the soil surface dry slightly between waterings.
White fuzzy mold? Poor airflow. I prop open my humidity dome slightly after sprouts appear and run a small fan nearby on low.
Damping off—when seedlings suddenly collapse at the soil line—is the worst. Caused by cold, wet soil and non-sterile mix. Prevention is key: use fresh seed starting mix, avoid overcrowding, and water carefully.
I keep a spray bottle of diluted chamomile tea handy. It’s a gentle antifungal that’s saved several trays when I spotted early mold.
Honestly? Strong seedlings start with consistent light, gentle feeding, and patience during hardening off.
It’s not complicated—but each step matters more than you’d think.
And guess what? You can make half your seed starting supplies from stuff already in your kitchen junk drawer.
Next up I’m sharing three DIY hacks that actually work—including the egg carton trick everyone talks about (plus two you’ve probably never heard). Click next to see how your recycling bin becomes a seed starting powerhouse 👇


GIPHY App Key not set. Please check settings