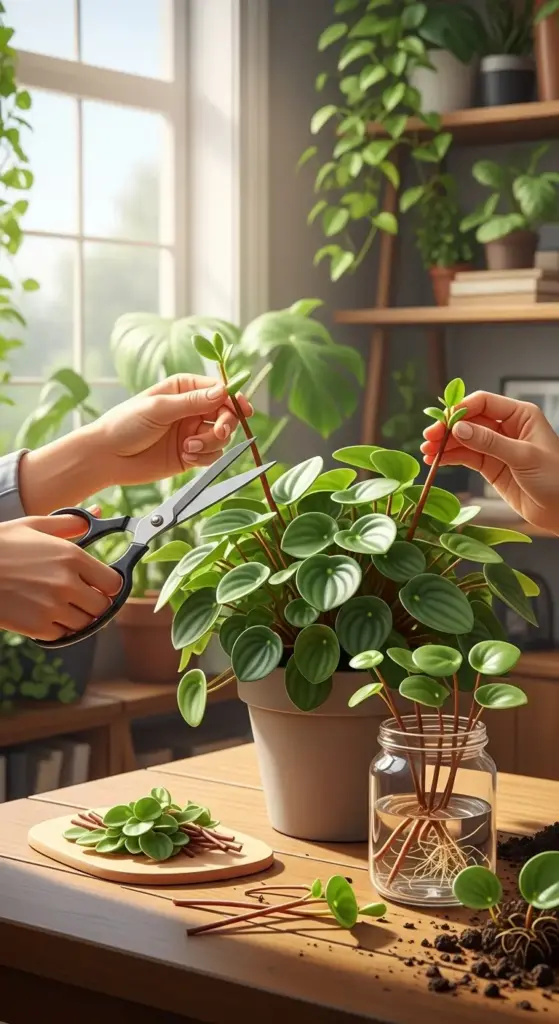
6. Advanced Pruning Techniques for Fuller, Bushier Plants
I used to be terrified of cutting my peperomias – what if I killed them? But avoiding pruning actually made my plants look worse over time.
Learning proper peperomia pruning techniques transformed my scraggly, leggy plants into full, gorgeous specimens that everyone asks about. The difference is absolutely mind-blowing!
Strategic Cutting for Maximum Bushiness
The secret is knowing exactly where to make your cuts. Most people just randomly snip stems and wonder why their plants don’t get bushier.
Always cut just above a node – that’s where new growth will emerge. I use clean, sharp scissors and make the cut at a 45-degree angle about 1/4 inch above the node.
The magic happens when you cut the main growing tip. This forces the plant to send energy to dormant nodes lower on the stem, creating multiple new branches.
I target stems that are getting too long or growing in awkward directions. Strategic pruning redirects growth exactly where you want it.
Never cut more than 1/3 of the plant at once. Peperomias need time to recover between major pruning sessions, or you’ll stress them into shock.
The Pinching Method That Changes Everything
This gentle technique is perfect for encouraging peperomia growth without the trauma of cutting. I wish someone had taught me this years ago!
Use your thumb and forefinger to pinch off the very tip of growing stems. Just the tiny growing point – we’re talking about removing less than 1/4 inch.
The best time for pinching is when you see new growth actively developing. The plant responds immediately by pushing out side shoots.
I pinch my peperomias every 2-3 weeks during growing season. Regular pinching creates incredibly dense, compact growth that looks professionally maintained.
This method works especially well on trailing varieties like Peperomia prostrata. Pinching the tips makes them branch out instead of just getting longer.
Shaping Your Peperomia Like a Professional
Creating that perfect, rounded shape takes patience and strategy. I’ve learned to think like a sculptor when shaping peperomias.
Start by identifying the natural growth pattern of your plant. Some peperomias want to be tall and upright, others prefer a spreading, mounded shape.
Work with the plant’s natural tendencies rather than fighting them. Forcing an upright peperomia to trail usually results in weak, unhappy growth.
I rotate my plants weekly while pruning to ensure even shaping from all angles. Symmetrical peperomias look so much more professional and healthy.
Remove any stems that cross over each other or grow toward the center. Good air circulation prevents fungal issues and promotes better overall health.
Rescuing Leggy, Bare-Stemmed Plants
Don’t give up on those sad, stretched-out peperomias! I’ve brought back plants that looked absolutely hopeless with these leggy peperomia fixes.
Severe pruning is often the only solution for extremely leggy growth. Cut stems back to 2-3 inches from the soil line – it sounds brutal, but it works.
The key is doing this during active growing season when the plant can quickly recover. Never attempt severe pruning during winter dormancy.
I cut leggy stems at different heights to create a more natural, layered look as new growth emerges. Staggered cutting prevents that “buzz cut” appearance.


After severe pruning, reduce watering by about 50% until new growth appears. The reduced leaf surface means less water uptake and higher rot risk.
Filling Sparse Areas with Pruned Cuttings
Here’s my favorite trick for creating instantly fuller plants. Those pruned peperomia cuttings don’t have to go to waste!
Root your cuttings using the water propagation method, then plant them directly back into the original pot. This creates the illusion of much denser growth.
I strategically place rooted cuttings in bare spots around the mother plant. Within a few months, you can’t tell where the original plant ends and the additions begin.
Multiple plants in one pot also creates more visual impact. I often combine 3-4 small peperomias in a larger container for that lush, full look.
Make sure all the plants have similar care requirements. Mixing different peperomia varieties with vastly different needs usually ends in disaster.
Timing Your Pruning Sessions
When you prune is just as important as how you prune. I learned this lesson after killing several plants with poorly timed cuts.
Spring is absolutely the best time for major pruning. The increasing daylight triggers rapid new growth that quickly fills in pruned areas.
I avoid heavy pruning from October through February unless I’m providing supplemental lighting. Plants need energy reserves to survive winter dormancy.
Light maintenance pruning can happen year-round. Pinching growing tips and removing dead or damaged leaves doesn’t stress the plant significantly.
Always prune in the morning when plants are fully hydrated. Stressed, wilted plants don’t recover well from pruning trauma.
Post-Pruning Care That Ensures Success
Your peperomia aftercare determines whether pruning helps or hurts your plants. I’ve made every mistake possible in this department!
Increase humidity slightly for the first two weeks after major pruning. The reduced leaf surface makes plants more susceptible to moisture stress.
Hold off on fertilizing for about a month after severe pruning. Stressed peperomias can’t process nutrients properly and may suffer fertilizer burn.
Watch for signs of shock like wilting or yellowing leaves. If this happens, move the plant to slightly lower light until recovery begins.
I keep a pruning journal noting what I cut and when. This helps me track which techniques work best for each variety in my collection.
Conclusion
These six professional peperomia tricks have completely transformed how I approach houseplant care, and I know they’ll do the same for you! From creating the perfect humidity pockets to mastering that secret soil mix, you now have the insider knowledge that separates thriving plant parents from struggling ones.
Remember, every plant is unique, so start with one or two techniques and observe how your peperomias respond. Your beautiful green companions will thank you with lush, vibrant growth that’ll make your friends wonder what your secret is!
Ready to become the peperomia expert in your friend group? Start with the humidity pocket method today – it’s the easiest trick with the most dramatic results. Share your before and after photos in the comments below, and don’t forget to save this guide for future reference!


GIPHY App Key not set. Please check settings