5. Propagation Secrets That Guarantee Success
I used to kill more peperomia cuttings than I successfully rooted. It was heartbreaking watching those beautiful leaves shrivel up and die in my propagation attempts.
Everything changed when I learned these professional secrets. Now I have a 95% success rate with peperomia propagation – and you can too!
The Water Propagation Method That Never Fails
Forget everything you’ve heard about soil propagation for peperomias. Water propagation is where the magic happens, and here’s exactly how to do it.
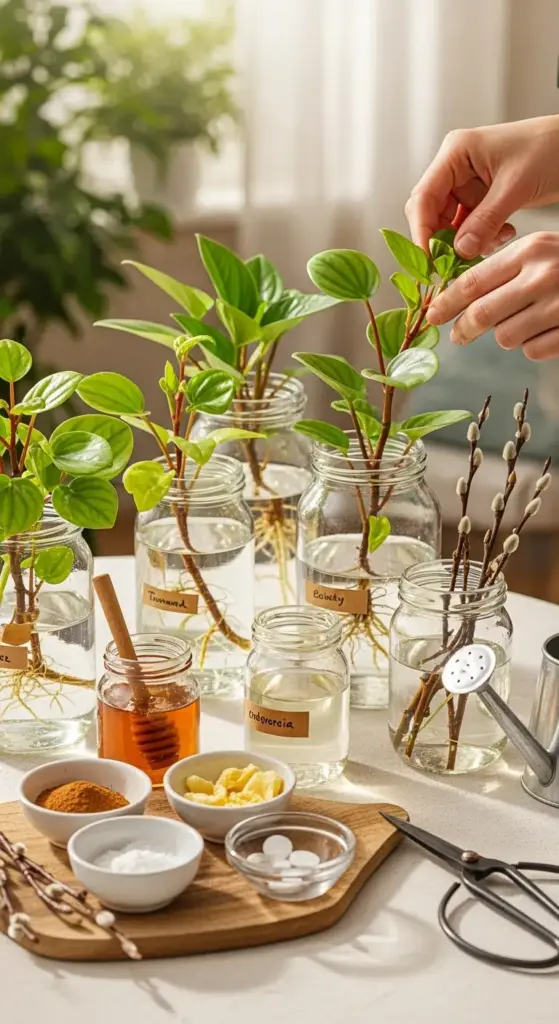
Use a clear glass jar filled with room-temperature distilled water. The clarity lets you watch root development, and distilled water prevents mineral buildup.
Cut your peperomia stem just below a node – that little bump where leaves emerge. This is where the roots will develop, so don’t skip this step.
Remove any leaves that would sit below the waterline. Submerged leaves will rot and contaminate your entire propagation setup.
I change the water every 3-4 days religiously. Fresh water provides oxygen to developing roots and prevents bacterial growth that kills cuttings.
Place your jar in bright, indirect light – the same conditions you’d give a mature peperomia. Direct sun will cook your delicate cuttings.
Timing Your Propagation Like a Pro
This is the secret that doubled my propagation success rate. Most people try to propagate at the wrong time of year and wonder why nothing works.
Spring and early summer are absolute gold for peperomia propagation. The plants are actively growing, and root development happens lightning fast.
I avoid propagating from October through February unless I’m using grow lights. Low light and cool temperatures make root development painfully slow.
The best time of day? Early morning when the parent plant is fully hydrated. Stressed, wilted cuttings rarely survive the propagation process.
I also wait for at least 24 hours after watering the parent plant. Overly turgid stems can actually split when cut, ruining your propagation attempts.
Creating Multiple Plants from One Cutting
Here’s where things get really exciting. One healthy peperomia cutting can become 3-4 new plants if you know this trick!
Look for nodes along your cutting – each node can potentially develop into a separate plant. I carefully cut between nodes to create multiple propagation pieces.
Each cutting needs at least one node and 2-3 leaves to survive. Smaller pieces work, but they take longer to establish and have lower success rates.
Leaf propagation works too, but it’s trickier. Choose thick, healthy leaves and let the cut end callus for 24 hours before placing in water.
I’ve successfully propagated single peperomia leaves by placing just the stem end in water. It takes 6-8 weeks, but tiny plantlets will emerge from the base.
Kitchen Ingredient Rooting Hormones That Work
Commercial rooting hormones are expensive and often unnecessary for peperomias. These DIY alternatives work just as well – sometimes better!


Cinnamon powder is my go-to rooting aid. Dust the cut end lightly before placing in water. It prevents rot and actually stimulates root development.
Honey works incredibly well too – just dip the cutting end in raw honey before propagation. The natural enzymes promote healthy root growth.
Apple cider vinegar is another secret weapon. Add one teaspoon to a cup of propagation water for faster, stronger root development.
I’ve even used crushed aspirin tablets – one tablet dissolved in a cup of water creates a natural rooting solution that rivals commercial products.
Willow water is the ultimate DIY rooting hormone. Soak willow branches in water for 24 hours, then use that water for propagation. The results are absolutely incredible.
Troubleshooting Propagation Disasters
Even with perfect technique, things can go wrong. Here’s how to save failing peperomia propagations before it’s too late.
Mushy, black stem ends mean bacterial rot has set in. Cut above the rot immediately, let the cut dry for an hour, then start fresh in clean water.
Yellowing leaves during propagation are usually normal – the cutting is redirecting energy to root development. Don’t panic unless all leaves are affected.
If roots aren’t developing after 3 weeks, try moving to a warmer location. Peperomia root development slows dramatically in temperatures below 65°F.
Cloudy propagation water is a red flag. Change it immediately and rinse the cutting gently. Add a tiny piece of activated charcoal to prevent future issues.
Cuttings that wilt despite being in water often have air bubbles blocking water uptake. Recut the stem underwater to eliminate air pockets.
When to Transplant Your New Babies
This timing is crucial – transplant too early and you’ll kill your new plants. Wait too long and the roots become fragile and tangled.
Perfect transplant timing is when roots are 1-2 inches long and you can see multiple root tips developing. This usually takes 3-5 weeks.
I use a very light potting mix for newly transplanted propagations – about 50% regular potting soil and 50% perlite for extra drainage.
Keep newly transplanted peperomias in slightly higher humidity for the first two weeks. I cover them with clear plastic bags to ease the transition.
Water very lightly for the first month. Those new roots are delicate and can’t handle the same watering schedule as mature plants.
Ready to transform your leggy, sparse peperomias into full, bushy showstoppers? Click “next” to discover the advanced pruning techniques that will make your plants so lush, your friends will think you bought new ones!


GIPHY App Key not set. Please check settings