


5. Strategic Pruning and Harvesting for Bushier Plants
I used to be terrified of cutting my rosemary plants. They looked so perfect and healthy that I didn’t want to “hurt” them by trimming anything off.
Big mistake! My rosemary grew tall and scraggly, with all the good growth at the top and bare, woody stems at the bottom. It looked more like a tiny tree than the bushy herb I was hoping for.
The Pinching Technique That Changes Everything
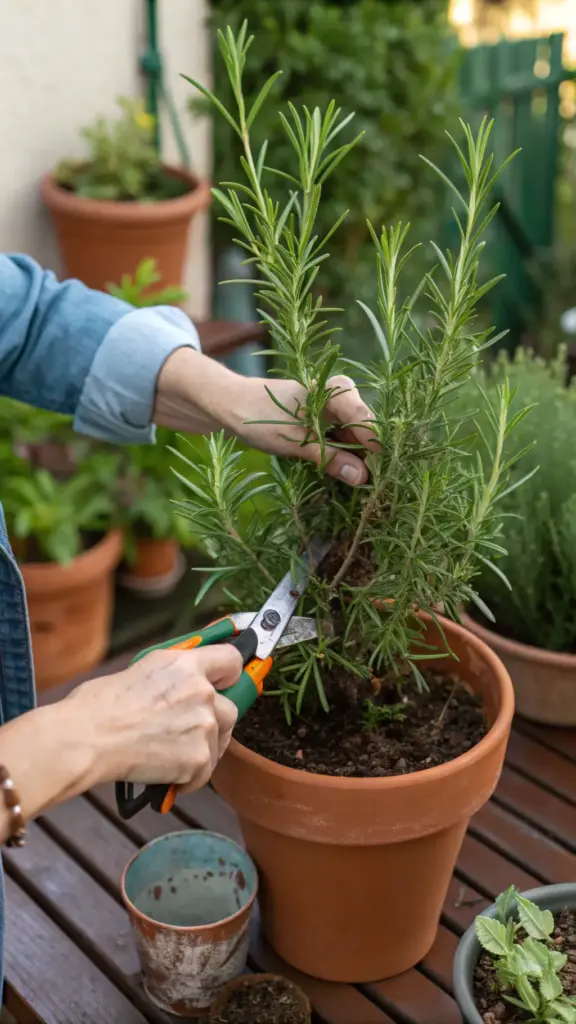
Here’s the secret I learned from a master gardener: pinch early and pinch often. When your rosemary stems are about 4-6 inches long, pinch off the top inch or two with your fingernails.
This forces the plant to branch out instead of just growing taller. Each pinch creates two new growing points where you had one before.
I pinch my rosemary every 2-3 weeks during the growing season. It feels weird at first, but you’ll see new growth sprouting from below the pinch point within days.
Never pinch more than one-third of the plant at once. I learned this the hard way when I got overzealous and shocked a plant into dormancy for months.
The best time to pinch is in the morning when the stems are full of moisture. They snap cleanly and heal faster than when the plant is stressed from afternoon heat.
Harvesting Methods That Keep Plants Producing
When I harvest rosemary now, I think of it as strategic pruning rather than just grabbing what I need for dinner. Every cut should encourage more growth.
I always cut just above a leaf node or where two stems meet. This gives the plant a clear signal of where to send new growth.
Instead of taking little snips from all over the plant, I harvest entire stems from the outside edges. This keeps the plant’s shape while encouraging branching from the center.
Morning harvesting gives you the most aromatic herbs because the essential oils are at their peak before the heat of the day. Plus, the plant recovers faster from cuts made in cooler temperatures.
I never harvest more than 25% of the plant at once, especially during the first year. Young rosemary needs time to establish strong root systems before heavy harvesting.
Seasonal Pruning That Works With Nature
Spring pruning is when I do my major shaping. After the last frost, I cut back about one-third of the previous year’s growth to encourage bushy new shoots.
Summer is all about light harvesting and pinching. I focus on removing flower buds (unless I want them for cooking) because flowering can make the leaves less flavorful.
Fall pruning depends on your climate. In mild areas, I do a light trim to clean up the plant. In cold regions, I leave the pruning until spring to protect against frost damage.
I learned not to prune rosemary in late fall in cold climates. New growth doesn’t have time to harden off before winter, making the whole plant more vulnerable to freezing.


Different Varieties Need Different Approaches
Upright varieties like ‘Tuscan Blue’ can handle more aggressive pruning. I cut these back by up to 40% in spring and they bounce back beautifully.
Prostrate varieties like ‘Prostratus’ need gentler handling. I focus on pinching growing tips rather than making major cuts.
Dwarf varieties in containers rarely need heavy pruning. Light pinching and harvesting usually keep them the perfect size and shape.
I’ve found that woody, older stems on any variety don’t regenerate well from hard cuts. Focus your pruning on younger, green growth for best results.
Turning Harvests Into Kitchen and Home Treasures
Every time I harvest rosemary, I sort it into cooking portions and drying bundles. Nothing goes to waste when you plan ahead.
Fresh sprigs go straight into olive oil for infused cooking oil. I keep a jar going all the time – it’s amazing on roasted vegetables.
Longer stems get bundled and hung to dry in my kitchen. Dried rosemary keeps for months and makes beautiful, aromatic decorations.
I freeze whole stems in ice cube trays with olive oil. Pop out a cube whenever you need fresh rosemary flavor for soups or roasts.
Free Plants From Your Pruning Scraps
Here’s my favorite trick: every pruning session becomes a propagation opportunity. Those 4-6 inch cuttings you remove are perfect for starting new plants.
Strip the leaves from the bottom 2 inches of each cutting and stick them in a glass of water. Change the water every few days and you’ll see roots in 2-3 weeks.
I’ve also had great success rooting cuttings directly in moist potting mix. Cover with a plastic bag to maintain humidity and keep in bright, indirect light.
Semi-hardwood cuttings taken in late summer root the fastest. These are stems that are starting to turn woody but still bend easily.
I always take more cuttings than I need because not all of them will root. It’s better to have extras to give away than to run out of successful propagations.
Ready to give your rosemary the nutrition it craves without overdoing it? The next section reveals the feeding secrets that professional growers use to boost aromatic oil production while avoiding the fertilizer mistakes that kill container herbs!


GIPHY App Key not set. Please check settings