4. Mint: The Refreshing Wealth Builder
I used to think mint was just that stuff you put in mojitos until I discovered it’s basically nature’s way of giving you a millionaire’s garden on a shoestring budget.
One small mint plant turned into the most lush, abundant display on my entire porch – and it cost me less than a fancy coffee drink.
How Mint Creates That Expensive Abundance Look
Here’s what nobody tells you about mint – it’s the ultimate overachiever in the herb world. While other plants are being all precious and slow-growing, mint just explodes into this gorgeous, full display that looks like you spent serious money.
I planted one tiny spearmint plant in a 12-inch pot last spring. By midsummer, it looked like a professional landscaper had installed a mature herb feature.
The secret is in the growth habit. Mint spreads through underground runners, creating this naturally full, cascading effect that screams “established garden.” Those heart-shaped leaves layer on top of each other, creating incredible texture and depth.
The fragrance factor is unbeatable too. Every breeze carries that fresh, clean scent that makes your whole porch feel like an expensive spa retreat.
Containing Mint Without Killing the Visual Impact
Okay, let’s address the elephant in the room – mint’s reputation for taking over everything. I learned this lesson the hard way when my first mint plant tried to colonize my neighbor’s yard through the fence cracks!
Container growing is actually mint’s sweet spot. It gives you all that lush abundance without the world domination drama.
The trick is choosing containers that are wide rather than deep. Mint spreads horizontally, so a 16-inch wide, 8-inch deep pot works better than a narrow, tall one.
I discovered the “pot-in-pot” method for larger displays. Plant mint in a smaller container, then nestle that inside a larger decorative pot. The mint gets contained, but you still get that full, overflowing look.
Double-potting also makes maintenance easier – you can lift out the inner pot for root pruning without disturbing your whole arrangement.
Tiered and Hanging Systems That Maximize Drama
This is where I got really creative and honestly had the most fun with mint displays.
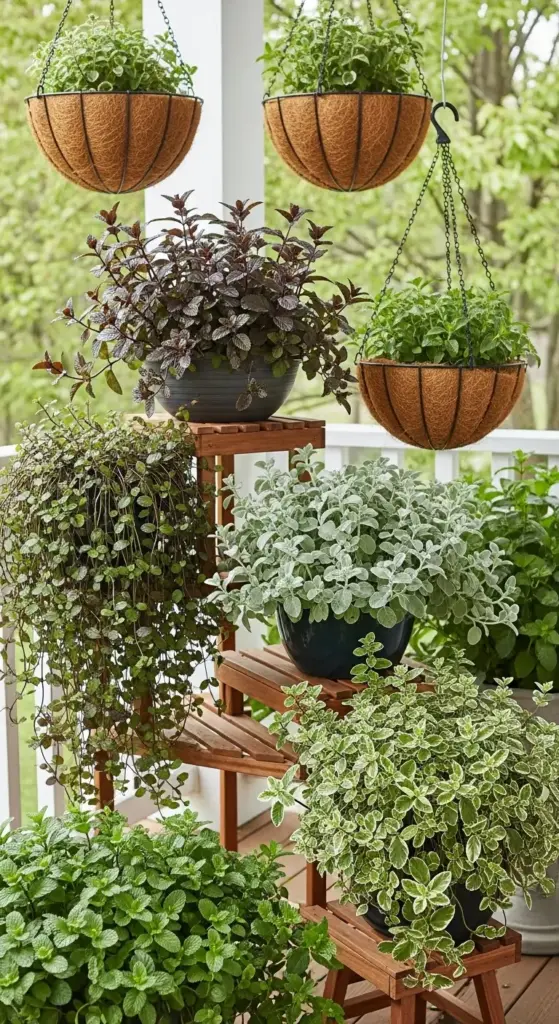
Tiered plant stands are perfect for mint because you can create this cascading waterfall effect. I use three different sized pots on a wooden ladder-style stand – chocolate mint on top, spearmint in the middle, and trailing apple mint on the bottom.
The visual impact is incredible – it looks like a professional herb installation but cost me maybe $25 total.
Hanging baskets transformed my small porch space. Mint naturally wants to trail and cascade, so hanging containers let it do its thing while saving precious floor space.
I learned to use coconut fiber liners in wire baskets – they look rustic and expensive while providing perfect drainage. The mint grows through the sides, creating this living sculpture effect.
Pro tip: Stagger hanging baskets at different heights. Creates depth and makes your space look bigger and more professionally designed.
Varieties That Add Color and Texture Interest
After growing probably 10 different mint varieties, I’ve learned which ones pack the biggest visual punch beyond just basic spearmint.
Chocolate mint is my absolute favorite for containers. Those dark purple stems and bronze-tinged leaves create incredible contrast, plus it smells like an after-dinner mint. Seriously, guests always ask what that amazing plant is.


Apple mint has these gorgeous fuzzy, rounded leaves that add completely different texture. The silvery-green color is sophisticated, and it trails beautifully in hanging containers.
Pineapple mint brings variegated leaves – green with creamy white edges that look almost ornamental. It’s like having a decorative houseplant that you can also use in cooking.
I discovered that mixing three varieties in one large container creates this incredible tapestry of colors and textures. It looks intentional and expensive instead of just “I threw some mint in a pot.”
Harvesting Techniques for Continuous Fullness
Here’s where I learned the difference between having mint plants and having gorgeous mint plants that stay full and productive all season.
Frequent harvesting is actually the secret to better-looking plants. The more you cut, the bushier and fuller they become. I harvest at least twice a week during peak growing season.
The key is cutting just above leaf nodes – those little bumps where new growth emerges. This encourages branching and creates that dense, lush look that screams “well-maintained garden.”
I learned to pinch flowers immediately when they appear. Mint flowers are pretty, but letting them develop makes the leaves bitter and the plant gets leggy. Constant pinching keeps everything looking full and fresh.
My weekly routine: Walk around with kitchen shears and harvest whatever I need for cooking, plus a little extra. The plants respond by getting even fuller and more beautiful.
Budget-Friendly Solutions Under $35
Here’s exactly what I spent on my most successful mint display setup:
Option 1: Tiered Display
- Three different mint plants: $12
- Wooden plant stand: $15
- Three matching pots: $8
- Total: $35 for a professional-looking arrangement
Option 2: Hanging Garden
- Two mint varieties: $8
- Wire hanging baskets (2): $10
- Coconut fiber liners: $6
- Hanging hardware: $5
- Total: $29 for a space-saving vertical display
My biggest money-saving discovery? Mint is incredibly easy to propagate. One plant becomes five plants in just a few weeks by rooting cuttings in water.
Free multiplication method: Cut 4-inch stems, strip lower leaves, stick in water. Roots appear in 7-10 days. I’ve literally never had a mint cutting fail to root.
This means you can buy one plant of each variety and create an entire mint garden for the cost of three plants. I’ve given away dozens of rooted cuttings to friends – it’s like having a mint money tree.
Thrift store container hunting is where I found my best deals. Old colanders, vintage planters, even repurposed kitchen items work perfectly for mint. The weathered, eclectic look actually adds to that expensive, curated garden aesthetic.
Pro budget tip: Start with just spearmint and chocolate mint – they’re the most visually dramatic and easiest to find. You can always add specialty varieties later as your collection grows.
The ongoing value is amazing too. Fresh mint for cocktails, teas, cooking, and natural pest control. Plus that constant feeling of abundance and luxury every time you step onto your porch.
Ready to add some delicate sophistication to your herb empire? Click “next” to discover Thyme: The Delicate Millionaire’s Touch – the tiny herb with huge visual impact that creates those cascading, textured displays you see in the fanciest gardens, all for less than the cost of a nice dinner out!


GIPHY App Key not set. Please check settings