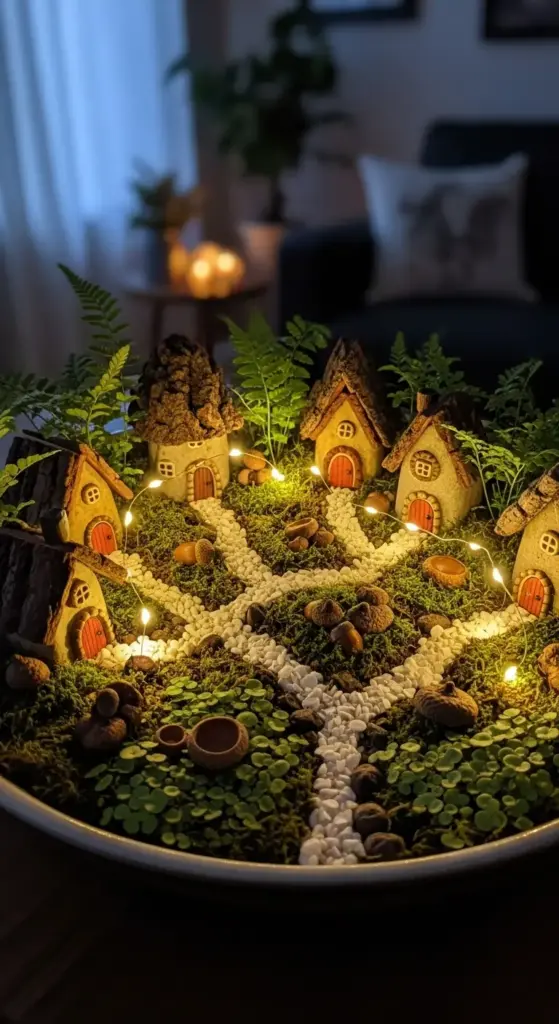
3. The Fairy Garden Wonderland
My daughter rolled her eyes when I told her I was making a fairy garden at age 35. “Mom, that’s for little kids,” she said.
Three months later, she was asking if we could make one for her room too.
There’s something absolutely magical about creating these tiny worlds that makes you feel like you’re playing again. But don’t let anyone fool you – a good fairy garden takes real planning and the right plants.
The Perfect Miniature Plants That Actually Stay Small
Baby tears was my first choice because everyone said it was “easy.” Well, easy to grow maybe, but this stuff spreads faster than gossip in a small town.
I learned to trim it back every two weeks or it completely takes over the entire display. The key is using it as ground cover, not letting it become the main event.
Small ferns add that lush, woodland feeling that makes fairy gardens feel authentic. I use button ferns because they stay naturally compact.
Maidenhair ferns are gorgeous but honestly? They’re drama queens about humidity. I killed three before switching to the much more forgiving brake ferns.
Moss varieties are where the magic really happens. I collect different types from my yard after rainy days – just make sure you’re not taking from protected areas.
Sheet moss creates perfect fairy lawns, while cushion moss looks like tiny green hills. The texture contrast is everything in these miniature landscapes.
DIY Fairy Houses That Don’t Look Homemade
My first fairy house was made from a yogurt container and looked exactly like what it was – trash covered in paint.
Natural materials are your best friend here. I collect interesting pieces of bark, small stones, and twigs during walks in the park.
Polymer clay lets you create custom doors and windows that actually look proportional. I bake small batches in my toaster oven – just don’t tell my husband I’m using kitchen appliances for crafts.
Acorn caps make perfect fairy bowls and planters. Pine cones can be turned into rustic fairy houses with just a little creativity and some moss glue.
Hot glue is your secret weapon for assembling everything. It dries clear and holds up to watering better than regular craft glue.
For windows, I use tiny pieces of clear plastic from packaging. It catches light beautifully and makes the houses look inhabited.
Creating Pathways That Lead Somewhere
This is where most people go wrong – they just scatter pebbles randomly and call it a path.
Crushed shells create the most magical pathways, especially when light hits them. I get mine from the craft store, but beach trips work too if you’re lucky enough to live near the coast.


Plan your pathway first before placing anything else. I sketch it out on paper because once plants are in place, it’s hard to change your mind.
Tiny river rocks work perfectly for more rustic fairy gardens. Sort them by size – the uniformity makes all the difference between amateur and professional-looking displays.
Curved pathways look more natural than straight lines. Think about how you’d actually walk through a miniature forest.
Sand mixed with the pebbles helps everything stay in place during watering. I learned this after my beautiful shell pathway got completely scattered the first time I watered.
Lighting That Creates Pure Magic
Battery-operated LED fairy lights changed everything for my displays. The warm white ones create this incredible ambiance in the evenings.
I wrap them around tiny branches to create “street lamps” for my fairy villages. The key is hiding the battery pack – I usually tuck it behind the largest plant or house.
Solar fairy lights work great if your garden gets decent sunlight during the day. They automatically turn on at dusk, which feels genuinely magical.
Avoid the multicolored lights unless you’re going for a carnival theme. Warm white or soft yellow creates that enchanted forest feeling you’re after.
Copper wire lights are incredibly flexible and easy to shape around miniature structures. They’re more expensive but worth it for the professional look.
Seasonal Swaps That Keep Things Fresh
This is honestly my favorite part – changing out decorations keeps the fairy garden feeling alive and current.
Spring calls for tiny silk flowers and maybe a miniature Easter egg hidden behind a mushroom. I add small flowering plants like miniature violets if I can find them.
Summer decorations include tiny beach chairs made from popsicle sticks and maybe a miniature picnic setup. Small succulents work great for summer displays.
Fall is perfect for miniature pumpkins, tiny scarecrows, and switching to plants with autumn colors. I collect small colorful leaves and press them for fairy decorations.
Winter fairy gardens get battery-operated snow (yes, that’s a thing) and tiny evergreen sprigs. White sand creates perfect snow effects that won’t melt or get moldy.
Holiday themes work amazingly well – tiny Christmas trees, miniature Halloween decorations, even small Valentine’s hearts. The key is keeping everything to scale.
Ready to transport yourself to the desert without leaving your living room? The next section reveals how to create a stunning desert landscape that’s virtually maintenance-free and looks like it belongs in a high-end spa. I’m talking about the three-layer sand technique that creates realistic dunes and the surprising plant that everyone thinks is fake! Click “next” to discover desert magic.


GIPHY App Key not set. Please check settings