Did you know that String of Hearts is one of the most requested plants at garden centers, with propagation success rates jumping to 95% when using professional techniques?
If you’ve ever wondered how garden centers manage to create those gorgeous, full trailing plants that seem impossible to replicate at home, you’re in for a treat!
As someone who’s spent countless hours perfecting plant propagation (and yes, I’ve killed my fair share of cuttings along the way), I’m excited to share the insider secrets that professional growers use. These aren’t your typical “stick it in water and hope” methods – these are tried-and-true techniques that actually work.
Whether you’re looking to expand your plant collection, create beautiful hanging displays for your home decor, or even start a little side business, mastering these propagation methods will transform your gardening game completely!
1. Water Propagation Method
Let me tell you, water propagation was my gateway drug into the world of String of Hearts obsession. I still remember staring at my first cutting floating in a mason jar, wondering if anything would actually happen.
Spoiler alert: it did, and now I have more String of Hearts plants than I know what to do with!
Getting Started: The Right Setup
The biggest mistake I made early on? Using tap water straight from the faucet. Don’t be like past me.
Filtered water or distilled water works so much better because it doesn’t have all those chemicals that can mess with root development. I learned this the hard way after watching three perfectly good cuttings just… sit there for weeks doing absolutely nothing.
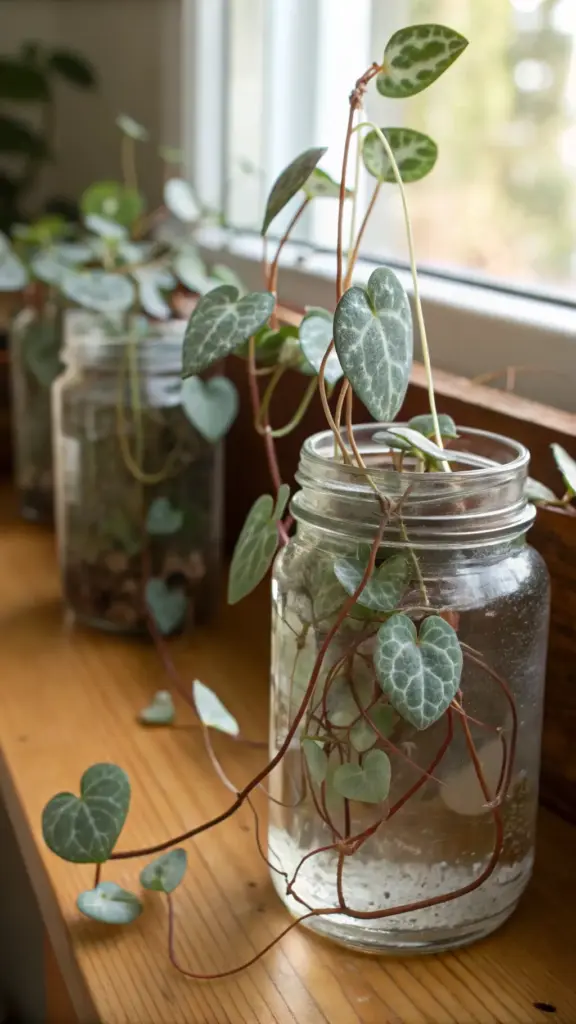
For containers, forget those fancy propagation stations you see on Instagram. A simple glass jar or even a clear plastic cup works perfectly fine.
The key is making sure it’s transparent so you can watch those roots develop. Trust me, you’ll become obsessed with checking on them daily!
The Step-by-Step Process That Actually Works
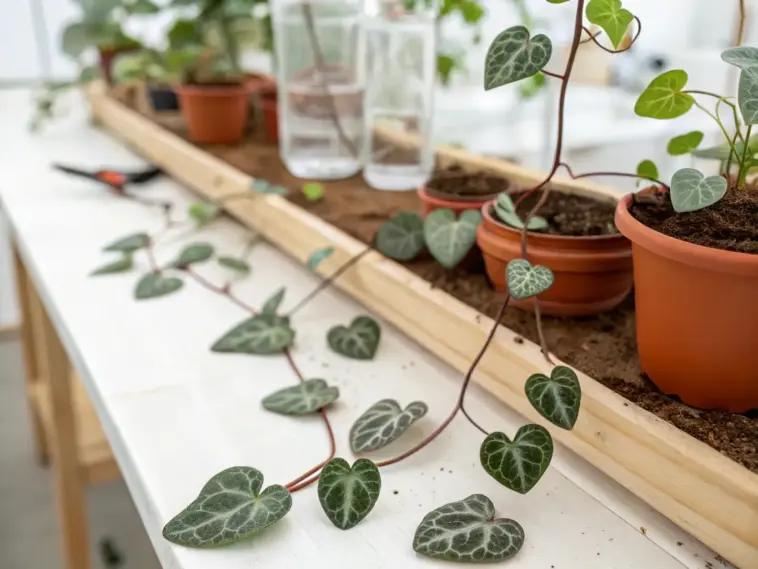
First, take your String of Hearts cutting and make sure it’s at least 4-6 inches long with several nodes. Those little bumpy spots along the vine? Those are your propagation nodes – they’re where the magic happens.
Remove any leaves that would sit below the waterline. This step is crucial because submerged leaves will rot and turn your water into a gross, smelly mess.
Fill your container with about 2-3 inches of water. You don’t need much – just enough to cover the nodes.
Place the cutting so the nodes are submerged but most of the leaves stay above water. I usually rest the vine on the rim of the jar.
Timeline and What to Expect
Here’s where patience becomes your best friend. Root development typically starts around day 7-10, but don’t panic if you don’t see anything yet.
I’ve had cuttings take up to three weeks to show their first tiny white roots. The water temperature and lighting conditions really affect this timeline.
By week 2-3, you should see some serious root action happening. Those roots will look like tiny white threads at first.
Common Mistakes That’ll Make You Want to Quit
Changing the water too often is probably the biggest newbie mistake. I used to change it every other day thinking I was being helpful.
Wrong! This actually stresses the cutting and can slow down root development. Change the water only when it gets cloudy or starts smelling funky – usually every 5-7 days.
Another killer mistake? Placing your propagation setup in direct sunlight. These cuttings prefer bright, indirect light while they’re developing roots.
I fried so many cuttings on my sunny windowsill before figuring this out. Learn from my plant casualties!
Making the Transition to Soil
This is where things get tricky, and honestly, where I lost quite a few plants in the beginning. The transition period from water to soil is delicate.
Wait until your roots are at least 1-2 inches long before even thinking about soil. Shorter roots just aren’t strong enough to handle the change.
When you’re ready, use a well-draining potting mix – I like mixing regular potting soil with some perlite for extra drainage. Succulent soil works great too.
Keep the soil consistently moist (not soaking!) for the first few weeks. The roots are used to constant moisture from the water propagation.
Pro Tips That Changed My Game
Add a tiny piece of activated charcoal to your water to keep it cleaner longer. This little trick has saved me so much hassle with water changes.
Room temperature water works best – cold water can shock the cutting, and warm water encourages bacteria growth.
If you’re dealing with hard water in your area, let tap water sit out overnight before using it. This helps some of the chemicals evaporate off.
Ready to level up your propagation game even more? The soil propagation technique I’m covering next is actually my personal favorite method – it’s faster, less fussy, and gives you stronger plants right from the start. Click that next button below to discover why garden centers swear by this method!

GIPHY App Key not set. Please check settings