7. Propagation Station Setup
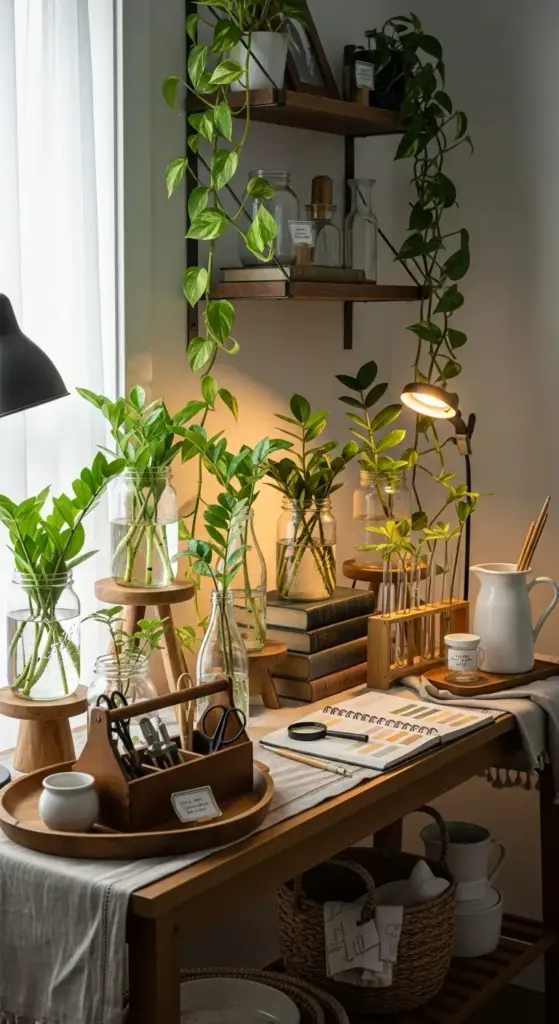
Propagation station setup is where function meets Instagram-worthy style. I used to have random jars and containers scattered all over my house until I realized I needed a dedicated space.
Game changer! Having everything organized in one beautiful spot actually improved my propagation success rates and made the whole process more enjoyable.
Now my propagation station is honestly one of my favorite corners of the house – guests always ask about it.
Creating Your Instagram-Worthy Display
Aesthetic propagation stations don’t happen by accident – they require thoughtful planning. I learned this after my first attempt looked like a science experiment gone wrong.
Start with a cohesive color palette. I stick to clear glass, natural wood, and white ceramics for a clean, modern look that photographs beautifully.
Varying heights is crucial for visual interest. I use wooden plant stands, vintage books, and floating shelves to create different levels for my containers.
Glass propagation vessels are non-negotiable for the Instagram factor. Mason jars work, but I’ve invested in some gorgeous test tube holders and vintage milk bottles that make everything look intentional.
Add some trailing plants like pothos around your ZZ propagation containers – the cascading greenery creates depth and fills empty spaces.
Finding the Perfect Location
Propagation station placement can make or break your success rates. I’ve moved mine three times before finding the sweet spot.
East or north-facing windows provide ideal bright, indirect light without scorching delicate new roots. My south-facing window was too intense and actually slowed root development.
Avoid high-traffic areas where containers might get knocked over. I learned this when my cat decided my propagation station was her new Code Playground.
Temperature consistency matters more than I initially realized. Avoid spots near heating vents, air conditioners, or drafty windows that create temperature swings.
I keep mine on a console table near my living room window – it gets perfect light and becomes a natural conversation starter when people visit.
Essential Tools and Supplies Organization
Propagation station supplies need their own dedicated storage system. I use a vintage wooden toolbox that keeps everything organized and portable.
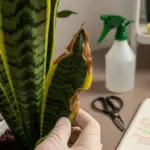
Sharp, clean scissors are non-negotiable – I keep two pairs so one’s always available while the other’s being sterilized. Label them “propagation only” so family members don’t use them for random tasks.
Rooting hormone powder stays fresh longer in a small airtight container. I transfer it from the original packaging to prevent moisture contamination.
Keep distilled water in a dedicated pitcher or bottle – tap water chemicals can slow root development, especially in sensitive cuttings.
Small measuring spoons, tweezers, and a magnifying glass help with detailed work. I feel like a plant surgeon with these tools!


Organizing Multiple Projects Like a Pro
Multiple propagation projects can quickly become overwhelming without a system. I use a simple notebook to track everything – dates, methods, progress notes.
Label everything with masking tape and permanent marker. Include the date, plant type, and propagation method. Trust me, you’ll forget which cutting is which after a few weeks.
Group similar projects together – all water propagations in one area, soil propagations in another. This makes maintenance routines more efficient.
I use a propagation calendar to track watering schedules and expected milestone dates. Different methods have different timelines, and it’s easy to lose track.
Color-coded labels help distinguish between different ZZ plant varieties or propagation experiments. Green for regular ZZ, yellow for raven ZZ, etc.
Styling Tips That Elevate Your Space
Propagation station styling should complement your existing home decor, not clash with it. I treat mine like a living art installation.
Add decorative elements that serve dual purposes – a beautiful wooden tray corrals small containers while protecting furniture surfaces.
Natural textures work beautifully with plant propagation. Woven baskets, wooden cutting boards, and linen table runners add warmth without competing with the plants.
Vintage elements like old glass bottles or antique plant labels add character and make your station feel curated rather than clinical.
Consider the backdrop – a plain wall lets your propagation display shine, while busy wallpaper can make everything look cluttered.
I change out seasonal elements like colored glass bottles in fall or white ceramics in winter to keep the display fresh and interesting.
Good lighting is everything for both plant health and photos. I added a small LED grow light that doubles as task lighting for evening maintenance.
The key is making your propagation station feel intentional and beautiful – when you love looking at it, you’re more likely to maintain it properly and catch problems early.
Conclusion
There you have it – 7 foolproof ways to multiply your ZZ plant collection and transform your living space into the green oasis you’ve always wanted!
Remember, propagation is as much about patience as it is about technique. Some methods work faster than others, but each one will reward you with beautiful new plants to style throughout your home.
Start with the water propagation method if you’re a beginner – it’s forgiving and gives you that satisfying visual progress. Once you’ve mastered that, experiment with the other techniques to find your favorites. Before you know it, you’ll have ZZ plants gracing your living room, bedroom, and home office!
Ready to become the plant parent your friends come to for advice? Pick your favorite method from this list and start propagating today. Your future self (and your beautifully decorated home) will thank you!


GIPHY App Key not set. Please check settings