6. Air Layering Advanced Technique
Air layering is the propagation method that makes you feel like a plant scientist. I discovered this technique when I had a gorgeous, tall ZZ plant that I couldn’t bear to cut up for regular propagation.
This method literally grows roots while the cutting is still attached to the parent plant. It’s like having a safety net – if something goes wrong, your original plant is still intact.
I’ll be honest, it looks complicated at first, but once you get the hang of it, air layering success rates are nearly 100%.
When Air Layering Makes Perfect Sense
Air layering ZZ plants is my go-to method for expensive or sentimental plants that I can’t risk losing. You know, that perfect specimen you paid$50 for at the fancy plant shop.
This technique works best on mature stems that are at least 12 inches tall and pencil-thick. Skinny, young stems don’t have enough energy stored for successful air layering.
I use air layering when I want to propagate the top portion of a leggy ZZ plant while keeping the original plant intact. It’s perfect for reshaping overgrown plants.
Variegated ZZ plants are ideal candidates because you maintain the exact same coloring – no risk of reverting to solid green like sometimes happens with other methods.
Essential Materials for Success
Don’t attempt air layering without the right supplies – I learned this when I tried improvising with random household items. Complete disaster.
You’ll need sharp, clean pruning shears or a razor blade for making precise cuts. Sterilize with rubbing alcohol first.
Sphagnum moss is crucial – not regular peat moss. I soak it in water for 30 minutes, then squeeze out excess moisture until it’s damp but not dripping.
Clear plastic wrap and twist ties or rubber bands for securing everything. I prefer clear wrap so I can monitor root development.
Rooting hormone powder speeds up the process, though it’s not absolutely necessary for ZZ plants.
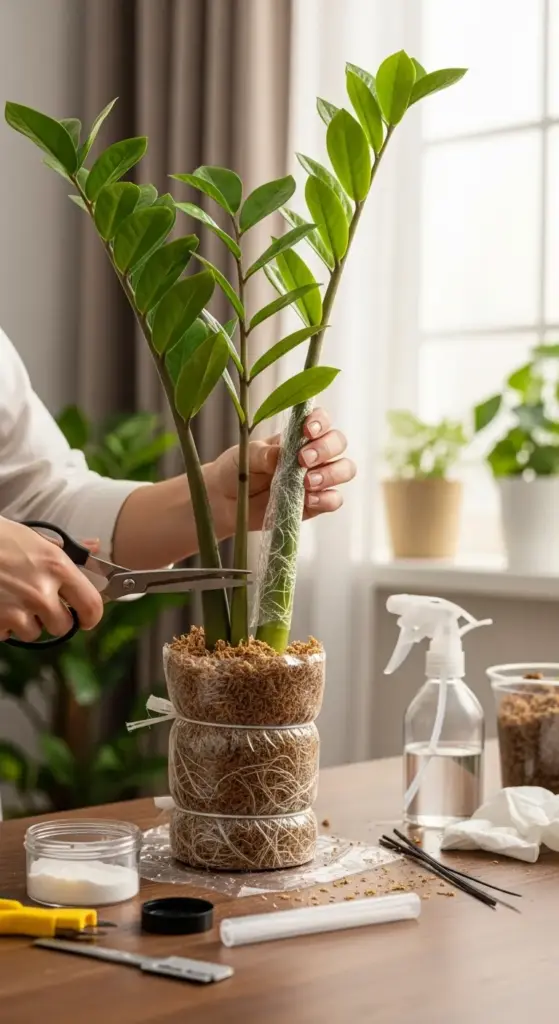
Step-by-Step Air Layering Process
Choose a healthy section of stem about 6-8 inches from the tip. This is where you’ll encourage new root development.
Make a shallow cut about 1/3 through the stem using your sterilized blade. Don’t cut all the way through – you want to wound the plant, not sever it.
Dust the cut with rooting hormone if you’re using it. This step isn’t critical but helps speed up root formation.
Wrap damp sphagnum moss around the wounded area, creating a ball about 2 inches thick. The moss should completely cover the cut.


Secure plastic wrap tightly around the moss ball using twist ties at both ends. You want to create a sealed, humid environment.
Make sure the plastic wrap is clear so you can check progress without disturbing the setup.
Monitoring Your Air Layer Project
Air layering maintenance is surprisingly low-key once everything’s set up. I check mine every 7-10 days for the first month.
Look for white root development through the clear plastic – this usually starts appearing after 3-4 weeks. It’s so exciting when you see those first tiny roots!
The sphagnum moss should stay consistently damp but not soggy. If it looks dry, carefully unwrap one end and add a little water with a spray bottle.
Mold growth on the moss is your enemy – if you see fuzzy growth, unwrap everything, clean the area, and start over with fresh moss.
I’ve found that air layers in bright, indirect light develop roots faster than those in low light conditions.
Harvesting Your New Plant
Once you see healthy root development that’s 2-3 inches long (usually after 6-8 weeks), it’s harvest time. This part always makes me nervous!
Cut the stem just below the root ball using clean, sharp shears. Take your time with this cut – you want a clean slice that won’t damage the new roots.
Carefully remove the plastic wrap and gently tease away some of the sphagnum moss. Don’t remove all of it – some moss helps with the transition.
Plant immediately in well-draining potting mix, keeping the new root system at soil level. I use a 4-6 inch pot for newly harvested air layers.
Water sparingly for the first 2-3 weeks while the plant adjusts to its new independent life. The roots are tender and can’t handle heavy watering yet.
The parent plant will often develop new growth from just below where you made the cut, giving you two plants for the price of one!
Ready to put all these techniques together in one gorgeous display? The propagation station setup I’m sharing next will transform your plant propagation into an Instagram-worthy hobby that actually helps your success rates!


GIPHY App Key not set. Please check settings