4. Division Method for Mature Plants
Plant division is hands down the fastest way to multiply your ZZ plant collection. I wish I’d discovered this method sooner instead of waiting months for cuttings to root!
My first division attempt was terrifying – I was convinced I’d kill my beloved 3-year-old ZZ plant. Spoiler alert: it survived and I ended up with four gorgeous plants.
Now division is my favorite propagation method when I want instant gratification.
Knowing When Your ZZ is Ready
Mature ZZ plants practically beg to be divided when they’re ready. Look for these telltale signs that I learned to recognize over the years.
Multiple stems growing from different areas of the pot – not just new shoots from existing stems. This indicates separate rhizome clusters.
The plant looks crowded and top-heavy, or you see rhizomes pushing against the pot walls. I once had a ZZ literally crack its ceramic pot!
Roots growing out of drainage holes is another dead giveaway. If your plant has been in the same pot for 2+ years, it’s probably ready.
The best time for division is spring when the plant enters its active growing season.
Essential Tools for Safe Division
Don’t attempt ZZ plant division without the right tools – I learned this lesson when I tried using a butter knife. Nearly destroyed the root system.
You’ll need clean, sharp pruning shears or a serrated knife. I sterilize mine with rubbing alcohol to prevent disease transmission.
A clean work surface covered with newspaper makes cleanup easier. Trust me, this gets messy.
Have several pots ready with well-draining potting mix. I always prepare more containers than I think I’ll need because divisions often surprise you.
Step-by-Step Division Process
First, water your ZZ plant 2-3 days before division. Slightly moist soil is easier to work with than bone-dry or soggy soil.
Gently remove the plant from its pot – sometimes I need to squeeze flexible pots or tap the sides of rigid ones. Don’t yank on the stems!
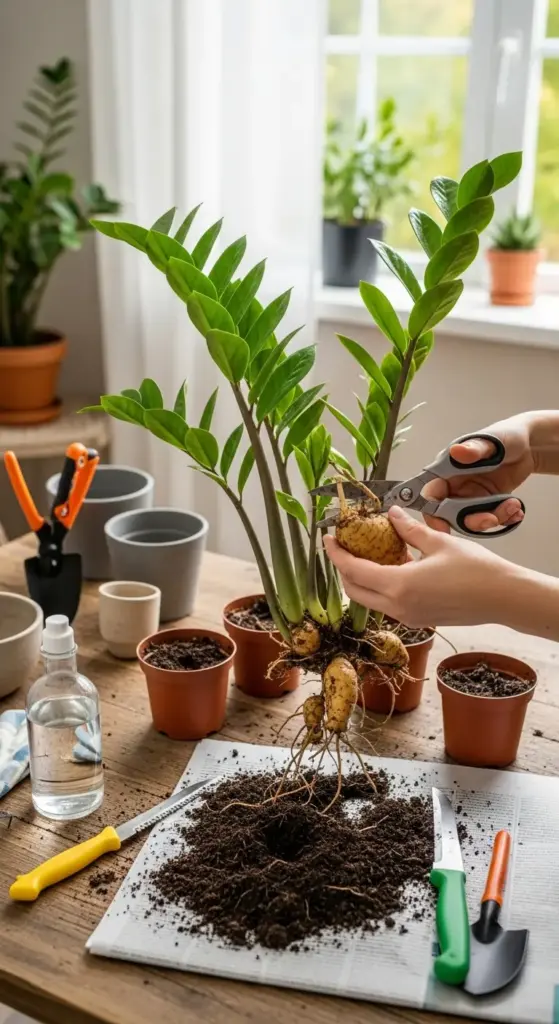
Brush away excess soil so you can see the rhizome structure clearly. ZZ plants have thick, potato-like rhizomes that store water and nutrients.
Look for natural separation points where rhizomes connect. These are your division lines – follow nature’s blueprint.


Use your sterilized knife to cut through connecting rhizomes. Each division needs at least 2-3 stems and a healthy portion of rhizome.
I let cut surfaces dry for 30 minutes before potting to prevent rot – learned this after losing a division to fungal issues.
Post-Division Care That Works
Newly divided ZZ plants are stressed and need gentle treatment for the first month. I treat them like recovering patients.
Plant each division in appropriately sized pots – don’t go too big or the soil stays wet too long. 4-6 inch pots work perfectly for most divisions.
Water sparingly for the first 2-3 weeks. The damaged roots can’t absorb water efficiently yet, so overwatering leads to rot.
Keep them in bright, indirect light – no direct sun while they’re recovering. I learned this when I scorched a beautiful division on my south-facing windowsill.
Don’t fertilize for at least 6 weeks. The plants need to focus energy on root recovery, not new growth.
Styling Your New Plant Collection
Here’s the fun part – displaying multiple ZZ plants throughout your home! I love creating plant groupings that look intentional, not like I just scattered pots everywhere.
Try the “rule of three” – group plants in odd numbers at varying heights. I use plant stands, books, or decorative risers to create levels.
Different pot sizes and textures add visual interest. Mix terra cotta, ceramic, and woven baskets for an eclectic look that feels curated.
Corner arrangements work beautifully with ZZ plants because of their upright growth habit. I place the tallest division in back and smaller ones in front.
Consider the room’s lighting when placing your divisions. ZZ plants tolerate low light, but they’ll grow faster in brighter spots.
I love putting one division in my bedroom, another in the living room, and keeping one in my home office. It’s like having coordinated decor that happens to purify the air!
Ready to dive into something more advanced? The rhizome cutting method I’m covering next is perfect for maximizing your propagation success – plus I’ll share the underground secrets that most plant parents never discover!


GIPHY App Key not set. Please check settings