3. Leaf Propagation Magic
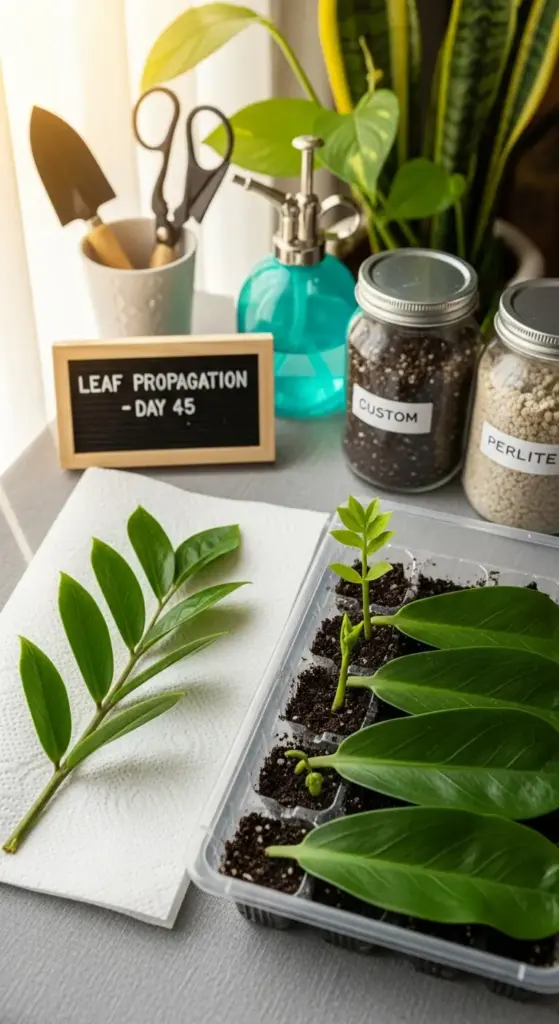
Okay, this is where things get absolutely mind-blowing. ZZ plant leaf propagation is like plant wizardry – you literally grow entire plants from single leaves.
I discovered this method by pure accident when a leaf fell off during repotting. Instead of tossing it, I stuck it in some soil and forgot about it for months.
Six months later, I had a tiny baby ZZ plant! I was hooked on this magical process ever since.
Selecting the Perfect Leaves
Not all ZZ plant leaves are created equal for propagation. You want mature, healthy leaves that are thick and glossy – basically the ones that look like they hit the gym regularly.
Avoid any leaves with brown spots, yellowing, or soft areas. Trust me, diseased leaves just rot in soil.
The best leaves come from the middle sections of mature stems. Baby leaves from new growth are too tender, and old leaves from the bottom often lack energy.
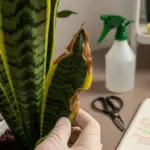
I gently twist the leaf at the base where it connects to the stem. You want the entire leaf including that little attachment point – that’s where the magic happens.
The Critical Callusing Process
Here’s where most people mess up leaf propagation – they plant immediately without letting the leaf callus. I made this mistake with my first dozen attempts.
Every single one rotted.
Let your leaves sit on a paper towel in indirect light for 3-7 days until the cut end forms a dry, protective callus. It should look slightly wrinkled and feel firm to touch.
This callusing prevents bacteria from entering the leaf tissue. Think of it like letting a cut on your skin scab over before going swimming.
Some leaves callus faster than others – thicker leaves take longer but are usually more successful.
Creating the Perfect Environment
ZZ leaf propagation needs specific conditions that I learned through lots of trial and error. Regular potting soil is too rich and holds too much moisture.
My winning mix: 70% succulent soil and 30% perlite. This combo drains perfectly while providing just enough nutrients.


Place the callused end about 1/4 inch deep in the soil – just enough to keep it stable. Don’t bury the entire leaf like I did initially.
I use shallow containers like seed trays because the roots don’t go deep initially. Clear plastic containers work great because you can monitor progress.
Humidity is crucial but tricky. I cover my propagation containers with plastic wrap, leaving small air holes for ventilation.
The Ultimate Patience Test
Let me be real with you – leaf propagation timeline is not for the impatient. This method takes 3-6 months to show significant results.
Month 1-2: Absolutely nothing visible (don’t give up!) Month 3-4: Tiny rhizome development underground Month 4-6: First baby shoots emerge from soil Month 6+: Recognizable mini ZZ plant
I check mine maybe once a week because constantly disturbing them slows progress. It’s like watching grass grow, but the payoff is incredible.
The hardest part is resisting the urge to dig up the leaf to check for roots. I’ve killed several promising propagations doing exactly this.
Troubleshooting Leaf Propagation Issues
Shriveled, brown leaves usually mean too much direct sunlight or not enough humidity. Move to bright, indirect light and increase humidity.
Mushy, black leaves indicate overwatering or poor drainage. I learned to water only when the soil is completely dry, about every 2-3 weeks.
Some leaves just won’t propagate – and that’s normal. I have about a 60% success rate, which is pretty good for this method.
If nothing happens after 4 months, the leaf probably isn’t viable. Don’t take it personally – even experienced propagators have duds.
Ready to learn a method that gives you multiple plants instantly? The division technique I’m sharing next is perfect when you have a mature ZZ plant that’s outgrown its pot – plus I’ll reveal the secret timing that makes all the difference!


GIPHY App Key not set. Please check settings