3 Genius DIY Hacks to Elevate Your Vegetable Garden on a Budget
I have a confession to make.
I spent way too much money on my first raised bed. Like, embarrassingly too much.
A beautiful cedar kit from a fancy garden retailer, professionally assembled, looking absolutely gorgeous — and completely unnecessary. Because a few months later, I discovered I could have built something just as beautiful for a fraction of the price.
That realization sent me down a DIY rabbit hole I never fully climbed out of. And honestly? Some of my favorite things in my garden are the ones I built myself with reclaimed materials and a little creativity.
These three hacks are the ones I recommend most often to beginners. They’re practical, budget-friendly, and — this part matters — they actually look good.
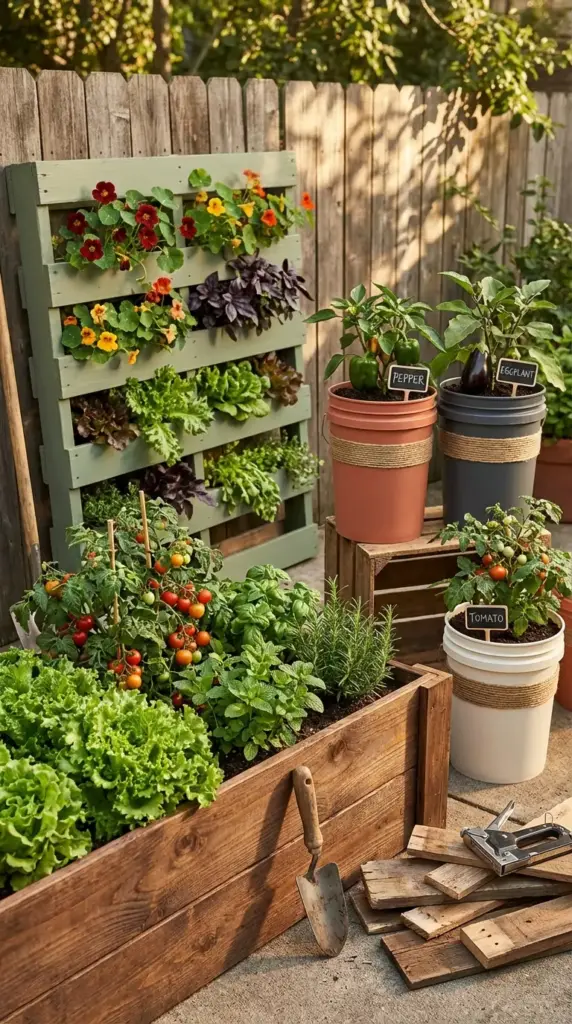
DIY Hack #1: Build a Raised Garden Bed for Under $50 Using Reclaimed Wood
Let’s start with the big one.
A standard cedar raised bed kit from a garden retailer can run you $150 to $300 or more. And while those kits are lovely, they are absolutely not necessary for a first-time gardener working with a real-world budget.
Here’s the truth: a functional, beautiful raised bed can be built for under $50 — sometimes significantly under — if you know where to look for materials.
What You’ll Need:
For a standard 4 feet wide x 8 feet long x 10 inches tall raised bed:
Three 2x10x8 boards (or reclaimed wood of similar dimensions)
One 2x10x4 board (or cut an 8-foot board in half)
One 2x4x8 board (cut into four corner posts, approximately 12 inches each)
Exterior wood screws (2.5 to 3 inch length) — one box
A drill with a screwdriver bit
A saw (or ask the hardware store to cut boards to length — most will do this for free or a small fee)
Sandpaper (optional but recommended for a more finished look)
Linseed oil or exterior wood stain (optional — for weather protection and aesthetics)
Total estimated cost using new lumber: $35 to $55Total estimated cost using reclaimed wood: $0 to $20
Where to Find Reclaimed Wood for Free or Cheap:
This is where the real savings happen.
Facebook Marketplace — search “free wood,” “lumber,” or “fence boards.” People give away usable wood constantly after home renovation projects
Nextdoor app — neighbors post free materials all the time, especially in spring
Habitat for Humanity ReStores — discounted building materials including lumber, often at 50 to 70% below retail
Craigslist free section — a genuinely underrated resource for reclaimed materials
Local fencing companies — call and ask if they have old fence boards they’re disposing of. Many will let you take them for free
Construction sites — ask the site manager if you can take scrap lumber. Always ask first — never just take.
Your own backyard — old fence boards, deck planks, or pallet wood can all be repurposed
One important note on reclaimed wood: Avoid wood that has been pressure-treated with older formulations (pre-2004 lumber marked “CCA” contained arsenic). Newer pressure-treated lumber (marked “ACQ” or “CA”) is considered safer, but many gardeners still prefer to avoid it for food gardens. Cedar, redwood, and untreated pine are all safe choices.
Step-by-Step Instructions:
Step 1: Gather and prepare your wood If using reclaimed wood, remove any old nails or screws. Sand rough edges lightly — this is especially important if little hands will be touching the bed. Cut all boards to your desired dimensions if not already done.
Step 2: Cut your corner posts Cut your 2×4 board into four equal pieces, approximately 10 to 12 inches long. These will be your interior corner supports.
Step 3: Assemble the short ends first Stand two corner posts upright and attach one of your 4-foot boards to them using 2 to 3 screws per post. Pre-drill your holes to prevent the wood from splitting — this is a small step that makes a big difference.
Step 4: Attach the long sides Connect your 8-foot boards to the corner posts on each side, screwing into the posts from the outside. Check that your corners are square using a carpenter’s square or the 3-4-5 method (measure 3 inches along one side, 4 inches along the other — the diagonal should measure exactly 5 inches if the corner is square).
Step 5: Repeat for the second layer Stack and attach your second row of boards, staggering the screws slightly from the first row for added strength.
Step 6: Finish and seal (optional but recommended) Sand any rough spots. Apply a coat of raw linseed oil or exterior wood stain to protect the wood from moisture and extend its life. This step also makes your bed look significantly more polished and intentional.
Step 7: Position and fill Place your bed in its permanent location before filling — it’ll be very heavy once full of soil. Line the bottom with cardboard (overlapping edges by at least 6 inches) to suppress weeds and grass. Fill with your soil mix and you’re ready to plant!
Making It Look Chic:
A few small details elevate a DIY raised bed from “homemade” to “intentional design”:
Consistent staining or painting — a coat of exterior wood stain in a warm walnut or weathered gray looks incredibly polished
Matching plant markers — uniform labels in the same material and style throughout the bed
A clean gravel or wood chip border around the outside of the bed
Symmetry — if you’re building multiple beds, keep them the same size and spacing for a designed, cohesive look
Total time to build: 2 to 3 hours for a complete beginner
DIY Hack #2: Create a Vertical Pallet Garden — Perfect for Small Spaces and Renters
This one is especially for my city dwellers — the New York apartment balcony crowd, the Philly row home backyard crew, the DC condo patio ladies.
A vertical pallet garden lets you grow a surprising amount of food in an incredibly small footprint. I’ve seen people grow 20+ plants on a single pallet leaned against a fence or wall.
And the best part? Pallets are almost always free.
What You’ll Need:
One wooden shipping pallet (more on sourcing below)
Landscape fabric or burlap (enough to cover the back and bottom of the pallet)
Staple gun and staples
Potting mix (approximately 1 to 2 cubic feet)
Small plants or seedlings (herbs, lettuce, strawberries, and trailing plants work best)
Sandpaper
Exterior paint or stain (optional)
Two heavy-duty hooks or a wall-mounting bracket if hanging, OR a way to prop it safely against a wall or fence
Total estimated cost: $0 to $30 (pallet is free, landscape fabric and staples are the main costs)
The Most Important Step: Choosing a Safe Pallet
Not all pallets are safe for growing food. This is critical.
Look for the IPPC stamp on the side of the pallet — a small logo with letters indicating how the pallet was treated:
HT (Heat Treated) ✅ — Safe! The wood was treated with heat, not chemicals
DB (Debarked) ✅ — Safe
MB (Methyl Bromide) ❌ — Do NOT use. This is a toxic fumigant and is not safe for food growing
No stamp or unclear markings ❌ — Skip it. When in doubt, don’t use it.
Where to find free pallets:
Behind grocery stores, hardware stores, and garden centers
Facebook Marketplace and Craigslist free section
Local warehouses and distribution centers — just ask politely
Nextdoor app
Step-by-Step Instructions:
Step 1: Clean and prep your pallet Sand rough edges and splinters thoroughly. This is especially important if children will be around the garden. Wipe down with a damp cloth and let dry completely.
Step 2: Paint or stain (optional but highly recommended) A coat of exterior paint in a bold color (sage green, terracotta, navy, or crisp white are all gorgeous) or a natural wood stain transforms a plain pallet into a design statement. Apply two coats and let dry fully before proceeding.
Step 3: Attach landscape fabric to the back and bottom Lay the pallet face-down. Cut landscape fabric to cover the entire back panel and the bottom edge. Staple it securely every 3 to 4 inches along all edges — this is what holds your soil in place, so don’t skimp on staples. Fold corners neatly like you’re wrapping a gift.
Step 4: Fill with potting mixKeep the pallet lying flat for this step. Pack potting mix firmly into each slat opening, filling completely. The landscape fabric on the back holds everything in place. Really pack it in — loose soil will fall out when you stand the pallet upright.
Step 5: Plant your seedlings While still flat, tuck small plants or seedlings into each slat opening. Firm the soil around each plant’s roots. Best plants for pallet gardens:
Lettuce and salad greens
Herbs (basil, parsley, chives, thyme, mint)
Strawberries
Nasturtiums (edible AND beautiful)
Spinach and arugula
Small pepper plants
Step 6: Let it rest flat for 1 to 2 weeksThis is the step most people skip — and then wonder why their plants fell out. Leaving the pallet flat while plants establish their roots means everything stays put when you stand it upright. Water gently during this period.
Step 7: Stand it up and position it Lean against a sturdy fence, wall, or railing. Make sure it’s stable and secure — a fully planted, watered pallet is heavier than you’d expect. Use hooks, zip ties, or brackets to secure it if needed.
Making It Look Chic:
Uniform plant selection — stick to one color palette of plants (all greens, or mix in purple basil and red lettuce for contrast)
Add a small chalkboard sign at the top labeling your “herb wall” or “salad garden”
Frame it — add thin trim boards around the outer edge of the pallet for a more finished, intentional look
Cluster with other elements — a pallet garden looks stunning flanked by two matching terracotta pots or a small bistro table
Total time to complete: 2 to 4 hours (plus 1 to 2 weeks resting time)
DIY Hack #3: Make Your Own Self-Watering Planter from Upcycled Materials
Okay, this one genuinely blew my mind the first time I tried it.
A self-watering planter uses a sub-irrigation system — a water reservoir at the bottom that wicks moisture up to the roots as needed. Plants take exactly as much water as they need, exactly when they need it.
Commercial self-watering planters can cost $40 to $150+. This DIY version costs almost nothing if you have the right materials on hand.
What You’ll Need (Two-Container Method):
Two plastic containers of the same diameter — one slightly smaller than the other (5-gallon buckets work perfectly, as do large plastic storage bins or even two matching plastic pots)
A drill with a ½ inch bit
PVC pipe or a large plastic bottle (for the fill tube — more on this below)
Landscape fabric or an old piece of mesh/screen
Potting mix
Scissors or a utility knife
Total estimated cost: $0 to $15 depending on what you have on hand
Where to source materials for free or cheap:
5-gallon buckets — free from bakeries, delis, and restaurants (they get frosting, pickles, and other foods in them and often give them away)
Large plastic storage bins — thrift stores, dollar stores, or ones you already have
Facebook Marketplace — people give away plastic containers constantly
Step-by-Step Instructions:
Step 1: Prepare your inner container (the planting container) Take your smaller container and drill multiple ½ inch holes across the entire bottom. These holes allow roots to access the water reservoir below and allow wicking to occur. Drill at least 15 to 20 holes — more is better here.
Step 2: Create your wicking basket Cut a piece of landscape fabric to line the inside of your inner container. This keeps soil from falling through the holes while still allowing water to wick upward. Alternatively, fill a small plastic cup with drainage holes with potting mix and nestle it through one of the larger holes — this acts as a direct wick between the reservoir and the soil.
Step 3: Create your fill tube Cut a piece of PVC pipe (or use a large plastic bottle with the bottom cut off, inverted) to a length slightly taller than your outer container. This is how you’ll add water to the reservoir without disturbing the soil. Drill a small hole near the top of the outer container at the height where you want the water level to stop — this acts as an overflow drain so you never overfill.
Step 4: Assemble the system Place the inner container inside the outer container. The inner container should sit above the bottom of the outer container — you can use small blocks, bricks, or a platform made from a cut plastic container to elevate it if needed. The gap between the two containers is your water reservoir. Insert your fill tube down through the inner container so it reaches the reservoir below.
Step 5: Fill with potting mix and plant Fill your inner container with high-quality potting mix. Plant your vegetables or herbs as normal. Water from the top once to help establish the plants, then switch to filling exclusively through the reservoir tube going forward.
Step 6: Fill the reservoir Pour water through your fill tube until it runs out of the overflow hole. That’s it. Your planter will now wick water up to the roots as needed. Check and refill the reservoir every 3 to 7 days depending on plant size, temperature, and weather.
Best Plants for Self-Watering Planters:
Tomatoes (especially cherry varieties)
Peppers
Lettuce and salad greens
Herbs
Eggplant
Cucumbers (with a small trellis)
Making It Look Chic:
Plain plastic buckets or bins aren’t exactly Pinterest-worthy. But a few simple upgrades change everything:
Spray paint the outer container in a matte finish — terracotta, sage green, charcoal, or white all look stunning
Add rope or jute twine wrapped around the outside for a natural, textured look
Use matching containers throughout your garden for a cohesive, designed aesthetic
Add a plant stake or decorative label identifying what’s growing inside
Cluster three different heights together — a tall self-watering bucket for tomatoes, a medium one for peppers, and a shallow one for herbs creates a beautiful, layered vignette
Total time to build: 30 to 60 minutes
Full Budget Breakdown
DIY Project
Materials Cost (Reclaimed)
Materials Cost (New)
Time to Complete
Raised Garden Bed (4×8)
$0 to $20
$35 to $55
2 to 3 hours
Vertical Pallet Garden
$0 to $30
$15 to $40
2 to 4 hours + rest time
Self-Watering Planter
$0 to $15
$10 to $25
30 to 60 minutes
Total (all three)
$0 to $65
$60 to $120
One weekend
Compare that to buying all three items retail — you’d easily spend $300 to $600+.
There is something genuinely special about growing food in something you built with your own hands.
It doesn’t have to be perfect. It doesn’t have to be expensive. It just has to work — and all three of these hacks absolutely do.
Start with whichever one excites you most, source your materials this week, and carve out a weekend afternoon to build it. You’ll be amazed at what you can create with a little resourcefulness and a lot of heart.
🎨 One more section to go — and it might be the most fun one yet! Click Next below because we’re finishing strong with all the best ideas for making your vegetable garden look absolutely gorgeous — garden decor, styling tips, lighting ideas, and how to create an outdoor space that’s as beautiful as it is productive. This is the section you’ll want to screenshot and save for inspiration. See you there! 🌸
Here you'll find all collections you've created before.
Manage Consent
We use technologies like cookies to optimize performance. Withdrawing consent may disable certain features.
Functional
Always active
The technical storage or access is strictly necessary for the legitimate purpose of enabling the use of a specific service explicitly requested by the subscriber or user, or for the sole purpose of carrying out the transmission of a communication over an electronic communications network.
Preferences
The technical storage or access is necessary for the legitimate purpose of storing preferences that are not requested by the subscriber or user.
Statistics
The technical storage or access that is used exclusively for statistical purposes.The technical storage or access that is used exclusively for anonymous statistical purposes. Without a subpoena, voluntary compliance on the part of your Internet Service Provider, or additional records from a third party, information stored or retrieved for this purpose alone cannot usually be used to identify you.
Marketing
The technical storage or access is required to create user profiles to send advertising, or to track the user on a website or across several websites for similar marketing purposes.


GIPHY App Key not set. Please check settings