Secret #6 – Plantlet Propagation Timing for Success
I used to snip off those adorable spider plant babies the second they appeared, thinking I was helping them become independent. What a rookie mistake! I probably killed dozens of perfectly good plantlets because I was way too eager.
Turns out, timing is absolutely everything when it comes to plantlet propagation. Get it wrong, and those cute little babies will just shrivel up and die on you.
The Size Rule That Changes Everything
Here’s the magic number that took me years to figure out: wait until your plantlets are at least 2-3 inches tall with 4-6 leaves before even thinking about separation.
I know they look ready when they’re tiny and perfect, but those little guys are still completely dependent on mama plant for survival. They’re basically plant toddlers pretending to be adults!
The roots need to be at least 1 inch long before they can handle life on their own. I learned this after watching too many promising babies just give up after a few days of independence.
Water vs. Soil Propagation (The Great Debate)
I’ve tried both methods extensively, and honestly? Water propagation is way more forgiving for beginners, but soil propagation creates stronger plants in the long run.
With water propagation, you can literally watch the root development happen day by day. It’s like plant TV! Plus, you can see immediately if something’s going wrong.
But here’s the catch – water roots are soft and fragile. When you transfer them to soil, there’s always some shock and adjustment period.
My Hybrid Method That Works Every Time
After years of trial and error, I developed this technique that combines the best of both worlds. I start plantlets in water until they have 2-inch roots, then move them to a super light soil mix.
The transition is way gentler because the roots are already established but haven’t gotten too comfortable in their water world.
I use a mix that’s 70% perlite and 30% potting soil for the first month. It drains fast but still holds some moisture for those tender new roots.
Encouraging Stubborn Plantlets to Root
Some spider plant babies are just lazy about developing roots, even when they’re the perfect size. I had one that hung there for three months looking gorgeous but rootless!
The trick is gentle stress – let the mother plant get slightly dry between waterings. This signals the plantlets that they better get their act together and grow some roots.
You can also try the rooting hormone trick using cinnamon powder. Just dust a tiny bit on the plantlet base before propagating. Cinnamon has natural rooting properties and prevents rot.
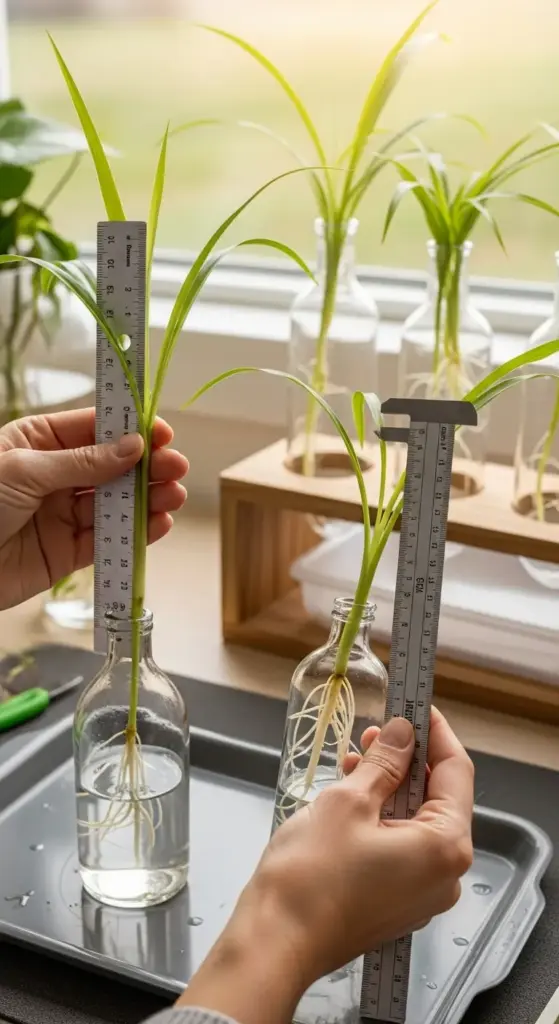
Creating a Propagation Station That Doesn’t Look Crazy
Let’s be real – most propagation setups look like science experiments gone wrong. Mason jars and plastic cups everywhere! I wanted something that actually looked good in my living room.
I found these gorgeous glass propagation tubes that mount on a wooden stand. They look intentional and decorative, not like I’m running a plant laboratory.


For a budget option, I use vintage glass bottles in different heights grouped on a wooden tray. It looks like intentional home decor instead of plant chaos.
The Timing Mistake That Breaks Hearts
I used to wait until plantlets had huge root systems before separating them, thinking bigger was better. Wrong again!
Once roots get longer than 3-4 inches, they become brittle and break easily during the separation process. The sweet spot is 1-2 inch roots that are flexible but established.
Also, never propagate during winter unless you have grow lights. Natural light levels are too low for successful root development, and you’ll just end up with sad, struggling babies.
My Propagation Station Setup
I keep my propagation area near an east-facing window with bright morning light. The glass containers sit on a waterproof tray (learned that lesson the hard way) with a small towel underneath for extra protection.
I change the water every 3-4 days to prevent bacteria buildup. Cloudy water is the kiss of death for developing roots.
I also learned to use room temperature water, not cold tap water. The shock of cold water can stunt root development for weeks.
Signs Your Propagation is Working
Within 7-10 days, you should see tiny white root nubs starting to form. This is when I do a little happy dance!
Healthy plantlets will also start looking more upright and perky as their roots develop. Droopy, sad-looking babies usually aren’t going to make it.
The leaves should stay bright green throughout the process. Yellow or brown leaves mean something’s wrong – usually too much direct sun or old water.
When Propagation Goes Wrong
I’ve seen every possible propagation disaster, trust me. Mushy black roots mean bacterial rot – toss that baby and start over with fresh water.
If the plantlet looks healthy but roots aren’t developing after 3 weeks, try moving it to a slightly warmer spot. Cool temperatures slow down root formation significantly.
Sometimes the mother plant is just too stressed to support babies. If multiple plantlets fail, focus on getting the parent plant healthier first.
Ready for the Final Defense?
Your propagation game is now on point, and you’ve got healthy spider plants multiplying like crazy! But here’s what nobody warns you about – all this lush growth and perfect humidity creates the ideal environment for some unwelcome guests.
The pest prevention strategy I’m sharing next will keep your spider plant paradise from turning into a bug nightmare. These natural methods work better than any chemical spray I’ve ever tried!


GIPHY App Key not set. Please check settings