9. Japanese-Inspired Pocket Garden: Creating Your Own Zen Oasis
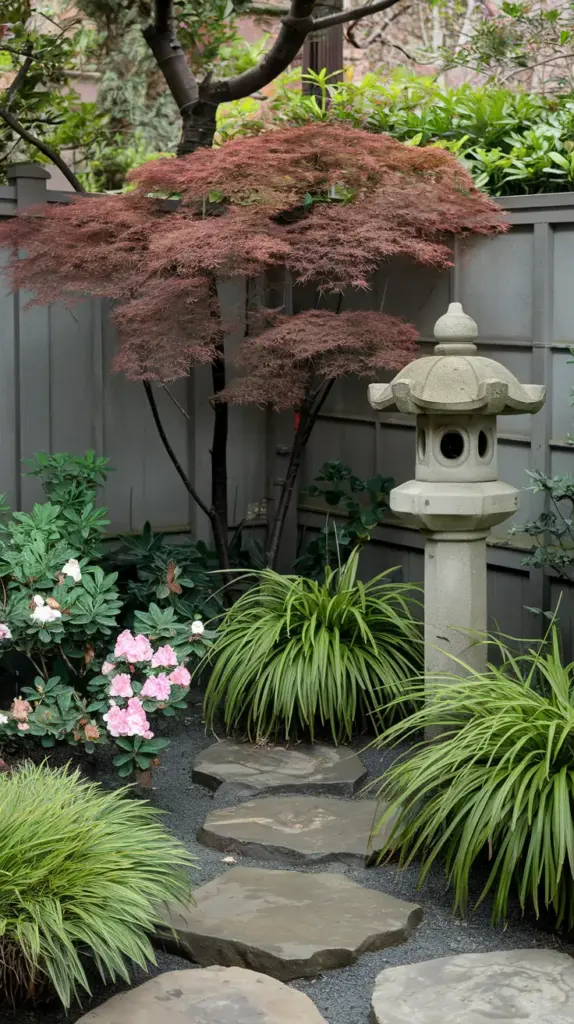
Let me tell you about my journey creating a Japanese-inspired pocket garden that completely transformed a forgotten 6×8 corner of my yard. After visiting Kyoto’s famous gardens, I became obsessed with bringing that same sense of peace to my own tiny space. And trust me, I’ve learned quite a few lessons along the way!
The Art of Minimal Design
The first thing I discovered about Japanese garden design is that less is absolutely more. My initial mistake? Trying to cram every “Japanese-looking” plant I could find into that small space! Now I know better – intentional design means choosing each element with purpose.
Start with a clean slate and divide your space into three main zones: a focal point (like a stunning Japanese maple or stone lantern), a peaceful seating area, and a transitional space. Remember, in Japanese gardens, empty space (called ma) is just as important as the elements you add.
Selecting the Perfect Plants
When it comes to plants, azaleas are absolute showstoppers in a Japanese garden. I’ve found that Kurume azaleas work particularly well in small spaces since they stay naturally compact. Plant them in groups of three – there’s something about odd numbers that just works better visually.
For year-round interest, I’ve learned to rely on these tried-and-true combinations:
- Nandina domestica (Heavenly Bamboo) for structure
- Japanese Forest Grass (Hakonechloa) for movement
- Dwarf Japanese Holly for evergreen presence
Creating Movement with Grasses
One of my favorite additions has been ornamental grasses. They bring such wonderful movement to the space! Hakone grass has become my go-to choice – it’s like watching waves when the breeze hits it. Just remember to plant it where it’ll get some afternoon shade; I learned that lesson the hard way after frying my first batch in full sun!


The Magic of Rock Features
Here’s a pro tip I wish I’d known earlier: start with your rock placement before adding plants. In Japanese gardens, rocks aren’t just decorative – they’re the backbone of the design. I use a combination of:
- Large anchor rocks (one or two statement pieces)
- Medium-sized rocks for groupings
- Small pebbles for ground cover
The key is to bury about 1/3 of each large rock to make it look like it’s naturally emerging from the earth. Trust me, this little detail makes a huge difference!
Want to know how to take your small garden to the next level? In our next section, we’ll explore how to create a vibrant Butterfly and Bee Garden that’ll bring your space to life with beautiful pollinators! Just click the “next” button below to discover how to transform your garden into a buzzing paradise with native flowering species and clever water features that’ll have your neighbors green with envy.
Remember, whether you’re aiming for zen simplicity or pollinator paradise, the key is working with your space, not against it. Every small garden has the potential to become something extraordinary!


GIPHY App Key not set. Please check settings