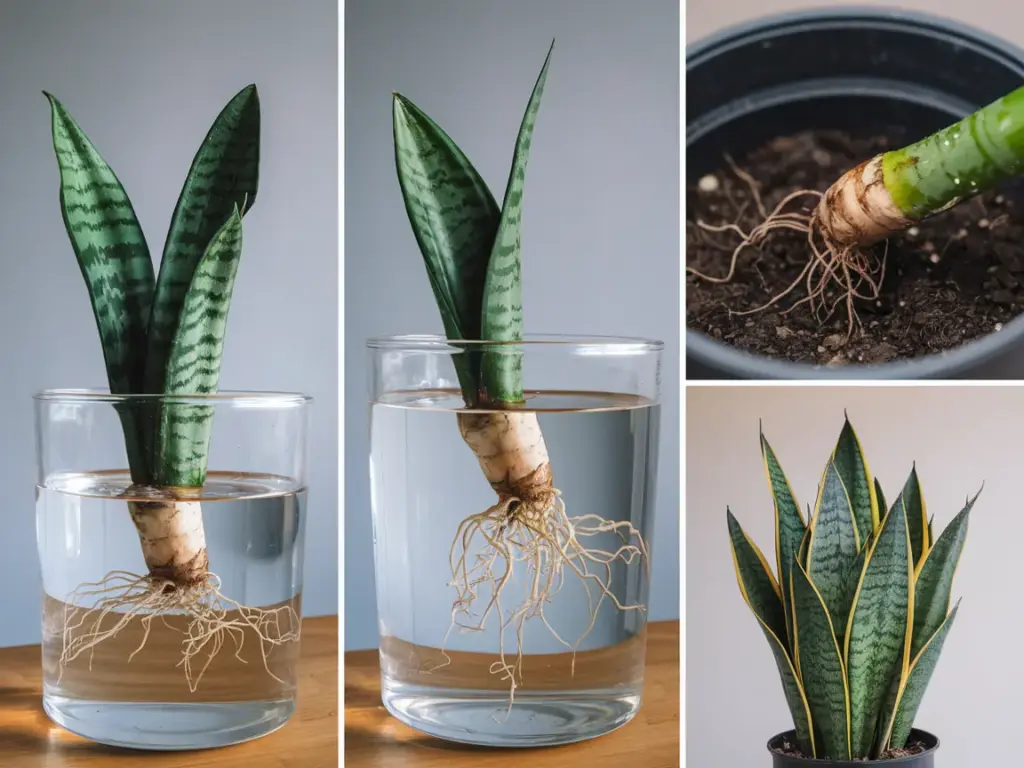
Water Propagation Method Step-by-Step

After years of experimenting with different propagation methods, I’ve become a huge fan of water propagation for snake plants. While some folks swear by direct soil planting, I’ve found that water propagation gives me a success rate of nearly 95% – and the best part? You get to watch those roots develop!
Why Choose Water Propagation
Let me tell you why I prefer this method over direct soil planting. First off, with water propagation, you can actually see root development happening. No more guessing games! Plus, there’s a lower risk of rot when you can monitor the entire process. I’ve found that water-propagated cuttings develop stronger root systems before they even touch soil.
Setting Up Your Container
The container choice is crucial here. I learned the hard way that those cute, narrow-necked vases are a nightmare when it’s time to remove your rooted cuttings! I now use wide-mouth mason jars or clear glass containers that are at least 3-4 inches deep. The transparency lets me monitor root development and water quality.
The Perfect Water Depth
Here’s a game-changing tip: you only want about 1-1.5 inches of water in your container. The biggest mistake I see (and made myself countless times) is submerging the cutting too deep. Only the bottom quarter of your cutting should be in water. Any deeper and you risk stem rot – trust me, I’ve lost some beautiful cuttings this way!
Maintaining Water Quality
Let’s talk about water changes. I change the water every 5-7 days, or sooner if it starts looking cloudy. Here’s my secret weapon: I use room temperature filtered water that’s been sitting out for 24 hours. This helps eliminate chlorine that could slow down root development. Clean water is absolutely essential for preventing bacterial growth.
Monitoring Root Development
This is the exciting part! After about 2-3 weeks, you should start seeing little white nubs forming at the base of your cuttings. These are your root primordia – basically baby roots! The first sign of successful propagation is when these nubs elongate into actual roots. Some of my cuttings have developed roots up to 2-3 inches long before I transferred them to soil.
The Perfect Time to Transfer
Timing is everything when it comes to transferring to soil. I wait until the roots are at least 2 inches long and have developed some secondary branches. This usually takes about 6-8 weeks, though I’ve had some speedy cuttings ready in just 4 weeks!
Here’s my foolproof test: if you see multiple healthy roots that are thick and white (not thin and translucent), it’s time to make the move to soil. Don’t rush this step – I once transferred a cutting too early and lost it because the roots weren’t strong enough to handle the transition.
Water propagation really is like having a front-row seat to the miracle of plant growth. There’s nothing quite like watching those first roots emerge!
Ready to learn what happens next? Click the “next” button below to discover my exact process for transitioning water-propagated cuttings to soil. I’ll share my special soil mix recipe and the watering technique that ensures a 90% successful transition rate. Plus, you won’t want to miss my tips for avoiding transplant shock – it’s a total game-changer!


GIPHY App Key not set. Please check settings