Warning Sign #5: Tiny Moving Dots Mean Pest Invasion is Underway
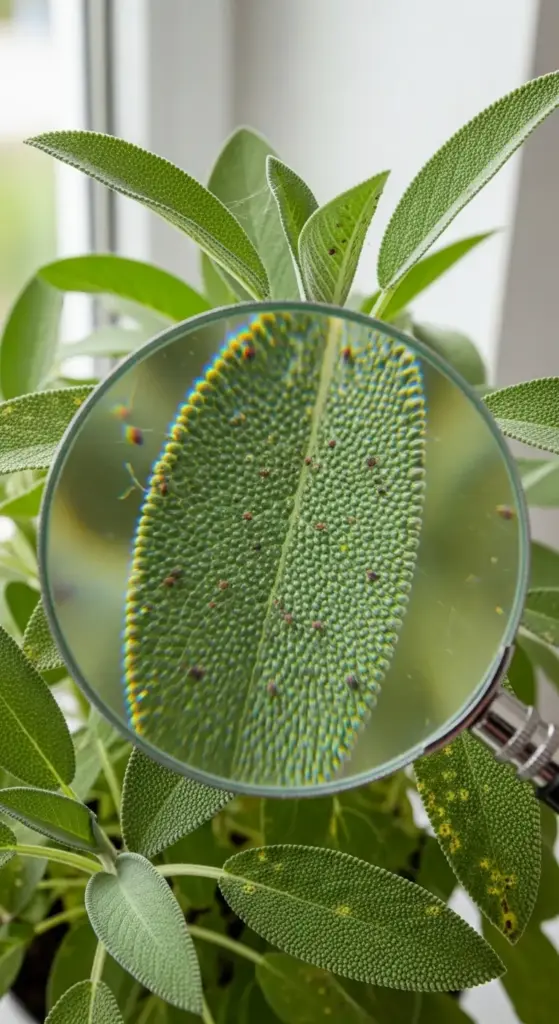
I thought I was losing my mind when I first noticed tiny specks moving on my sage leaves. Seriously, I questioned whether I needed glasses or if stress was making me hallucinate.
Turns out, spider mites had thrown a house party on my plant, and I was the last to know. These microscopic vampires were literally sucking the life out of my sage while I stood there squinting like an idiot.
The Pest Lineup: Know Your Enemy
Spider mites are the ninjas of the plant pest world – barely visible but incredibly destructive. They look like tiny red or brown dots that move slowly across leaf surfaces, and they leave behind fine webbing that looks like dust bunnies.
I discovered them by accident when I was wiping down my sage leaves and noticed the cloth came away with tiny moving specks. That’s when the horror really set in.
Aphids are easier to spot but just as annoying. These little green or black bugs cluster on new growth and leaf undersides, literally sucking plant juices until leaves curl and yellow.
Whiteflies are the drama queens of plant pests. Touch the plant and they fly up in a cloud of tiny white insects, then settle right back down to continue their feast. They leave behind sticky honeydew that attracts other problems.
The magnifying glass I bought for $8 on Amazon became my best plant care investment. What looked like dirt specks turned out to be entire pest colonies having a buffet on my herbs.
Organic Pest Control for Edible Plants
Chemical pesticides were a hard no for me since I actually eat my sage. My first successful treatment was insecticidal soap – just 2 tablespoons of mild dish soap per quart of water.
The key is thorough coverage – you have to hit the undersides of leaves where most pests hide. I learned to flip every single leaf and spray until the solution drips off.
Rubbing alcohol works great for spot treatments. I dip a cotton swab in 70% isopropyl alcohol and dab individual aphids or mite clusters. They die instantly, and it’s oddly satisfying.
For whitefly infestations, I use yellow sticky traps placed near affected plants. The flying adults get stuck, breaking their reproduction cycle. Got mine at the garden center for $5.
Beneficial insects sound fancy, but you can actually buy ladybugs online. I released 500 of them in my apartment (with my roommate’s permission) and they demolished an aphid problem in three days.
DIY Neem Oil: The Nuclear Option
Neem oil is like the Swiss Army knife of organic pest control. I buy pure neem oil and mix my own spray because the pre-made stuff is overpriced and often less effective.
My go-to recipe: 2 tablespoons neem oil, 1 teaspoon mild dish soap, and 1 quart warm water. The soap helps emulsify the oil so it doesn’t separate in the spray bottle.
Timing matters with neem oil – I only spray in the evening because sunlight can cause leaf burn on wet, oily leaves. I learned this after frying half my sage plant on a sunny afternoon.
Shake constantly while spraying because oil and water want to separate. I literally shake the bottle between each plant to keep the mixture consistent.
The smell is… distinctive. Kind of like garlic mixed with old gym socks. But it works, and the odor fades within a few hours of application.


Building Pest Inspection Into Your Routine
I used to only look at my plants when I was watering them, which meant I missed early pest invasions. Now I do weekly inspections every Sunday morning with my coffee.
Leaf undersides are where the action happens. I flip leaves systematically, checking for eggs, webbing, or moving specks. It takes maybe 2 minutes per plant but saves hours of treatment later.
New growth inspection is crucial because pests love tender young leaves. I check the tips and newest leaves extra carefully since that’s where infestations usually start.
I keep a small flashlight with my plant supplies because good lighting reveals problems that normal room light misses. Those tiny spider mites are almost invisible without proper illumination.
Photo documentation helps track problems over time. I take pictures of suspicious spots with my phone so I can compare them week to week and catch slow-developing issues.
Quarantine Setup for New Plants
Every new plant gets mandatory quarantine now, no exceptions. I learned this lesson after a $12 basil plant brought spider mites that infected my entire herb collection.
My quarantine area is a shelf in my spare bedroom, at least 10 feet away from my established plants. New arrivals stay there for 2-3 weeks minimum while I monitor for problems.
Separate watering tools are essential during quarantine. I use different spray bottles, scissors, and even different clothes when handling quarantined plants to prevent cross-contamination.
Daily inspections during quarantine catch problems before they explode. I check new plants every single day for the first week, then every other day after that.
I also shower new plants gently in the sink before quarantine to wash off any hitchhiking pests. It’s like a decontamination process that removes surface pests and eggs.
Emergency Response Protocol
When I find an active infestation, immediate isolation is step one. The affected plant gets moved away from others instantly, even if it messes up my carefully arranged plant display.
Aggressive treatment starts the same day. I don’t wait to see if the problem gets worse – spider mites can double their population every few days in the right conditions.
Document everything – which treatment you used, when you applied it, and how the plant responded. This creates a playbook for future infestations.
Follow-up treatments are usually necessary. Most organic pest controls need 2-3 applications spaced a week apart to break the pest life cycle and catch newly hatched insects.
I also inspect neighboring plants daily for two weeks after discovering an infestation, even if they look healthy. Pests are excellent travelers.
Conquered the creepy crawlies? Click “next” to learn about the most confusing sage problem I’ve ever encountered – wilting despite moist soil. This root issue stumped me for weeks and nearly cost me my favorite plant!


GIPHY App Key not set. Please check settings