Warning Sign #4: White Powdery Coating Reveals Hidden Fungal Infections
I’ll never forget the morning I walked into my kitchen and saw what looked like someone had dusted my sage leaves with flour. My first thought was honestly, “Did I somehow get baking powder on my plant while cooking?”
Nope. Powdery mildew had moved in overnight, and I was about to learn a very expensive lesson about fungal infections spreading through my entire herb collection.
Spotting Powdery Mildew Before It Takes Over
Early detection is everything with fungal issues. That innocent white dusting I ignored for two days? It turned into thick, fuzzy patches that covered half my sage within a week.
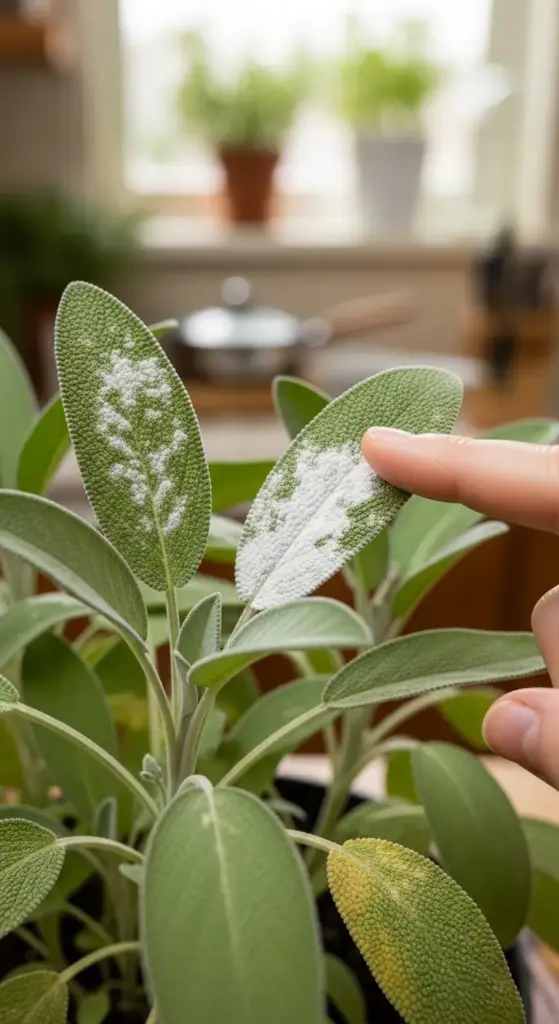
The telltale signs start small – tiny white spots that look like dust or lint on the leaf surface. You can actually wipe it off with your finger at first, but it comes right back within hours.
Advanced powdery mildew looks like someone sprayed white paint on your leaves. The coating gets thick and fuzzy, and underneath, the leaves start turning yellow and dropping off.
Other fungal infections show up differently. I’ve dealt with black spot (exactly what it sounds like) and rust fungus that creates orange-brown spots on leaf undersides. Each one spreads just as fast if you don’t catch it early.
The smell is another giveaway – healthy sage smells earthy and aromatic, but fungal infections create this musty, basement-like odor that hits you when you get close to the plant.
Safe Natural Treatments for Kitchen Herbs
Since I actually cook with my sage, I wasn’t about to spray it with harsh chemicals. My first successful treatment was a baking soda spray – 1 teaspoon per quart of water with a drop of dish soap.
The dish soap is crucial because it helps the solution stick to the leaves instead of just rolling off. I spray in the evening to avoid leaf burn from sun hitting wet leaves.
Neem oil became my go-to prevention and treatment. It’s organic, safe for edible plants, and actually works. I mix 2 tablespoons per gallon of water and spray every 7-10 days during humid weather.
Milk spray sounds weird but it’s surprisingly effective – 1 part milk to 9 parts water. The proteins in milk have natural antifungal properties, and I’ve used this on mild cases with great success.
For severe infections, I remove affected leaves immediately and dispose of them in the trash – never compost fungal-infected plant material because it just spreads the problem.
Air Circulation Hacks That Look Intentional
Poor air circulation was the root cause of my fungal nightmare. My sage was tucked in a corner where air barely moved, creating the perfect breeding ground for mildew.
I started using a small desktop fan on the lowest setting, positioned to create gentle air movement around my plants. It looks like part of my workspace setup, not a plant emergency measure.
Strategic plant spacing made a huge difference. I used to crowd my herbs together for that lush garden look, but now I leave at least 6 inches between pots to allow airflow.
Ceiling fans help more than you’d think. Even on the lowest setting, they create enough air movement to prevent that stagnant, humid microclimate where fungi thrive.


I also moved my sage away from the wall – even 4 inches of space behind the pot allows air to circulate completely around the plant.
Prevention in Humid Climates and Small Spaces
Living in a humid climate means constant vigilance against fungal issues. I learned to run a dehumidifier in my plant area during summer months to keep humidity below 60%.
Watering technique matters more than I realized. I used to water from above, getting the leaves wet every time. Now I water at soil level to keep foliage dry.
Morning watering is key because it gives plants all day to dry off. Evening watering leaves them sitting wet all night, which is basically an invitation for fungi to party.
Overcrowding in small apartments creates humidity pockets. I spread my plants throughout different rooms instead of keeping them all in one “plant corner” where moisture builds up.
I also stopped misting my sage entirely – foliar feeding and humidity boosts aren’t worth the fungal risk with herbs that are prone to mildew.
Quarantine Protocol for Plant Collections
The day I found powdery mildew on my sage, I should have immediately moved it away from my other plants. Instead, I waited three days and watched it spread to my basil and oregano.
Immediate isolation means at least 6 feet away from healthy plants, preferably in a different room. I use my bathroom as a plant hospital because it has good light and I can control the environment.
Check neighboring plants daily for the first two weeks after discovering an infection. Fungal spores are invisible and can travel through air currents to nearby plants.
Quarantine duration should be at least 2-3 weeks after the last signs of infection disappear. I learned this the hard way when I moved a “recovered” plant back too early and it reinfected my collection.
Tools need quarantine too – I now have separate scissors and watering equipment for infected plants, and I clean everything with rubbing alcohol between uses.
When to Give Up and Start Over
Sometimes the infection is just too advanced. I’ve had to throw away entire plants when the fungal damage covered more than 50% of the foliage and kept spreading despite treatment.
Root infections are usually game over. If you see black, mushy roots or smell that distinctive rotten odor, it’s time to say goodbye and start fresh with new soil and a clean pot.
Don’t feel guilty about plant disposal – it’s better to lose one plant than watch an infection destroy your entire collection. I’ve made this mistake and regretted the false economy.
Think fungi are bad? Click “next” to discover the tiny moving dots I found crawling all over my sage leaves – and why these microscopic pests can destroy your plant faster than any fungal infection! The magnifying glass became my new best friend…


GIPHY App Key not set. Please check settings