6. Sophisticated Ceramic Collections for Sage Varieties
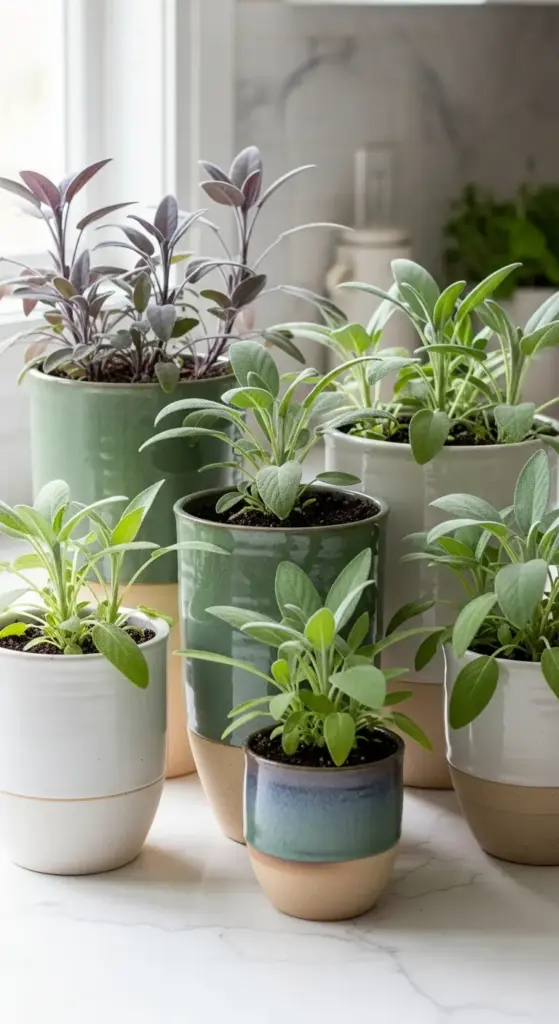
My ceramic planter collection started with one impulse purchase at a local pottery studio – this gorgeous hand-thrown vessel with the most beautiful sage green glaze. The irony of buying a sage-colored pot for sage wasn’t lost on me, but sometimes the universe just aligns perfectly.
That single ceramic pot turned into an obsession that now takes up half my kitchen counter space. But honestly? It’s the most functional art collection I’ve ever owned.
Artisan Ceramics That Steal the Show
Kitchen decor gets elevated instantly when you invest in quality ceramic planters that look intentional rather than random. I learned this after years of mismatched pots that made my kitchen look like a garage sale explosion.
Handmade ceramics have character that mass-produced pots just can’t match. Those slight imperfections and unique glazes tell a story – plus, they’re conversation starters when you’re entertaining.
Local pottery studios are goldmines for finding unique pieces that nobody else will have. I’ve built relationships with three different ceramic artists, and they often create custom pieces based on my specific herb-growing needs.
The functional art aspect is what makes ceramic herb planters worth the investment. These aren’t just plant containers – they’re sculptural elements that happen to grow your dinner ingredients.
Drainage considerations are crucial with artisan ceramics because many artists prioritize beauty over function. I always ask about drainage holes before purchasing, and I’m not shy about requesting modifications.
Glazing effects can actually impact plant health. Darker glazes absorb more heat, which sage varieties generally love, while lighter colors reflect heat and stay cooler. I match my glaze choices to each sage variety’s specific needs.
Sage Variety Growing Guides That Work
Purple sage is my absolute favorite for ceramic containers because the silvery-purple leaves look incredible against almost any glaze color. This variety is practically bulletproof once established – perfect for beginners.
The key with purple sage is not overwatering. I check the soil moisture by sticking my finger about two inches down. If it’s still damp, I wait another day or two. Ceramic retains moisture longer than terracotta, so adjust your watering schedule accordingly.
Garden sage (the classic culinary variety) needs more space than you’d think. I use ceramic pots that are at least 8 inches wide and equally deep. Cramped sage gets woody and bitter – learned that lesson the expensive way.
Pineapple sage is the showstopper of my ceramic collection. The bright red flowers are stunning against white or cream ceramics, and the leaves smell exactly like fresh pineapple when you brush against them.
Growing requirements vary slightly between varieties, but all sages prefer well-draining soil and bright light. I mix regular potting soil with about 25% perlite to improve drainage in ceramic containers.
The seasonal growth patterns of different sage varieties create visual interest throughout the year. Purple sage stays relatively consistent, garden sage goes dormant in winter, and pineapple sage blooms spectacularly in fall.
Color Coordination That Actually Works
Kitchen aesthetics and ceramic herb collections need to work together, not compete for attention. I spent way too much money on beautiful pots that clashed horribly with my existing decor before figuring out some basic coordination principles.
Neutral ceramics work with everything – cream, white, soft gray, and natural clay colors blend seamlessly into most kitchen color schemes. These are my go-to choices for large sage plants that’ll be permanent fixtures.
Accent colors should echo existing elements in your space. If you have blue backsplash tiles, a few blue ceramic planters create cohesion. But don’t go overboard – I made that mistake and my kitchen looked like a pottery showroom explosion.
Dining room aesthetics matter too if your herbs are visible from eating areas. I choose more formal, elegant ceramic pieces for sage plants that’ll be seen during dinner parties.


Texture mixing adds visual interest without color chaos. Smooth glazed ceramics next to matte finishes, or combining different surface treatments, creates depth in your herb display.
The seasonal flexibility of neutral ceramics means you can change up styling elements around them. I add seasonal touches like wooden cutting boards or linen napkins to refresh the look without buying new planters.
Spacing Techniques for Container Success
Ceramic container gardens require different spacing strategies than traditional garden beds because you’re working in confined spaces with specific drainage patterns. I’ve learned this through plenty of overcrowded disasters.
Single sage plants per container work best for most ceramic pots. Sage varieties have different growth habits, and cramming multiple plants together leads to competition and poor performance.
Root space calculations are crucial – sage needs room to spread horizontally as well as vertically. I use the “twice the width of the mature plant” rule when selecting ceramic container sizes.
Grouping multiple ceramic containers creates more visual impact than trying to fit everything in one large pot. I arrange mine in triangular clusters with varying heights for the most pleasing display.
Air circulation between containers prevents fungal issues that can develop in humid kitchen environments. I leave at least 6 inches between ceramic pots to ensure good airflow around all the plants.
The visual weight of ceramic containers affects spacing too. Darker, heavier-looking pots need more space between them, while lighter colors can be grouped more closely without looking cluttered.
Gourmet Harvesting and Preservation
Harvesting techniques for sage grown in ceramic containers are slightly different from garden-grown plants because container plants tend to be more delicate and compact. Timing and method matter more than you’d think.
Morning harvesting after dew evaporates gives you the most concentrated essential oils. I learned this from a chef who insisted that timing affects flavor intensity dramatically.
Proper cutting technique involves using sharp kitchen shears and cutting just above a leaf node. This encourages bushier growth and prevents that scraggly look that happens when you just randomly pinch leaves.
Never harvest more than one-third of the plant at once – I killed my first beautiful ceramic sage garden by getting overzealous before a dinner party. The plants took months to recover from my enthusiasm.
Preservation methods for ceramic-grown sage work best with smaller, more frequent harvests. I dry small bundles tied with kitchen twine, hanging them in my pantry where they’re convenient but out of direct light.
Freezing sage in olive oil creates these amazing flavor cubes that are perfect for winter cooking. I use ice cube trays and pop them out once frozen for easy storage.
The gourmet applications of fresh sage are endless – brown butter sage sauce, crispy fried sage leaves, sage-infused simple syrups for cocktails. Having multiple varieties in beautiful ceramic containers means I always have the perfect sage for whatever I’m cooking.
Ready to dive into the high-tech world of hydroponic herb growing? Hit “next” to discover how modern hydroponic systems can give you fresh mint varieties year-round – plus the smart home integration tricks that’ll make your friends think you’ve hired a professional gardener!


GIPHY App Key not set. Please check settings