2. Vintage Copper Pots for Aromatic Rosemary
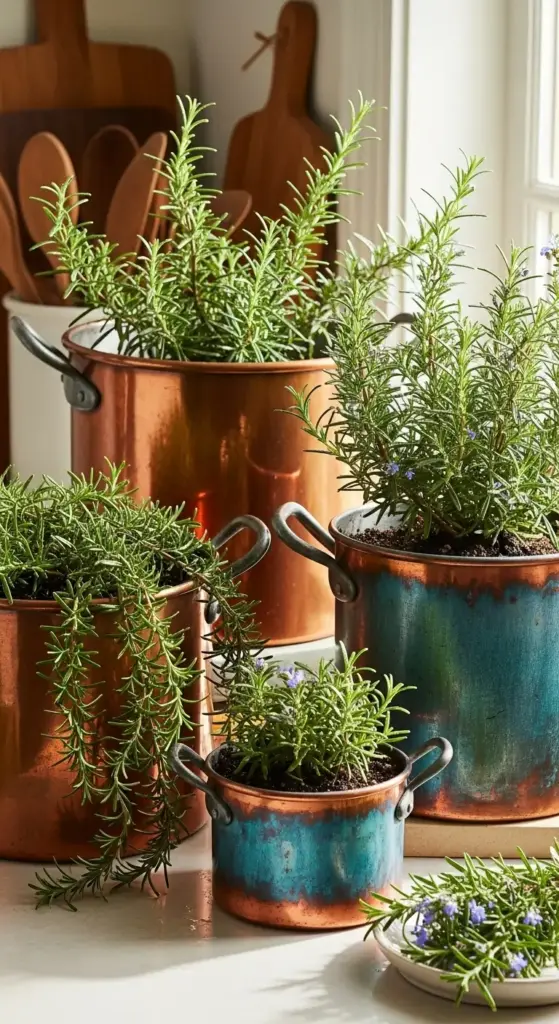
My obsession with copper planters started at a flea market in Philadelphia where I spotted this gorgeous, tarnished copper pot that was practically calling my name. The vendor said it was from an old French kitchen – probably just sales talk, but I was hooked.
That impulse purchase turned into one of my best gardening decisions ever. Rosemary and copper are like a match made in herb heaven.
The Copper Science That Actually Works
Here’s something most people don’t know about copper containers – they naturally release tiny amounts of copper ions into the soil. Sounds scary, but it’s actually amazing for herb root development.
I noticed my rosemary roots were way more robust in copper compared to my plastic pots. The antimicrobial properties of copper help prevent root rot, which is honestly the number one killer of indoor herbs.
Copper also conducts heat differently than other materials. It warms up faster in morning sun but doesn’t get scorching hot like black plastic containers do. Your rosemary roots get this gentle, consistent warmth that promotes healthy growth.
The pH buffering effect is real too – copper slightly alkalizes the soil over time, and rosemary loves that slightly alkaline environment. It’s like the metal was designed for Mediterranean herbs.
Choosing Your Rosemary Variety
Not all rosemary varieties work well in container gardening, and I learned this through some expensive trial and error. My first attempt with standard rosemary was a disaster – the thing grew like a small tree and completely outgrew its copper home.
Prostrate rosemary is perfect for copper pots because it stays compact and trails beautifully over the edges. The variety ‘Prostratus’ has this gorgeous cascading habit that looks incredible in vintage copper.
‘Arp’ rosemary is my go-to for cooking because it’s super hardy and has this intense, piney flavor that holds up well in roasted dishes. Plus, it stays relatively compact in containers.
Blue Boy rosemary is the dwarf variety that works amazing in smaller copper pots. The tiny blue flowers are adorable, and the needle-like leaves pack serious flavor punch.
Creating That Perfect Patina
The authentic vintage appeal of copper planters comes from the patina – that gorgeous green-blue oxidation that develops over time. But waiting for natural patina can take years, and honestly, who has that kind of patience?
I’ve experimented with different patina solutions, and here’s what actually works. A mixture of white vinegar and salt creates beautiful blue-green patina in just a few weeks when applied regularly.


For faster results, I use a solution of ammonia and salt – but do this outside because the fumes are intense. The patina develops in days rather than months with this method.
Weather exposure speeds up the process naturally. I leave my copper pots outside during rainy periods, then bring them back to their kitchen spots once I like the patina level.
Strategic Placement for Success
Kitchen accessibility is crucial when you’re growing herbs for cooking. I made the mistake of putting my first copper rosemary pot on a high shelf – looked great but was totally impractical for daily use.
Counter space near your main prep area is ideal if you’ve got the room. I keep mine about arm’s length from my cutting board so I can snip fresh rosemary while I’m cooking.
Natural light requirements for rosemary are pretty specific – they need at least 6 hours of direct sunlight daily. South-facing windows work best, but I’ve had success with bright east-facing spots too.
Avoid placing copper pots near heat sources like stoves or dishwashers. The extra heat can stress the plants and cause the copper to expand and contract, potentially cracking your beautiful patina.
Professional Pruning Secrets
The pruning techniques I learned from watching restaurant chefs completely changed my rosemary game. Most home gardeners are way too gentle with their pruning – rosemary actually loves aggressive cutting.
Cut back about one-third of the plant every few months to keep it bushy and prevent it from getting woody. I use sharp kitchen shears and make clean cuts just above leaf nodes.
Harvesting for cooking should be done in the morning after the dew dries but before the heat of the day. The essential oils are most concentrated then, giving you maximum flavor impact.
Never cut more than 25% of the plant at once for cooking – I learned this when I got overzealous prepping for a dinner party and nearly killed my poor rosemary plant. It took months to recover from my enthusiasm.
Want to know why concrete planters are taking over high-end restaurant kitchens? Hit that “next” button to discover how minimalist concrete vessels create the perfect environment for thyme – plus the DIY secrets that’ll save you hundreds on designer planters!


GIPHY App Key not set. Please check settings