6. Never Rush the Transplanting Process
This one hits close to home because I’ve murdered more monstera cuttings at the transplant stage than I care to admit. The excitement of seeing those first tiny roots made me way too eager.
I used to transplant as soon as I saw any root development – like literally 1-inch roots that were barely there. Within days, my beautiful propagated cuttings would wilt and die.
Patience is not my strong suit, but I learned the hard way that transplant timing can make or break months of careful propagation work.
Reading Root Readiness Like a Pro
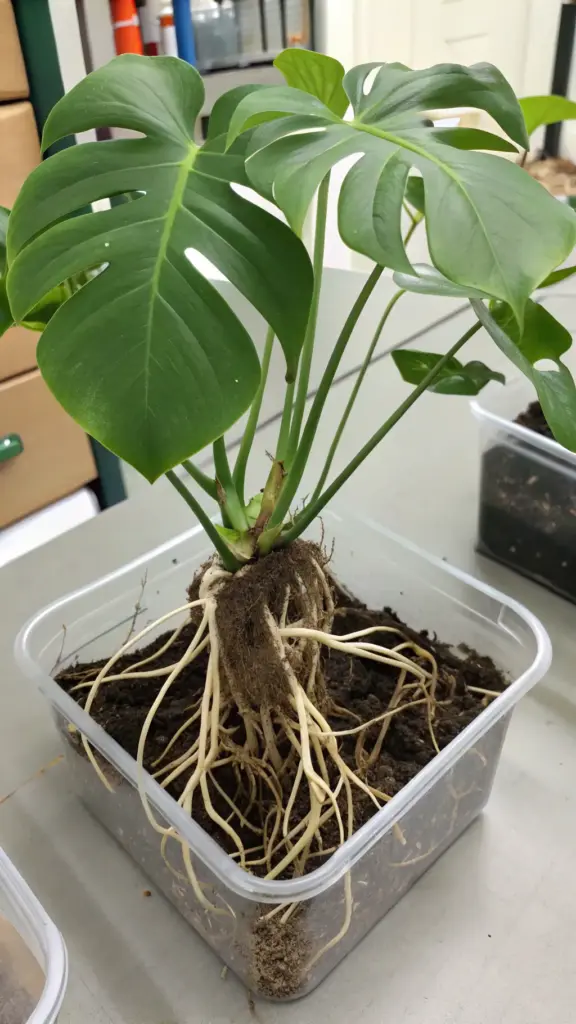
Strong roots for transplanting should be at least 2-3 inches long and thick enough that they don’t break when you gently handle them. Wimpy little thread roots aren’t ready for the big leagues.
I look for multiple root systems developing from different nodes, not just one lonely root trying to do all the work. The more root mass, the better your chances.
White or cream-colored roots are healthy and ready. Brown or mushy roots mean you’ve got problems that need fixing before any transplant happens.
My Foolproof Transplant Method
First, I prepare everything before touching the cutting – well-draining potting mix, appropriately sized pot, and a quiet workspace where I won’t be rushed.
I gently remove the cutting from water and let excess moisture drip off for about 10 minutes. This prevents the roots from going into shock from sudden soil contact.
The planting depth should position the root system just below soil level, with the stem and nodes sitting right at the surface.
Soil Mix That Actually Works
Regular potting soil is usually too heavy for newly transplanted cuttings. I learned this after watching several plants slowly suffocate in dense soil.
My go-to transplant mix is 50% quality potting soil, 30% perlite, and 20% orchid bark. It drains well but still holds enough moisture.
Chunky, airy soil lets those delicate new roots spread out without fighting through compacted dirt. Think jungle floor, not clay brick.
Recognizing Transplant Shock
Transplant shock usually shows up within the first week as drooping leaves, even when the soil moisture is perfect. It’s like the plant is having a panic attack.
Yellowing leaves from the bottom up is another classic sign, especially if it happens suddenly after transplanting. The cutting is basically saying “this is too much change too fast.”
Wilting that doesn’t improve with proper watering means the root system isn’t functioning yet in its new environment.
Prevention Strategies That Work
I always transplant during the growing season (spring/summer) when plants naturally recover faster. Winter transplants are just asking for trouble.
Gradual acclimation helps too – I keep newly transplanted cuttings in slightly lower light for the first week to reduce stress.
Consistent moisture without overwatering is crucial. The soil should feel like a wrung-out sponge, never soggy or bone dry.
My Post-Transplant Care Routine
Humidity becomes even more important after transplanting. I keep a humidity dome or plastic bag loosely over the plant for the first few days.


No fertilizer for at least 4-6 weeks – those roots need time to establish before dealing with nutrients. I made this mistake early on and burned several transplants.
Gentle watering around the edges of the pot, not directly on the stem. I use a spray bottle to mist the soil surface lightly.
Signs of Successful Establishment
New growth is the ultimate sign that your transplant worked. Usually takes 2-4 weeks to see fresh leaves or aerial root development.
Perky leaves that stay upright and maintain their color mean the root system is functioning properly in the new soil.
Resistance when gently tugging the plant indicates the roots are spreading and anchoring into the soil.
Troubleshooting Common Issues
If transplant shock hits hard, I immediately increase humidity and reduce light exposure. Sometimes you need to baby them back to health.
Root rot after transplanting usually means the soil is too wet or doesn’t drain well enough. I’ll carefully unpot, trim damaged roots, and repot in better soil.
Slow recovery is normal – some cuttings take 6-8 weeks to fully establish. Patience is everything at this stage.
When to Admit Defeat
Sometimes transplants just don’t make it, and that’s okay. I’ve learned to recognize when a cutting is too far gone to save.
Completely yellow leaves, mushy stems, or black roots usually mean it’s time to start over. Cut your losses and learn from the experience.
Multiple failed transplants from the same propagation batch often indicates the roots weren’t actually ready, even if they looked good.
Building Transplant Confidence
I keep detailed notes about root length and transplant timing for each cutting. Tracking success rates helps me dial in the perfect timing.
Practice with easier plants first – pothos and philodendrons are way more forgiving than monsteras for learning transplant techniques.
Start small with 4-inch pots rather than going straight to large containers. Newly transplanted cuttings do better in appropriately sized homes.
Conclusion
Propagating your monstera doesn’t have to be intimidating! By avoiding these six critical mistakes, you’re setting yourself up for that incredible moment when you see those first tiny roots emerging. Remember, every plant parent has been where you are right now – we’ve all killed a cutting or two along the way.
The key is patience, observation, and giving your plant babies the consistent care they deserve. Your future self (and your beautifully filled home) will thank you for taking the time to do it right. Ready to start your propagation journey?
Grab those clean shears and let’s grow something amazing together!


GIPHY App Key not set. Please check settings