4. Never Overwater Your Propagation Setup
I used to think more water meant faster root growth. Classic beginner mistake that cost me so many beautiful cuttings.
My first water propagation attempt looked like a science experiment gone wrong – murky, smelly water with black, mushy stems floating around like sad plant zombies.
I was changing the water daily and topping it off constantly. Turns out I was basically drowning my monstera cuttings with kindness.
The Goldilocks Zone of Watering
Propagation watering is all about finding that sweet spot – not too much, not too little, but just right. It took me months to figure this out through trial and error.
For water propagation, you want the water level to cover the nodes but not submerge the entire stem. About 2-3 inches of water is usually perfect.
Soil propagation needs even more finesse – the soil should feel like a wrung-out sponge, moist but not soggy or dripping wet.
Reading Your Cutting’s Thirst Signals
Learning to tell the difference between a thirsty cutting and a drowning one literally saved my propagation game. The signs are totally different once you know what to look for.
A thirsty cutting in water will have clear, clean water that’s dropped below the node level. The aerial roots might look a bit shriveled or dry.
Drowning symptoms include cloudy or smelly water, black or mushy root tips, and leaves that turn yellow from the bottom up. Not a pretty sight.
Water vs. Soil Propagation Schedules
My water propagation routine is way simpler now – I change the water every 5-7 days, or sooner if it starts looking cloudy. No more daily water changes that stressed everyone out.
For soil propagation, I check the moisture level by sticking my finger about an inch down. If it’s dry, time to water lightly around the edges.
Soil cuttings usually need water every 7-10 days, but it totally depends on your humidity and temperature. I learned to trust the soil, not the calendar.
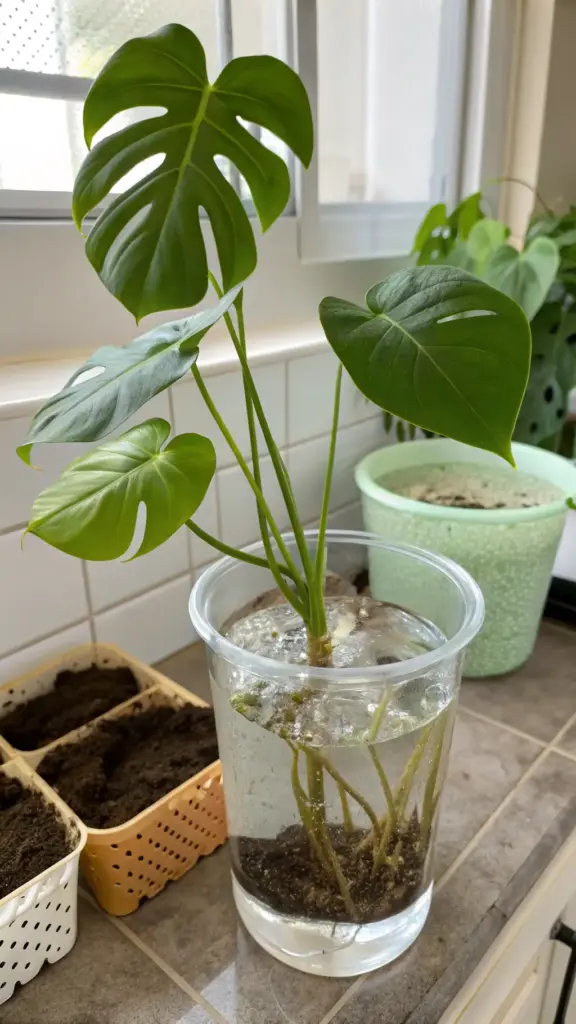
My Water Propagation Setup
I use clean glass jars filled with filtered water – tap water works too, but I let it sit out overnight to let the chlorine evaporate. Those chemicals can stress already vulnerable cuttings.
The water level stays consistent at about 2 inches, just enough to keep the nodes happy without creating a bacterial swimming pool.
I add a tiny piece of activated charcoal to each jar now. Keeps the water cleaner longer and prevents that gross smell I used to deal with.


Soil Propagation Watering Wisdom
Well-draining potting mix changed everything for my soil propagation success. Regular potting soil holds too much moisture and creates root rot city.
I mix my own blend – regular potting soil, perlite, and a bit of orchid bark for extra drainage. The cuttings can get moisture without sitting in soggy conditions.
Bottom watering became my go-to method. I put the pots in a tray of water for 30 minutes, then let them drain completely.
Spotting Root Rot Early
Root rot starts as dark, mushy spots on the roots or stem. Healthy roots should be white or light tan, never black or slimy.
The smell is usually the first giveaway – that gross, swampy odor that hits you when you lift the cutting. Healthy propagation setups shouldn’t smell like anything.
Yellowing leaves from the bottom up is another red flag, especially if the soil feels constantly wet or the water looks murky.
Emergency Root Rot Rescue
When I catch root rot early, I can usually save the cutting with some quick action. Time is everything with this stuff.
First, I remove the cutting and trim off all the black, mushy parts with sterilized scissors. Sometimes you lose a lot, but it’s better than losing everything.
Then I let the cut areas dry for a few hours before putting the cutting in fresh water or new, dry soil. Give those wounds time to callus over.
Prevention is Everything
Now I use the “less is more” approach to propagation watering. It’s way easier to add water than to fix root rot.
I keep a simple schedule written down – water change dates for my water propagation jars, and soil check dates for my potted cuttings.
Proper drainage and consistent (not constant) moisture keeps my success rate way higher than my old “water everything daily” approach.
Think you’ve mastered the watering game? The next mistake involves something most people completely ignore – and it can make or break your root development in ways that’ll shock you! Click “next” to discover why your home’s environment might be secretly sabotaging your propagation success. 🌡️🔥


GIPHY App Key not set. Please check settings