3. Never Place Cuttings in Direct Sunlight
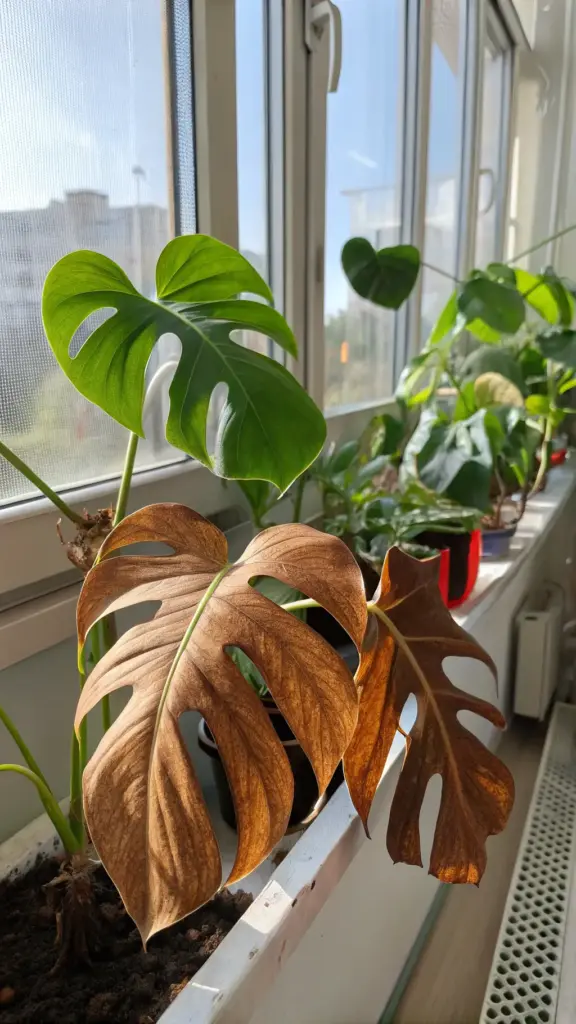
Picture this: I’m so excited about my fresh monstera cuttings that I put them right on my south-facing windowsill. Seemed logical at the time – plants need light, right?
Within 48 hours, those beautiful green leaves looked like someone had taken a blowtorch to them. Crispy, brown, and absolutely heartbreaking.
I literally watched my propagation dreams shrivel up in real time. Talk about a rookie mistake that still makes me cringe.
Why Indirect Light is Your Best Friend
Here’s what I wish someone had told me earlier – fresh cuttings are basically plant babies in the ICU. They’re vulnerable and stressed from being separated from their root system.
Direct sunlight is like putting a sick person under a heat lamp. The cutting can’t process that intense energy without a proper root system to support it.
Bright, indirect light gives your cutting just enough energy to focus on root development without overwhelming its already stressed system.
The Perfect Window Hunt
After my windowsill disaster, I became obsessed with finding the ideal propagation spots around my house. It’s like real estate – location, location, location.
My north-facing windows became my go-to spots. They get consistent, gentle light all day without those harsh direct rays.
East-facing windows work great too, especially if you can place your cuttings a few feet back from the glass. Morning sun is way gentler than that brutal afternoon heat.
Reading Your Cutting’s Light Signals
Learning to spot light stress early saved me from so many more propagation failures. Your plants are constantly talking to you if you know what to look for.
Too much light shows up as yellowing leaves, brown crispy edges, or that telltale bleached-out look. The cutting basically looks sunburned because, well, it is.
Too little light is trickier – you’ll see slow or no root growth, leggy stretching toward windows, or leaves that start looking pale and weak.
My Current Window Strategy
I’ve got my propagation stations set up about 3-4 feet from my brightest windows now. Close enough for good light, far enough to avoid the danger zone.


Sheer curtains became my secret weapon for filtering that harsh afternoon sun. They diffuse the light perfectly without blocking it completely.
I also rotate my cuttings every few days so all sides get equal light exposure. Prevents that weird lopsided growth thing that used to drive me crazy.
The Grow Light Game-Changer
When I finally invested in some LED grow lights, my propagation success rate went through the roof. Consistent, controlled lighting takes all the guesswork out.
I use full-spectrum LED panels positioned about 12-18 inches above my cutting containers. They run on a timer for about 12-14 hours daily.
Grow lights let me propagate year-round without worrying about seasonal light changes or cloudy weather ruining my progress.
Creating the Perfect Light Setup
My current setup uses a combination of natural indirect light and supplemental grow lighting. Best of both worlds without the stress.
I keep my propagation area in a spot that gets good ambient light, then add the LED strips for consistency. The plants seem to love this hybrid approach.
Light meters helped me dial in the perfect intensity – around 200-400 foot-candles for most monstera cuttings. Sounds fancy, but you can get a decent meter for like$15.
Signs You’ve Nailed the Light Balance
When you get the lighting just right, your cuttings will tell you. New root growth appears within 2-3 weeks, and the leaves stay that gorgeous deep green color.
No yellowing, no browning, no weird stretching – just healthy, happy cuttings doing their thing at a steady pace.
The aerial roots start plumping up and turning white, which is basically plant language for “thank you for not frying me alive.”
Got your lighting dialed in perfectly? Don’t celebrate yet – the next mistake involves water and it’s probably the #1 cutting killer I see in plant parent groups! Click “next” to learn why that “just add water” mentality might be drowning your monstera babies. 💧😱


GIPHY App Key not set. Please check settings