2. Never Use Dirty or Dull Cutting Tools
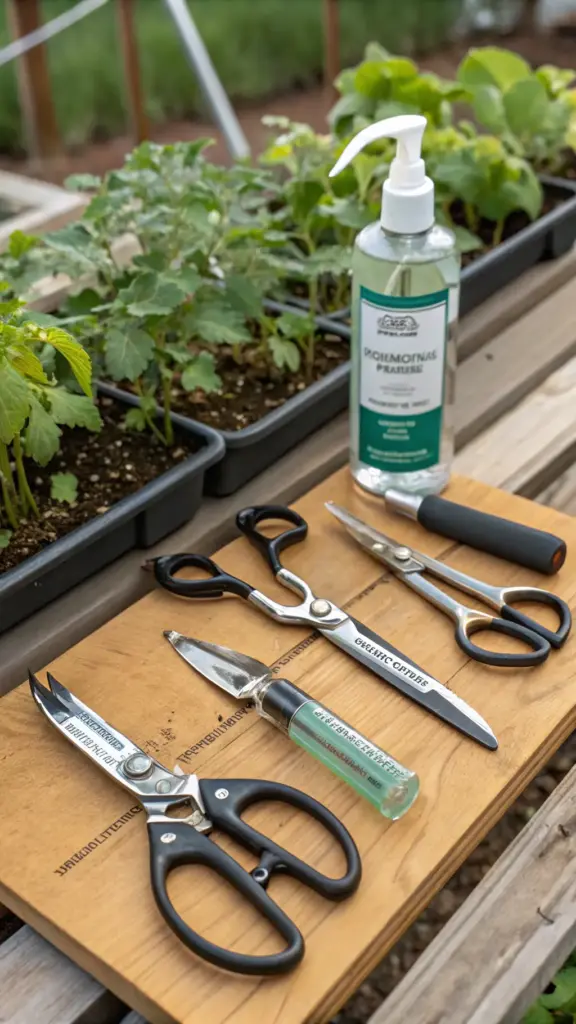
I used to think my old kitchen scissors were perfectly fine for plant propagation. Boy, was I wrong about that assumption.
One afternoon, I decided to take cuttings from three different plants using the same pair of scissors. Didn’t even think about cleaning them between cuts.
Two weeks later, all three of my monstera cuttings developed this gross black rot at the cut sites. I basically created a bacterial highway between my plants.
The Sterilization Game-Changer
After that disaster, I became obsessed with tool sterilization. It’s honestly not that complicated, but it makes such a huge difference.
I learned that bacteria and fungi love to hang out on cutting tools. They’re just waiting for their next victim – your precious plant babies.
Now I wipe down my pruning shears with rubbing alcohol before every single cut. Takes like 10 seconds but saves weeks of heartbreak.
Choosing the Right Tool for Each Job
Different stem thicknesses need different approaches, and I had to figure this out through trial and error. Thin, young stems get crushed by heavy-duty pruners.
For stems thinner than a pencil, I use small craft scissors or precision pruners. They give me way better control and cleaner cuts.
Thicker, mature stems need the real deal – bypass pruners that can handle stems up to about an inch thick without crushing the plant tissue.
How Contaminated Tools Spread Plant Death
Here’s something that still gives me nightmares – I once lost five plants from my collection because of one dirty cutting tool. One tool, five dead plants.
The bacterial infection spread like wildfire through my propagation station. Each cutting I made with that contaminated tool became a new infection site.
Root rot started showing up in plants that weren’t even related to my original cuttings. It was like a horror movie for plant parents.


DIY Sterilization That Actually Works
You don’t need fancy expensive solutions for tool cleaning. I keep a small spray bottle filled with 70% rubbing alcohol right next to my plant supplies.
Between each cut, I give my tools a quick spray and wipe. Takes maybe 15 seconds but prevents so much drama later.
I also discovered that a 10% bleach solution works great for deeper cleaning. Just make sure to rinse thoroughly afterward because bleach residue can damage plant tissue.
The Sharp Tool Revolution
Dull tools are almost worse than dirty ones because they create jagged cuts that take forever to heal. Think paper cut versus clean surgical incision.
I sharpen my pruning shears every few months now, and the difference is incredible. Clean cuts seal themselves faster and resist infection better.
You can tell when your tools are getting dull – the cuts start looking crushed or torn instead of clean and precise.
My Current Tool Cleaning Routine
Before I start any propagation session, I lay out all my tools and give them the full treatment. Alcohol wipe, sharpness check, backup tools ready.
I even keep separate tools for different plant families now. My monstera tools don’t touch my pothos, and vice versa.
It might seem excessive, but after losing so many plants to preventable infections, I’d rather be overly cautious than sorry.
Think you’ve got the cutting part down? Wait until you see how the next mistake can literally cook your precious monstera cuttings alive! Click “next” to learn why that sunny windowsill might be the worst possible spot for your propagation setup. ☀️💀


GIPHY App Key not set. Please check settings