Did you know that 68% of houseplant enthusiasts fail at their first monstera propagation attempt? Don’t let that discourage you! As someone who’s been nurturing these gorgeous statement plants for years, I’ve seen every mistake in the book – and trust me, I’ve made plenty myself.
Your monstera deliciosa isn’t just a plant; it’s a living piece of art that transforms your space into an Instagram-worthy jungle oasis.
Whether you’re looking to expand your collection, share cuttings with fellow plant parents, or simply want that satisfaction of growing something beautiful with your own hands, successful propagation is totally achievable.
But here’s the thing – there are some critical mistakes that can turn your propagation dreams into a nightmare of rotting stems and disappointment.
1. Never Cut Without Proper Node Identification

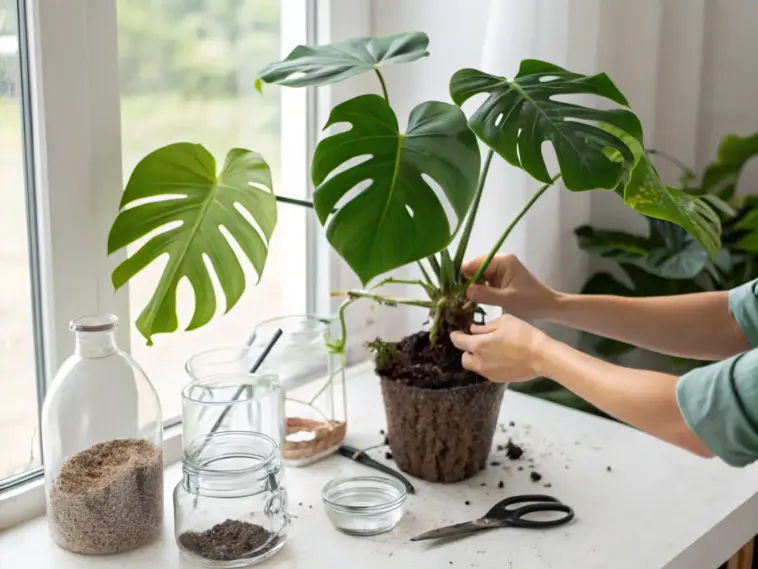
Oh boy, do I have a story for you about this one. Last spring, I was feeling super confident about my monstera propagation skills and decided to take like six cuttings from my gorgeous deliciosa.
I grabbed my scissors and just started snipping away at what looked like good spots. Big mistake.
Three weeks later, I’m staring at a bunch of sad, rotting stems floating in murky water. Not a single root in sight, and I felt like such a plant parent failure.
What Exactly Are Nodes and Why They Matter
Here’s the thing about monstera nodes – they’re basically the plant’s reproductive powerhouses. Think of them as little factories where all the magic happens.
A healthy node looks like a small bump or swelling on the stem, usually brownish or tan colored. Sometimes you’ll see tiny aerial roots already poking out, which is like hitting the propagation jackpot.
Without a proper node, your cutting is basically just a pretty green stick that’s gonna die. I learned this the hard way, obviously.
How to Spot the Perfect Cutting Location
The best cutting spots are right below where you see those aerial roots or node bumps. I always look for sections that have at least one fully developed leaf and one clear node.
Pro tip I wish someone had told me earlier – use your phone’s flashlight to really examine the stem closely. Those nodes can be sneaky little things, especially on younger plants.


You want to see that slightly raised area on the stem, maybe with some brownish coloring or tiny root nubs. If you’re squinting and not sure, it’s probably not the right spot.
The Tools That Actually Make a Difference
After my epic propagation fail, I invested in some proper plant cutting tools. My old kitchen scissors were apparently doing more harm than good.
I grabbed a pair of sterilized pruning shears – nothing fancy, just clean and sharp. The difference was incredible.
Clean cuts heal faster and reduce the risk of bacterial infections. I also keep some rubbing alcohol nearby to wipe down my tools between cuts.
Visual Clues That Scream “Cut Here!”
Look for stems that are at least pencil-thick with visible node development. Thin, spindly growth usually doesn’t have mature enough nodes for successful propagation.
The sweet spot is usually between leaf nodes, about 4-6 inches from the tip. You want that cutting to have some substance to it.
I always count at least two nodes per cutting now – gives me better odds and makes me feel way more confident about the whole process.
Why Wrong Cuts Equal Dead Plants
When you cut in random spots without nodes, you’re basically asking your plant to perform miracles. Monstera cuttings need those specialized cells in the nodes to develop new root systems.
I’ve seen people try to root just leaves or stem pieces without nodes. It’s like trying to grow a tree from a random branch – just not gonna happen.
The propagation success rate drops to basically zero without proper node identification. Trust me, I’ve got the dead plant collection to prove it.
Ready to learn about the next crucial mistake that could ruin your propagation dreams? Click the “next” button below to discover why your cutting tools might be secretly sabotaging your monstera babies before they even have a chance to root! 🌱


GIPHY App Key not set. Please check settings