
7. The Propagation Mastery Method
I’ll admit it – I was intimidated by plant propagation for years. The whole process seemed like some kind of botanical wizardry that only master gardeners could pull off.
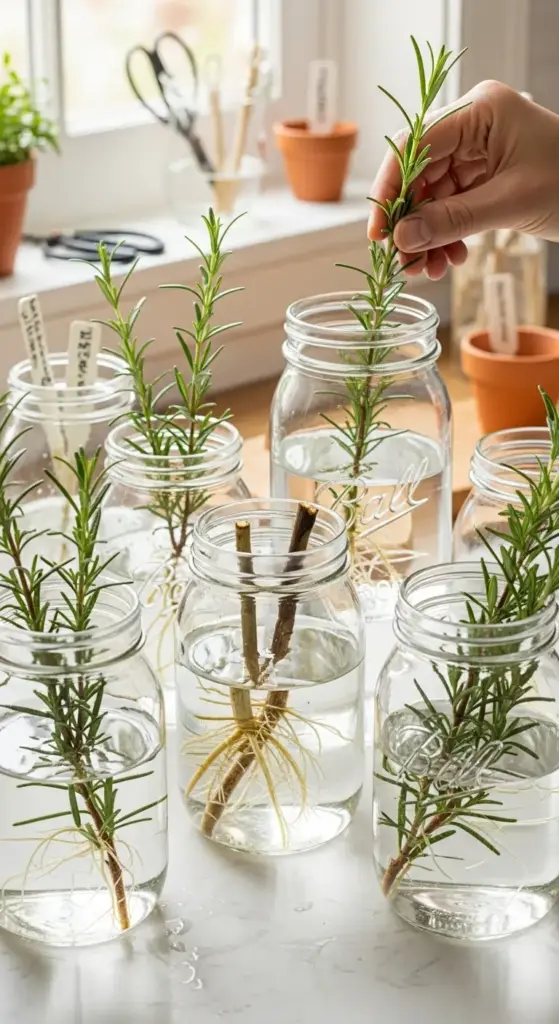
Then my neighbor gave me a tiny rosemary cutting in a mason jar, and I watched in amazement as roots appeared within two weeks. That’s when I realized propagation isn’t magic – it’s just timing and technique.
The Water Propagation Trick That Never Fails
Here’s my 95% success rate method that I’ve perfected over three years of obsessive experimentation:
Take 4-6 inch cuttings from new growth (not woody stems). Strip the bottom 2 inches of leaves, leaving just the top foliage.
Place cuttings in a clear glass jar with about 2 inches of room temperature water. The key is using filtered or distilled water – tap water chemicals can inhibit root development.
Change the water every 3-4 days religiously. This step alone doubled my success rate when I started being consistent about it.
The Perfect Cutting Selection Strategy
Not all rosemary stems are created equal for propagation. I learned this after failing with dozens of cuttings before figuring out the pattern.
Best cuttings come from:
- Semi-hardwood growth (flexible but not completely soft)
- Stems that haven’t flowered recently
- Morning harvests when plants are fully hydrated
- Healthy parent plants that aren’t stressed
Avoid these stems:
- Woody, brown stems (they rarely root)
- Brand new, super soft growth (too fragile)
- Stems from flowering branches
- Any cutting with yellowing or damaged leaves
Timing That Makes All the Difference
Late spring through early summer is propagation gold time. I get my highest success rates between May and July when plants are in active growth mode.
Fall propagation can work, but the success rate drops to maybe 60-70%. Winter propagation? Forget about it – I’ve never had success with winter cuttings.
Morning cutting collection works better than afternoon. The stems are fully hydrated and less stressed from daily heat and sun exposure.
My Step-by-Step Foolproof Method
Day 1: Take 4-6 inch cuttings in the morning, immediately into water Days 2-7: Change water every other day, watch for tiny root bumps Days 8-14: Roots should be visible, keep changing water Days 15-21: Roots are 1-2 inches long, ready for soil transition Days 22-28: Plant in small pots with well-draining soil mix
The soil transition is where most people mess up. I use a 50/50 mix of potting soil and perlite for newly rooted cuttings.
The Rooting Hormone Debate (My Honest Take)
I’ve tried propagation with and without rooting hormone, and honestly? The difference isn’t huge with rosemary.
Rooting hormone might speed things up by 3-5 days, but it’s not necessary for success. I only use it now when I’m propagating expensive or rare rosemary varieties.
Honey water works almost as well as commercial rooting hormone. Mix 1 teaspoon honey in 2 cups warm water, let cuttings sit for 30 minutes before regular water propagation.
Creating Your Rosemary Empire
From one healthy parent plant, I can easily get 8-12 new plants per growing season without stressing the original.
My propagation schedule:
- May: First round of cuttings (4-6 pieces)
- June: Second round from new growth
- July: Final round before summer heat
This gives me plenty of plants for gifts, expanding my own garden, and backup plants in case something happens to the originals.
The Mason Jar Setup That Works
Clear glass containers are essential – you need to see root development and water quality. I use wide-mouth mason jars because they’re the perfect size and easy to clean.
Place jars in bright, indirect light. Direct sun heats the water too much and can cook the delicate new roots.
I keep my propagation station on a north-facing windowsill where it gets consistent light without temperature swings.
Troubleshooting Common Failures
Problem: Cuttings turn black and mushy Solution: Water was too warm or changed too infrequently. Start over with fresh cuttings.
Problem: No roots after 3 weeks Solution: Cutting was probably too woody. Try softer, newer growth.
Problem: Roots appear then disappear Solution: Water quality issue or temperature shock. Use filtered water and avoid temperature swings.


Problem: Leaves dropping off cutting Solution: Normal stress response. As long as the stem stays green, keep going.
The Soil Transition Technique
Moving rooted cuttings from water to soil is the most critical step. I’ve lost more plants here than anywhere else in the process.
Wait until roots are at least 1-2 inches long. Shorter roots often can’t handle the transition stress.
Use small pots (3-4 inch) with excellent drainage. Big pots hold too much moisture for newly transplanted cuttings.
Water very lightly after planting – just enough to settle the soil. The roots are used to constant moisture, but soil that’s too wet causes rot.
My Propagation Station Setup
I keep a dedicated propagation area on my kitchen counter near the sink. Easy water changes, good light, and I see the progress daily.
Equipment list:
- 6-8 mason jars
- Sharp, clean scissors
- Small watering can
- Labels (I forget which cutting is which variety)
- Small pots for transplanting
The Gift Plant Strategy
Propagated rosemary makes incredible gifts. I start extra cuttings in March so I have beautiful potted plants ready for Mother’s Day, teacher gifts, and housewarming presents.
People are always amazed when I tell them I grew the plant from a cutting. It makes the gift feel so much more personal and thoughtful.
Advanced Propagation Tricks
The double-jar method: Use a smaller jar inside a larger one to create an air gap. This prevents temperature swings and seems to improve root development.
The plastic bag trick: Cover the cutting and jar with a clear plastic bag to increase humidity. Especially helpful in dry climates or winter indoor air.
The aspirin water method: Dissolve 1/4 aspirin tablet in the propagation water. Some gardeners swear it improves root development, though I’m not 100% convinced.
Building a Collection for Cooking
Different rosemary varieties have distinct flavors, and propagation lets me build a collection without spending a fortune.
I now have:
- Tuscan Blue (classic cooking variety)
- Arp (cold-hardy for outdoor growing)
- Prostrate (trailing variety for containers)
- Golden Rain (variegated leaves, mild flavor)
Each variety propagates slightly differently, but the basic water method works for all of them.
My Biggest Propagation Disasters
Disaster #1: Left cuttings in water for 6 weeks because I was too busy to transplant. The roots got so long and tangled that transplanting shocked them to death.
Disaster #2: Used tap water with high chlorine content. Nothing rooted properly until I switched to filtered water.
Disaster #3: Tried to propagate 20 cuttings at once in summer heat. The success rate was terrible because I couldn’t keep up with water changes.
Lesson learned: Start small, be consistent, and don’t get greedy with quantities until you master the basics.
Conclusion
These seven master herbalist secrets have transformed countless struggling rosemary plants into thriving, aromatic additions to home gardens across the country.
From the Mediterranean soil mimicry method to the propagation mastery technique, you now have the insider knowledge that separates successful herb gardeners from those who struggle with plant care.
Remember, growing rosemary isn’t just about having fresh herbs for your cooking – it’s about creating a beautiful, functional element in your garden design that connects you to centuries of herbal wisdom.
Your friends will be amazed at your lush, fragrant rosemary plants and beg for your secrets!
Start implementing these techniques today, beginning with the soil preparation method. Your rosemary plants will thank you with vigorous growth, intense fragrance, and abundant harvests.
Don’t forget to share your success stories and tag us in your beautiful herb garden photos – we love seeing these ancient secrets work their magic in modern homes!


GIPHY App Key not set. Please check settings