7. Artistic Laser-Cut Panel Alternatives

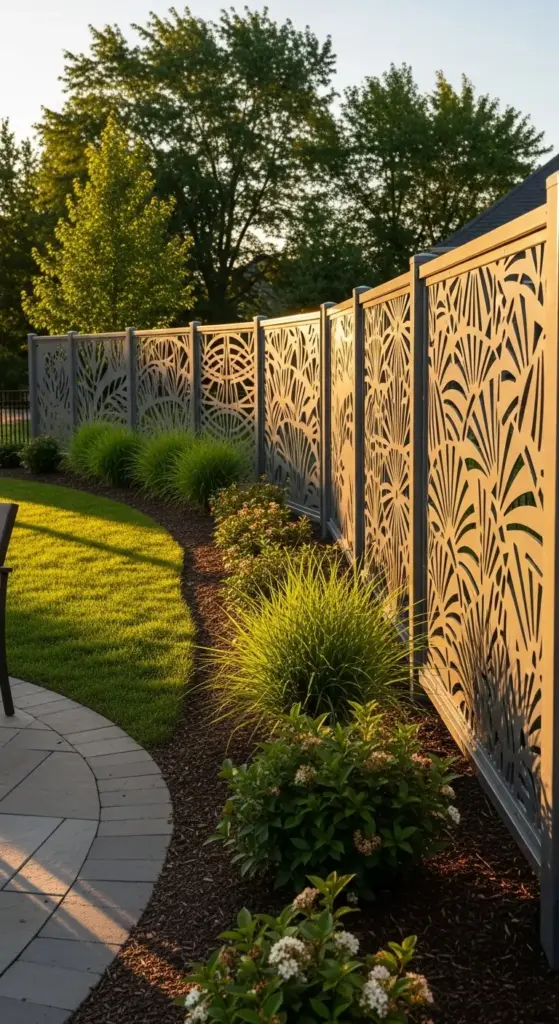
When I first saw those stunning artistic laser-cut panels in upscale fence designs, I was absolutely blown away. The intricate patterns, the way light filtered through the cutouts – it was like functional art for your backyard. Then I got quotes from laser cutting services and nearly fell over. $200-500 per panel? For a fence?
That’s when my stubborn DIY side kicked in. I was determined to figure out how to create these gorgeous patterns without spending a fortune on professional laser cutting. My first attempts were… well, let’s just say my jigsaw skills weren’t quite up to creating delicate geometric patterns!
But after months of experimenting with different materials and techniques, I’ve developed methods for creating laser-cut panel alternatives that look absolutely stunning and cost about 90% less than the real thing. The secret is choosing the right materials and using the proper cutting techniques for each design type.
Creating Custom Patterns Using Affordable Cutting Techniques
Custom pattern creation became my obsession once I realized how much money I could save. The key is matching your cutting technique to the complexity of your desired pattern.
Jigsaw cutting works great for larger, simpler patterns with gentle curves. I use a fine-tooth blade and go slowly – rushing always leads to rough edges that look obviously homemade. For best results, I clamp a straight edge as a guide for long cuts.
Router cutting with templates creates incredibly clean, repeatable patterns. I make my templates from 1/4-inch MDF and use a flush-trim router bit. This technique is perfect for geometric patterns with straight lines and consistent curves.
Scroll saw work handles the most intricate patterns that would normally require laser cutting. I bought a decent scroll saw for $300 – way less than having a few panels laser cut. The learning curve is steep, but the results are amazing.
CNC routing is the ultimate solution if you have access to one. Many makerspaces and community colleges have CNC routers you can rent by the hour. I’ve created incredibly complex patterns this way for about $20 per panel in machine time.
Hand cutting techniques still have their place for certain designs. I use a coping saw for small interior cutouts and a sharp utility knife for scoring cuts in thinner materials. Sometimes the old-school methods work best.
Template systems let you reproduce successful patterns multiple times. I make templates from hardboard or thin plywood and use them to trace patterns onto my panel material. Consistency is key for professional-looking results.
Plywood and MDF Alternatives to Expensive Metal Panels
Choosing the right plywood and MDF alternatives was crucial for getting results that actually look intentional rather than like budget substitutes. Not all sheet goods work well for decorative panels.
Marine-grade plywood became my go-to for outdoor applications. It’s more expensive than regular plywood but handles weather exposure much better. The smooth face takes paint beautifully and doesn’t show grain lines that scream “cheap wood.”
MDO (Medium Density Overlay) plywood has a resin-impregnated paper face that’s incredibly smooth and weather-resistant. It’s what sign makers use, and it takes paint like a dream. The surface is so smooth it looks almost like metal when painted properly.
High-density fiberboard works well for protected applications but needs serious sealing for outdoor use. I only use it for panels that will be under roof overhangs or in covered areas.
Exterior-grade MDF has come a long way in recent years. The newer moisture-resistant formulations hold up surprisingly well outdoors when properly sealed and painted. It cuts cleanly and has zero grain pattern to interfere with your design.
Composite panels like Azek or Trex offer the ultimate in weather resistance. They’re expensive but cut beautifully and never need repainting. The smooth surface looks very much like painted metal when finished properly.
Thickness considerations affect both appearance and structural integrity. I use 3/4-inch material for panels over 2 feet square, and 1/2-inch for smaller decorative elements. Thinner material looks flimsy and flexes too much.
Finishing Techniques That Mimic High-End Powder Coating
Getting finishing techniques right is what separates amateur-looking panels from ones that could fool a professional. The surface preparation and paint application make all the difference.
Surface preparation is absolutely critical for a powder-coat look. I sand everything to 220 grit, then use tack cloth to remove every speck of dust. Any imperfections will show through the final finish.
Primer selection determines how well your topcoat adheres and looks. I use high-build automotive primer that fills minor imperfections and creates that perfectly smooth surface. Two coats with light sanding between gives the best results.
Spray application is essential for that factory-finish appearance. I invested in a decent HVLP spray gun setup – brush marks or roller texture immediately give away the DIY nature of the project.
Color matching to actual powder-coated samples helps sell the illusion. I take photos of real powder-coated panels to paint stores for custom color matching. The investment in custom paint is worth it for authentic results.
Multiple thin coats create better coverage and appearance than fewer thick coats. I typically apply 3-4 light coats, allowing proper flash time between each. Patience during painting pays off with professional results.
Clear coat protection adds durability and that subtle sheen that mimics powder coating. I use automotive clear coat for the best UV protection and longevity. It’s more expensive but worth it for outdoor applications.
Installation Methods for Secure Mounting and Weather Resistance
Installation methods for DIY panels require different approaches than metal panels. Wood-based materials have different expansion characteristics and mounting requirements.
Hidden fastener systems maintain the clean appearance of laser-cut panels. I use figure-8 fasteners recessed into the back of panels, which allow for seasonal movement while keeping everything secure.
Aluminum angle brackets provide strong mounting points without visible hardware. I attach them to the back of panels with screws and bolts, then mount the brackets to fence posts or frames.
Floating mount systems accommodate wood movement better than rigid mounting. I use slotted holes in mounting brackets that allow panels to expand and contract with temperature changes.
Weather sealing around panel edges prevents moisture infiltration that can cause delamination or rot. I use high-quality exterior caulk in colors that match the panel finish.
Ventilation gaps behind panels prevent moisture buildup that can cause finish failure. I use spacer blocks to maintain 1/4-inch air gaps between panels and backing surfaces.
Structural considerations are more important with wood panels than metal ones. I ensure adequate support for the increased weight and wind load of solid wood panels compared to perforated metal.
Design Software and Templates for Creating Your Own Patterns
Design software opened up unlimited creative possibilities once I learned to use it properly. You don’t need expensive CAD programs – there are great free options for pattern design.
SketchUp Free is perfect for creating geometric patterns and visualizing how they’ll look in your fence design. The learning curve is gentle, and there are tons of YouTube tutorials to get you started.
Inkscape is a free vector graphics program that’s ideal for creating cutting templates. I can design patterns, then print them full-size on multiple sheets of paper to create cutting templates.
Fusion 360 offers more advanced capabilities if you want to get serious about pattern design. It’s free for personal use and can generate toolpaths for CNC cutting if you go that route.
Pattern libraries online provide inspiration and starting points for your own designs. Sites like Pinterest and architectural pattern books are goldmines for geometric and organic pattern ideas.
Grid-based design makes pattern creation much easier for beginners. I start with simple grid systems and build complexity gradually. Even basic geometric patterns look sophisticated when executed well.
Scale testing is crucial before cutting full-size panels. I always make small test pieces to verify that patterns look good at actual size and that my cutting technique can handle the detail level.
Template materials need to be durable enough for multiple uses. I make my templates from 1/4-inch hardboard or thin plywood, depending on the cutting method I’ll be using.
The key to successful DIY laser-cut alternatives is starting simple and building your skills gradually. Even basic geometric patterns can look incredibly sophisticated when properly designed and executed.
Printing templates at full size requires planning for large patterns. I use a local print shop for patterns larger than what my home printer can handle. The cost is minimal compared to professional laser cutting.
Conclusion
These seven luxury-inspired fence ideas prove that you don’t need a million-dollar budget to create a stunning garden boundary that turns heads and adds serious curb appeal to your home. From modern horizontal slats to artistic panel designs, each option offers a unique way to elevate your outdoor space while staying within a reasonable budget.
The key to success lies in smart material choices, careful planning, and attention to those finishing details that make all the difference. Remember, even the most expensive-looking fences started with someone’s vision and willingness to get creative with their approach.
Ready to transform your garden into a luxury-worthy retreat? Start with the fence idea that speaks to you most, gather your materials, and begin creating the outdoor sanctuary you’ve always dreamed of. Your neighbors will be asking for your designer’s contact information!


GIPHY App Key not set. Please check settings