6. Gabion-Style Wire and Stone Features

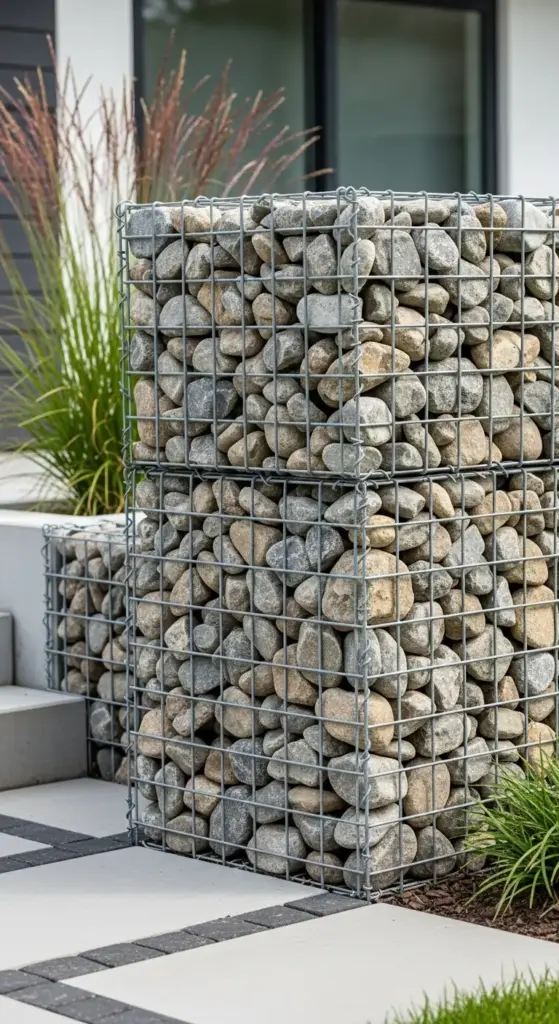
The first time I saw gabion-style wire and stone features in a high-end landscape design, I was completely mesmerized. These structured stone walls held in wire cages looked so industrial-chic and expensive – I figured they were way out of my DIY league.
Then I found out what contractors were charging for gabion installations. We’re talking $150-300 per linear foot for something that’s basically rocks in a wire box! That’s when I decided to figure out how to build these myself.
My first attempt was… let’s call it a learning experience. I used chicken wire (terrible idea) and random rocks from my yard (even worse idea). The whole thing looked like a failed art project and started falling apart within weeks.
But after researching proper techniques and materials, I’ve built gabion features that look professionally installed and have held up beautifully for years. The secret is understanding that these aren’t just decorative – they’re actual structural elements that need proper engineering.
DIY Gabion Construction Using Readily Available Materials
DIY gabion construction is way more accessible than I initially thought. You don’t need specialized equipment or professional welding skills – just the right materials and proper assembly techniques.
Welded wire mesh panels from farm supply stores became my go-to material. I use 4-gauge galvanized mesh with 2×4 inch openings. It’s strong enough to hold tons of stone but still allows for good drainage and visual texture.
Hog panels work great for smaller gabion features. These 16-foot by 4-foot panels cost about $25 each and can be cut to size with bolt cutters. The 4×4 inch grid pattern looks more refined than larger mesh sizes.
Assembly is surprisingly straightforward once you understand the basic technique. I cut panels to size, bend them into box shapes, and connect the edges with galvanized wire ties every 6 inches. No welding required.
Corner reinforcement is critical for structural integrity. I use galvanized angle brackets at each corner, secured with wire ties. This prevents the corners from spreading under the weight of the stone fill.
Base preparation makes or breaks the entire installation. I excavate 6 inches deep and fill with compacted gravel. Gabions sitting directly on soil will settle unevenly and look terrible within a year.
Modular construction lets you build complex shapes from simple rectangular boxes. I plan my designs using 2-foot, 3-foot, and 4-foot modules that can be combined in different configurations.
Stone Selection and Sourcing Tips for Maximum Impact
Getting stone selection right was harder than I expected. My first gabion looked like I’d filled it with random gravel because I didn’t understand how stone size and color affect the final appearance.
Stone size matters enormously for both appearance and structural performance. I use stones that are 2-6 inches in diameter – smaller stones fall through the mesh, while larger ones create gaps that look unprofessional.
River rock gives you that smooth, refined look that works well in contemporary settings. It’s more expensive than crushed stone but the visual impact is worth it. I pay about $45 per ton delivered.
Crushed granite offers great color consistency and sharp edges that lock together well. The angular shapes create a more structured appearance that complements modern architecture. Cost runs about $35 per ton.
Local quarry stone is often your best value for large projects. I found a quarry 20 minutes away that sells mixed fieldstone for $25 per ton. The variety in size and color creates incredible natural texture.
Color coordination with your existing landscape is crucial. I bring photos of my house and yard when selecting stone to ensure the colors work together. What looks great in the quarry might clash terribly at home.
Delivery logistics need planning ahead of time. A ton of stone is roughly one cubic yard, and it’s incredibly heavy. Make sure delivery trucks can access your work area, or you’ll be moving stone by wheelbarrow for days.
Wire Mesh Alternatives That Look Expensive But Aren’t
Finding wire mesh alternatives that look high-end without the custom fabrication costs took lots of research. The standard agricultural mesh works fine structurally but doesn’t have that refined appearance.
Decorative wire panels from architectural suppliers offer much more sophisticated looks. I found panels with smaller mesh patterns and powder-coated finishes that look like custom metalwork for about 40% more than standard mesh.
Expanded metal mesh creates a completely different aesthetic – more industrial and modern. It’s actually cheaper than welded wire mesh but looks much more intentional and designed. The diamond pattern catches light beautifully.
Woven wire mesh has an almost fabric-like appearance that softens the industrial look of gabions. It costs about twice as much as standard mesh but creates a much more refined appearance.
Galvanized hardware cloth with 1/2-inch openings works great for smaller decorative gabions. It’s fine enough to hold smaller stones and creates a more delicate, jewelry-like appearance.
Powder-coated mesh in custom colors transforms the entire look of gabion features. I’ve used black-coated mesh that virtually disappears, letting the stone be the star. Green coating helps gabions blend into landscape settings.
Stainless steel mesh is the ultimate upgrade for coastal areas or anywhere corrosion is a concern. It’s expensive but will literally last forever and maintains that bright, clean appearance indefinitely.
Incorporating Lighting and Plant Pockets into the Design
Lighting integration transforms gabion features from daytime structural elements into stunning nighttime focal points. The stone texture and wire patterns create amazing shadow effects when properly lit.
LED strip lighting hidden behind the wire mesh creates gorgeous uplighting effects. I run weatherproof strips along the back edge of gabions, and the light filters through the stones beautifully.
Solar spotlights positioned at ground level provide dramatic uplighting without electrical work. I use narrow-beam spots placed about 3 feet away from the gabion face. The grazing light emphasizes stone texture incredibly well.
Integrated lighting channels can be built into larger gabions during construction. I leave 2-inch gaps in the stone fill and run low-voltage cable through PVC conduit. The lights are completely hidden but create amazing effects.
Plant pockets add living elements that soften the industrial appearance of gabions. I create these by leaving sections of the wire mesh unfilled and adding soil for planting.
Trailing plants work beautifully cascading from upper plant pockets. I use creeping phlox, trailing rosemary, or sedums depending on the sun exposure. The contrast between hard stone and soft plants is stunning.
Integrated irrigation for plant pockets requires planning during construction. I run drip irrigation lines through the gabion structure before filling with stone. It’s invisible but keeps plants healthy with minimal maintenance.
Drainage Considerations for Long-Term Structural Integrity
Drainage planning is absolutely critical for gabion longevity. Water problems will destroy even the best-built gabion features if you don’t address them properly from the start.
French drain systems behind gabions prevent water buildup that can cause structural failure. I install 4-inch perforated pipe in gravel beds behind any gabion over 3 feet tall.
Weep holes at the base allow water to escape freely. I leave the bottom 6 inches of wire mesh unfilled with stone in several spots along each gabion section. Water drains out naturally without building pressure.
Gravel backfill behind gabions provides drainage and prevents soil pressure buildup. I use 3/4-inch crushed stone extending at least 12 inches behind the gabion structure.
Foundation drainage prevents undermining from water flow. I install the gabion base on a 6-inch layer of compacted gravel that extends 6 inches beyond the gabion footprint on all sides.
Surface water management directs runoff away from gabion structures. I grade the surrounding area to slope away from gabions and install gutters or swales to handle heavy rainfall.
Freeze-thaw protection is essential in cold climates. Proper drainage prevents water from freezing inside the gabion structure, which can cause wire failure and stone displacement.
The key to successful gabion construction is thinking like an engineer, not just a decorator. These features need to handle significant structural loads and weather extremes while looking beautiful for decades.
Ready for the final fence transformation technique? The next section reveals how to create stunning artistic laser-cut panel alternatives using affordable materials and simple tools. I’ll show you the cutting techniques that mimic expensive laser work and the finishing methods that make plywood look like premium metal. Click “next” to discover the creative patterns that’ll make your fence a true work of art!


GIPHY App Key not set. Please check settings