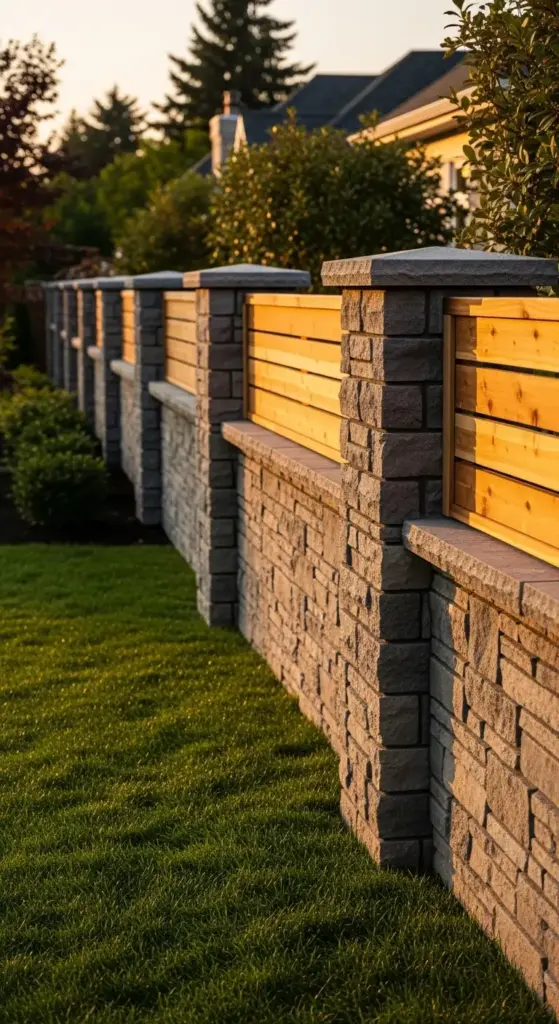
3. Mixed Material Fencing (Stone and Wood Combination)

When I first saw those stunning stone and wood combination fences in the upscale neighborhoods around Atlanta, I knew I had to figure out how to recreate that look. The problem? Real stone installation would’ve cost me more than my car was worth!
I spent months researching alternatives and made some pretty embarrassing mistakes along the way. My first attempt looked so obviously fake that my neighbor actually asked if I was “going for that plastic look on purpose.” Ouch.
But after perfecting my technique over several projects, I can now create mixed material fencing that fools even experienced contractors. The secret is all in the details and knowing which shortcuts work and which ones scream “amateur hour.”
Achieving the High-End Stone Look with Affordable Alternatives
Here’s what I wish someone had told me from the start – faux stone technology has come incredibly far in recent years. The cheap stuff still looks terrible, but the mid-range options are absolutely convincing when installed correctly.
Cultured stone veneer became my go-to after trying everything else. It’s about 60% lighter than real stone and costs roughly one-third the price. The key is buying from manufacturers like Eldorado Stone or Coronado – their textures and color variations actually look natural.
Concrete stone panels are another fantastic option I discovered by accident. These interlocking panels cost around $8-12 per square foot compared to $25-40 for real stone. When you add proper mortar lines and weather them correctly, they’re virtually indistinguishable from the real thing.
Stacked stone panels work beautifully for modern fence designs. I use the ones with built-in corner pieces – they eliminate that awkward transition problem I struggled with for months on my first project.
The biggest mistake I see DIYers make? Trying to save money on the really cheap foam panels. Trust me, spend the extra $3 per square foot for quality materials. Your fence will look professional instead of like a theme park prop.
Faux Stone Panels and Veneer Application Techniques
Installing faux stone veneer properly is all about the prep work – something I learned after my first installation started falling off within six months. The surface preparation is absolutely critical for long-term success.
Start with a solid substrate – I use cement backer board over plywood sheathing. Regular drywall or OSB will fail eventually, especially in humid climates. This lesson cost me a complete redo on my first fence section.
Adhesive application makes or breaks the whole project. I use a combination of construction adhesive and mechanical fasteners for panels over 2 square feet. The adhesive alone isn’t enough for vertical installations, despite what some manufacturers claim.
Work from bottom to top and use a chalk line to keep your rows level. I made the mistake of eyeballing it once, and by the fourth row, everything was noticeably crooked. A $5 chalk line saves hours of frustration.
Mortar joints are what sell the illusion. I use a grout bag to apply mortar between panels, then tool the joints with a wooden dowel for that authentic hand-pointed look. This step takes forever but makes all the difference.
Weather the panels after installation using a diluted stain solution. Real stone has subtle color variations that new faux panels lack. A light wash with gray or brown stain adds years of apparent age.
Wood Species That Complement Stone Aesthetics on a Budget
Choosing the right wood species for stone combinations was trickier than I expected. My first attempt used pressure-treated pine, and it looked completely wrong against the stone texture – too yellow and artificial.
Cedar is still king for this application. The natural gray weathering complements almost any stone color, and it’s naturally rot-resistant. I buy rough-sawn cedar when possible because the texture plays better with stone than smooth-planed boards.
Redwood works beautifully if you can find it at a reasonable price. The rich color creates gorgeous contrast with gray stone, and it ages to this amazing silver-gray that looks incredibly sophisticated.
Pressure-treated lumber can work if you stain it properly. I use a gray-toned semi-transparent stain that mimics cedar’s natural weathering. The key is avoiding anything too uniform or artificial-looking.
Composite materials are worth considering for the wood portions. They maintain consistent color and require zero maintenance. I’ve used Trex in “Island Mist” with great success – it has enough texture to look natural against stone.
Avoid pine or fir unless you’re planning to paint everything. These woods turn gray in an unattractive way and don’t have the character needed to complement stone textures.
Installation Sequence for Professional-Looking Results
Getting the installation sequence right is crucial for a professional appearance. I learned this the hard way when I had to partially disassemble my first fence to fix alignment issues.
Foundation work comes first – and I mean a real foundation, not just setting posts in concrete. Stone veneer needs solid backing, so I pour a concrete footer at least 6 inches wide and 18 inches deep.
Post installation happens next, but here’s the trick – set your posts slightly proud of where you think they should be. You can always trim them down, but adding height later is nearly impossible.
Frame your sections completely before adding any stone or wood elements. This includes all horizontal supports and backing materials. Trying to add framing around installed stone is a nightmare.
Stone installation comes before wood in most cases. Stone work is messier and requires more precise fitting. Getting it perfect first makes the wood installation much easier.
Wood elements go on last and can be adjusted to accommodate any slight irregularities in the stone work. This flexibility is why I always plan the installation sequence this way.
Hardware and trim are the final touches that make everything look intentional. Quality hinges, latches, and cap pieces transform a DIY project into something that looks professionally installed.
Weather Protection Strategies for Long-Lasting Beauty
Weather protection for mixed material fences requires different strategies for each component. I learned this when my first fence aged unevenly – the wood looked great but the stone started showing water damage.
Proper drainage is absolutely critical. Water trapped behind stone veneer will cause adhesive failure and potential structural damage. I install weep holes every 24 inches along the bottom course.
Sealing stone surfaces isn’t always necessary, but it helps in harsh climates. I use a penetrating sealer that doesn’t change the appearance but repels water. Reapply every 3-4 years for best results.
Wood protection requires regular maintenance regardless of species. I re-stain cedar components every 2-3 years and check for loose fasteners annually. Prevention is way cheaper than replacement.
Flashing details around caps and transitions prevent water infiltration. I use aluminum flashing bent to custom profiles – it’s invisible when done right but prevents expensive water damage.
Caulking joints between different materials is essential but often overlooked. Use a high-quality exterior caulk that matches your stone color. This small detail prevents water penetration and looks much more professional.
Seasonal inspections catch problems before they become expensive repairs. I check my mixed material fences every spring and fall, looking for loose stones, damaged wood, or failed caulk joints.
Ready to add some serious visual interest to your fence design? The next section reveals how to incorporate decorative metal panel inserts that look like expensive custom metalwork but cost a fraction of the price. I’ll show you exactly where to source these panels online and how to install them for maximum impact. Click “next” to discover the metal accent techniques that’ll make your fence the talk of the neighborhood!


GIPHY App Key not set. Please check settings