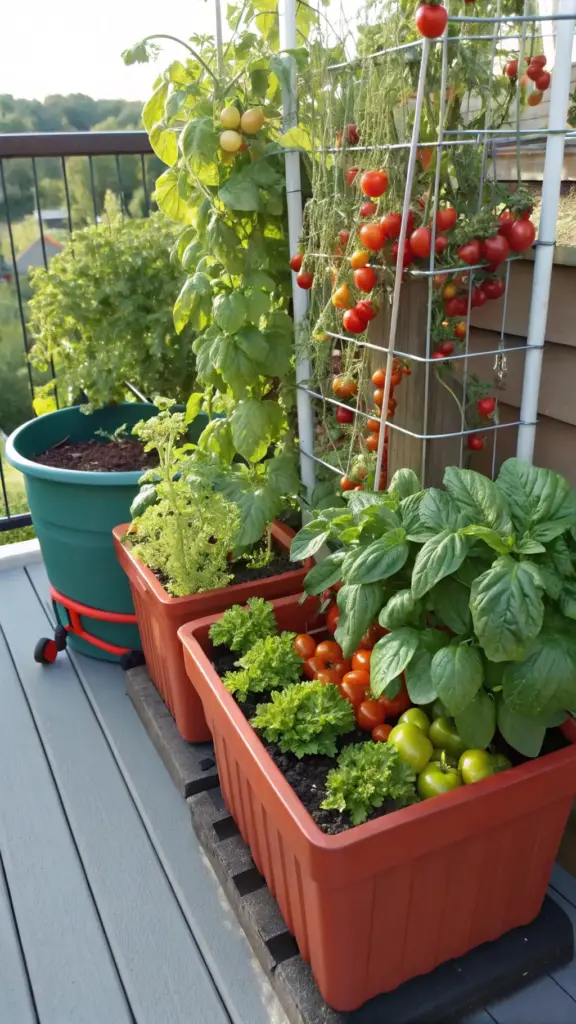
5. Edible Beauty Vegetable Container
The first time I tried growing vegetables in containers, I made every rookie mistake in the book. I planted full-size tomatoes in tiny pots, crammed way too many plants together, and wondered why everything looked sad and produced nothing.
It was a complete disaster.
But that failure taught me everything about creating productive edible containers that actually feed my family. Now I grow enough fresh vegetables on my patio to cut my grocery bill by $50 a month!
Space-Saving Vegetable Champions
Cherry tomatoes are absolute container superstars, but you have to choose the right varieties. I learned this after my first ‘Better Boy’ tomato plant took over my entire deck.
‘Patio Princess’ and ‘Tiny Tim’ stay compact but still produce tons of sweet little tomatoes. These determinate varieties won’t outgrow their containers like the sprawling indeterminate types.
Compact peppers work beautifully in containers and come in amazing varieties. ‘Lunchbox’ peppers are perfect for snacking, while ‘Fish’ peppers add gorgeous variegated foliage that’s as pretty as it is productive.
Lettuce varieties like ‘Black Seeded Simpson’ and ‘Buttercrunch’ grow quickly and don’t need deep containers. I can harvest baby greens in just 30 days!
Maximizing Production in Small Spaces
Container size makes or breaks your vegetable success. I use 5-gallon containers minimum for tomatoes and peppers – anything smaller and they’ll be constantly stressed.
Succession planting keeps fresh lettuce coming all season. I plant new seeds every 2 weeks in separate small containers so I always have tender greens ready.
Companion planting works in containers too. I grow basil alongside my tomatoes because it supposedly improves flavor, plus I love having both ingredients right there for caprese salads.
The square foot gardening method adapted for containers helps me maximize space. I can fit 4 lettuce plants or 16 radishes in a 12-inch square container.
Vertical Growing Game-Changers
Trellises and cages are essential for tomatoes and climbing vegetables. I use sturdy tomato cages that won’t tip over when the plants get heavy with fruit.
Hanging baskets work great for trailing cherry tomatoes like ‘Tumbling Tom’. They cascade beautifully and save precious floor space on my small patio.
Tiered plant stands let me grow multiple containers in the same footprint. I put sun-loving tomatoes on top and shade-tolerant lettuce underneath.
Vertical pocket planters are perfect for herbs and small greens. I grow different lettuce varieties in each pocket for a living salad wall.
Organic Care for Family Safety
Organic potting mix is non-negotiable when you’re growing food for your family. I use certified organic soil and never use synthetic fertilizers on my edible containers.
Compost tea is my secret weapon for healthy, productive plants. I brew it weekly using kitchen scraps and worm castings – it’s like vitamins for vegetables.
Natural pest control keeps my vegetables safe without chemicals. Companion planting with marigolds and nasturtiums helps repel harmful insects naturally.
Hand-picking pests is actually therapeutic once you get into the routine. I check my plants every morning with my coffee and remove any unwanted visitors.


Fertilizing for Maximum Harvest
Fish emulsion provides the nitrogen boost that leafy greens crave. I dilute it according to package directions and apply every two weeks during growing season.
Calcium is crucial for tomatoes to prevent blossom end rot. I add crushed eggshells to my containers and use organic calcium supplements when needed.
Balanced organic fertilizer keeps everything healthy without the chemical buildup. I prefer granular types that release slowly over liquid fertilizers that can burn roots.
Compost is the ultimate soil amendment. I mix it into my potting soil at planting time and top-dress containers monthly throughout the season.
Harvest Timing for Peak Flavor
Morning harvesting gives you the best flavor and longest storage life. I learned this from an old farmer who swore vegetables taste better before the heat of the day.
Cherry tomatoes should be fully colored but still firm. I pick them every other day during peak season to keep the plants producing.
Lettuce is best harvested when leaves are young and tender. I use the cut-and-come-again method, taking outer leaves and letting the center keep growing.
Peppers can be harvested green or left to ripen to their mature color. Green peppers are crisp and mild, while fully ripe ones are sweeter and more nutritious.
Budget-Smart Seed Starting
Starting from seed saves serious money compared to buying transplants. A packet of lettuce seeds costs $2-3 and provides dozens of plants.
Indoor seed starting extends my growing season. I start tomato and pepper seeds under grow lights 8-10 weeks before the last frost date.
Direct seeding works great for quick crops like lettuce and radishes. I plant these directly in containers after the soil warms up in spring.
Saving seeds from open-pollinated varieties lets me grow the same favorites year after year. Cherry tomatoes and peppers are especially easy to save seeds from.
Harvest-to-Table Recipe Magic
Fresh salsa made with homegrown cherry tomatoes and peppers tastes incredible compared to store-bought versions. I make it within hours of harvesting for maximum flavor.
Caprese skewers using cherry tomatoes and fresh basil from the same container are perfect for entertaining. Guests always ask where I buy such flavorful tomatoes!
Stir-fries with fresh lettuce and peppers picked minutes before cooking have this amazing crisp texture you can’t get from grocery store vegetables.
Pizza toppings straight from the container make homemade pizza night extra special. Fresh basil and cherry tomatoes elevate any pizza to gourmet status.
Ready to create a stunning garden that practically takes care of itself? Click “next” to discover drought-tolerant native plants that’ll thrive in any weather while supporting local wildlife – and they’re gorgeous too!


GIPHY App Key not set. Please check settings