4. You’re Not Providing Adequate Nutrition and Fertilization
I used to think potting soil was like a magical nutrient buffet that would feed my fiddle leaf fig forever. Boy, was I wrong about that assumption.
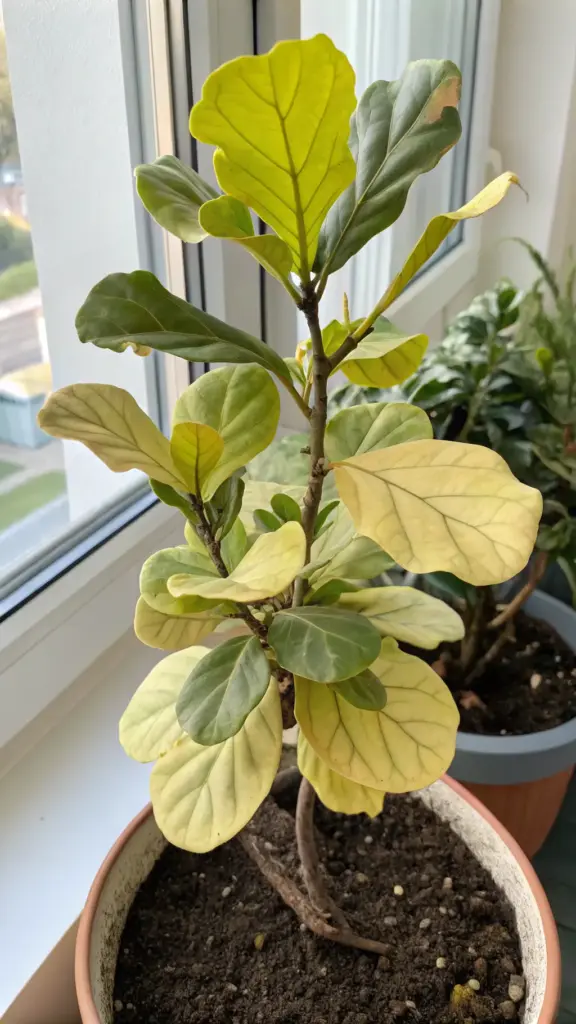
After about six months, my plant started looking pale and pathetic despite perfect watering and lighting. The new leaves were coming in tiny and yellowish, and I was starting to panic.
That’s when my plant-obsessed neighbor asked me about my fertilizing routine. Routine? I literally had no idea that houseplants needed regular feeding like some kind of green pet.
The Essential Nutrients Your Fiddle Leaf Fig is Craving
Nitrogen is like protein for your plant – it’s what creates those gorgeous, deep green leaves. Without enough nitrogen, your fiddle leaf fig will look pale and weak.
Phosphorus helps with root development and overall plant energy. Think of it as the vitamin that keeps your plant’s internal systems running smoothly.
Potassium is crucial for disease resistance and helps your plant handle stress. It’s basically the immune system booster your fiddle leaf fig needs to stay healthy.
Your plant also needs secondary nutrients like calcium, magnesium, and sulfur. Magnesium deficiency is super common in houseplants and shows up as yellowing between leaf veins.
Micronutrients like iron, manganese, and zinc might be needed in tiny amounts, but they’re still essential for proper growth and leaf color.
Red Flags: When Your Plant is Nutritionally Starved
Pale or yellowing leaves are usually the first sign of nitrogen deficiency. The older leaves at the bottom will start turning yellow and dropping off first.
I used to think this was normal aging, but healthy fiddle leaf figs shouldn’t be constantly dropping lower leaves. That’s your plant basically eating itself to survive.
Stunted growth is another dead giveaway. If your fiddle leaf fig isn’t producing new leaves during growing season, it’s probably not getting enough nutrition.
Small leaf size compared to older growth is a classic hunger sign. New leaves should be the same size or larger than existing ones – not these sad, tiny versions.
Brown leaf tips can indicate potassium deficiency, while yellowing between veins usually means your plant needs more magnesium or iron.
Fertilizer Options That Actually Work
Liquid fertilizers are my personal favorite because you can control the concentration easily. I use a balanced 10-10-10 or 20-20-20 formula diluted to half strength.
The key is “little and often” rather than big, infrequent doses. I fertilize every 2-3 weeks during growing season with a weak solution.
Slow-release granules are great if you’re forgetful about plant care. Sprinkle them on the soil surface and they’ll feed your plant for 3-6 months.
Fish emulsion works amazingly well, but fair warning – it smells like low tide for about a day after application. My apartment smelled like a seafood restaurant, but my plants loved it.
Avoid general garden fertilizers that are too strong for houseplants. Look for products specifically labeled for indoor plants or houseplants.
Creating a Foolproof Feeding Schedule
Spring and summer are prime feeding time when your fiddle leaf fig is actively growing. I fertilize every 2-3 weeks from March through September.
During winter months, I cut back to once a month or sometimes skip fertilizing entirely. Your plant is basically hibernating and doesn’t need as much nutrition.


Growing season indicators include new leaf production, increased water consumption, and overall plant activity. If your plant isn’t growing, don’t force-feed it.
I keep a simple calendar reminder on my phone that says “feed the green babies.” It sounds ridiculous, but it works better than trying to remember on my own.
Always fertilize when the soil is already moist. Never fertilize dry soil – that’s a recipe for root burn and plant trauma.
Organic vs. Synthetic: The Great Fertilizer Debate
Synthetic fertilizers work faster and give you more control over nutrient ratios. They’re also usually cheaper and have a longer shelf life.
The downside is they can build up salt in the soil over time, which can damage roots. I flush my pots with plain water every few months to prevent salt buildup.
Organic options like compost tea, worm castings, or fish emulsion release nutrients more slowly and improve soil structure.
They’re gentler on plants and less likely to cause fertilizer burn. The trade-off is they work more slowly and can be messier to apply.
Compost mixed into potting soil provides slow-release nutrition, but it’s not enough on its own for container plants.
Avoiding the Fertilizer Burn Disaster
Over-fertilizing is way more dangerous than under-fertilizing. I learned this when I thought “more must be better” and nearly killed my plant with kindness.
Signs of fertilizer burn include brown, crispy leaf edges, wilting despite moist soil, and white crusty buildup on the soil surface. It looks similar to underwatering, which is confusing.
Always dilute liquid fertilizers to half the recommended strength for houseplants. The instructions are usually written for outdoor plants that can handle stronger concentrations.
If you suspect fertilizer burn, flush the soil with plain water several times to wash out excess salts. Let water run through the drainage holes for several minutes.
Less is definitely more when it comes to feeding houseplants. A slightly underfed plant will recover quickly, but an overfed plant might take months to bounce back.
Emergency Fixes for Nutrient-Stressed Plants
If your fiddle leaf fig is showing severe nutrient deficiency, resist the urge to hit it with a strong fertilizer dose. That’s like giving a starving person a huge meal – it can cause more harm than good.
Start with a very dilute liquid fertilizer – maybe quarter strength – and gradually increase over several weeks.
Epsom salt can provide a quick magnesium boost if you’re seeing yellowing between leaf veins. Dissolve a teaspoon in a gallon of water and use it once.
Sometimes the problem isn’t lack of nutrients but poor soil that’s preventing nutrient uptake. If fertilizing doesn’t help after a month, consider repotting with fresh soil.
Think you’ve mastered the basics? Click “next” to uncover the sneaky environmental stressors that could be sabotaging all your hard work – including the common household item that’s probably poisoning your plant’s air right now!


GIPHY App Key not set. Please check settings